Sunday, February 19, 2012

Raspberry Cream Coffee Cake


Some flavors are meant to be together. Peanut butter & grape jelly, maple & walnut, and here, raspberries & almonds. What are your favorite flavor pairings?


This coffee cake is elegant and easy. It starts off with your basic sour cream coffee cake with a layer of jam and a tangy cream cheese filling. Then it gets topped off with an almond crumb topping. The jam and cream cheese remind me of the Danish pastries I used to eat as a kid.


Raspberry Cream Coffee Cake
9" round cake | adapted from food.com

2 1/4 cups flour
3/4 cup sugar
3/4 cup butter
1/2 teaspoon baking powder
1/2 teaspoon baking soda
1/4 teaspoon salt
3/4 cup sour cream
1 teaspoon almond extract
1 egg
8 ounces cream cheese
1/4 cup sugar
1 egg
3/4 cup raspberry jam
1/4 cup sliced almonds

1. Preheat oven to 350 degrees F. In a large bowl, combine flour and 3/4 cup sugar. Using pastry blender, cut in butter until mixture resembles coarse crumbs. Reserve 1 cup of crumbs.

2. To remaining crumb mixture, add baking powder, baking soda, salt, sour cream, almond extract, and 1 egg. Blend well. Spread batter over bottom and 1 1/2 inches up sides of greased and floured 9 inch springform pan. Batter should be about 1/4 inch thick on sides.

3. In a small bowl, combine cream cheese, 1/4 cup sugar, and 1 egg. Blend well. Pour in batter lined pan. Spoon jam over cream cheese mixture. In a small bowl, combine reserved crumbs and sliced almonds. Sprinkle over jam. Bake for 45 to 55 minutes.

Tuesday, February 14, 2012

Caramel Filled Shortbread Bars


Happy Valentine's Day!!! I feel incredibly loved today. I curled up under a comfy blanket on the couch and watched the Magic Schoolbus with my son this morning before sending him to preschool. Later tonight I am seeing my wonderful fiancé! A nice treat since he lives across the border and we only usually see each other on weekends. Wishing everyone a fantastic Valentine's Day! If nothing else it is a good excuse to induge in lots of sugar!


These bars combine a crumbly shortbread base with a soft, decadent caramel filling. Then they are topped off with a thin layer of chocolate. I love love love the filling. Made with sweetened condensed milk, it is very dulce de leche-ish. Firm enough to hold its shape when cut but soft enough to melt on your tongue.

I have heard of a variation of these called "Millionnaire's Shortbread" because they are so rich. They are also incredibly addictive.


Caramel Filled Shortbread Bars
9" Square Pan

Base:
1 1/4 cup flour
1/4 cup sugar
1/2 cup butter, cold

Filling:
1 can (approx 1 cup) sweetened condensed milk
1/2 cup sugar
1/2 cup butter
2 tbsp corn syrup
1 tsp vanilla
1/2 cup chopped pecans (optional)
2 oz. semisweet chocolate, melted

1. Preheat oven to 350 degrees F. Grease or line a 9" square pan. Make base by combining flour and sugar. Cut in butter until pea-sized. Press the crumbly base mixture into the prepared pan to form an even layer. Bake this for 20-25 until golden brown.

2. Filling: In a medium saucepan, combine condensed milk, sugar, butter and cornsyrup over medium-high heat. Stir constantly. When butter is melted and sugar is dissolved, bring to a boil then reduce and simmer, stirring often, until it carmellizes and turns golden brown. Stir in vanilla and pecans (if using. Pour the filling over the base and spread to cover base evenly. Let cool and set fully, at least 1 hour. [I left mine overnight].

3. Spread the melted chocolate evenly over the filling. It will be a thin layer. Let stand to set fully (another hour or so) before cutting and serving.

Thursday, February 9, 2012

Cranberry Walnut Orange Muffins


Here is yet another great recipe from Cook's Illustrated. Orange and cranberry flavors are natural partners, while the walnuts are outstanding little gems within the muffin. They were light and flavorful and smelled wonderful as they baked.

Remember, if you’re short on time, you can melt the butter, mix it with the eggs, and stir it into the dry ingredients. When thoroughly mixed, beat in the yogurt and proceed with the recipe. To cinnamon-coat muffin tops, dip warm muffins in melted butter, then in mixture of one-half cup granulated sugar and two teaspoons cinnamon.

Cranberry-Walnut-Orange Muffins
makes 12 | adapted from Cook's Illustrated, Jan/97

3 cups unbleached all-purpose flour
1 tablespoon baking powder
1/2 teaspoon baking soda
1/2 teaspoon table salt
10 tablespoons unsalted butter , softened
1 cup granulated sugar , less 1 tablespoon
1 teaspoon grated orange zest
2 large eggs
1 1/2 cups plain yogurt
1 1/2 cups chopped cranberries , fresh or frozen
3/4 cup chopped walnuts

1. Adjust oven rack to lower middle position and heat oven to 375 degrees. Mix flour, baking powder, baking soda, and salt in medium bowl; set aside.

2. Beat butter and sugar with electric mixer on medium-high speed until light and fluffy, about 2 minutes. Add orange zest to butter-sugar mixture. Add eggs, one at a time, beating well after each addition. Beat in one-half of dry ingredients. Beat in one-third of yogurt. Beat in remaining dry ingredients in two batches, alternating with yogurt, until incorporated. Fold cranberries and walnuts into finished batter.

3. Spray twelve-cup muffin tin with vegetable cooking spray or coat lightly with butter. Use large ice cream scoop to divide batter evenly among cups. Bake until muffins are golden brown, 25 to 30 minutes. Set on wire rack to cool slightly, about 5 minutes. Remove muffins from tin and serve warm.

Wednesday, February 8, 2012

Copycat Club: February 2012


Here are the famous clones for February 2012! Thanks for participating! If you have any copycat recipes you would like me to include next month, please email them to me.


Lofthouse Sugar Cookies by "The Baker Chick" at www.the-baker-chick.com


CPK's Kung Pao Spaghetti by Tia of www.buttercreambarbie.com


Homemade Girl Scout Cookies by Michele of SomethingNewisCooking.blogspot.com


Carraba's Champagne Chicken by Steph at www.plainchicken.com

Tuesday, January 31, 2012

Cinnamon Sugar Breakfast Sticks


I love the familiar smell of cinnamon and sugar baking in the oven. Yum! These little twists are very similar to cinnamon buns but shaped into twists instead of rolls. They feature a sweet yeast dough covered generously with butter, sugar and cinnamon. 3 of my favorite ingredients!

My boyfriend fiance sometimes works on Saturdays (I still have to get used to the word "fiance", lol). I made these for him to bring to work on Saturday morning. If you've gotta work on the weekend, you owe yourself a treat and some sugar to get you through the day! These are also especially good with a hot cup of coffee!


Cinnamon Sugar Breakfast Sticks
Makes 24 | Taste of Home

1 package (1/4 ounce) active dry yeast
3/4 cup warm water (110° to 115°), divided
4 to 4-1/2 cups all-purpose flour
1/4 cup sugar
1-1/2 teaspoons salt
1/2 cup warm 2% milk (110° to 115°)
1/4 cup butter, softened
1 egg

FILLING:
1/4 cup butter, melted
1/2 cup packed brown sugar
4 teaspoons ground cinnamon

1. In a large bowl, dissolve yeast in 1/4 cup warm water. Add 2 cups of flour, sugar, salt, milk, butter, egg and remaining water; beat on medium speed for minutes. Stir in enough remaining flour to form a soft dough.

2. Turn onto a floured surface; knead until smooth and elastic, about 6-8 minutes. Place in a greased bowl, turning once to grease top. Cover and let rise in a warm place until doubled, about 1 hour.

3. Punch down dough. Roll into a 16-in. x 12-in. rectangle. Brush with butter. Combine brown sugar and cinnamon; sprinkle over butter. Let dough rest for 6 minutes. Cut lengthwise into three 16-in. x 4-in. strips. Cut each strip into sixteen 4-in. x 1-in. pieces. Twist and place on greased baking sheets. Cover and let rise until doubled, about 30 minutes.

4. Bake at 350° for 15 minutes or until golden brown.

Saturday, January 28, 2012

Coconut Butter Bars


These look more difficult to make than they really are. The recipe was from Gourmet Magazine (December 1993). Oh, the 90's. They don't even seem that long ago but the recipe was printed almost 20 years ago! Wow, I sound old... reminiscing about days gone by and I'm only 27! They are a traditional recipe that was once known as "London Bars" although I'm not sure why.
Not only are they easy to make, they are different from other bars, don't require a lot of ingredients, and are delish. They are dense without being tough. They are also versatile. Try them with pecans and milk chocolate or macadamia nuts and dried pineapple.


If you let them sit for at least a day or two, the flavor improves greatly. They are a thinner bar, so if you like a thicker bar, consider using a 9" square baking pan instead of the 9x13" one.

Buttery Coconut Bars
9x13" pan | Gourmet, Dec. 1993

1 1/2 cups firmly packed light brown sugar
1 cup plus 3 tablespoons all-purpose flour
1 stick (1/2 cup) unsalted butter, melted and cooled
1 1/2 cups sweetened flaked coconut
1 cup chopped blanched almonds
2 large eggs, beaten lightly
1 teaspoon vanilla
1/2 teaspoon salt

1. reheat the oven to 350 degrees F. Combine 1/2 cup brown sugar, 1 cup of the flour, and the butter until the mixture is combined well.

2. Press the mixture evenly onto the bottom of a 9 x 13 inch baking pan, and bake for 10 minutes.

3. Combine the remaining 1 cup brown sugar, the remaining 3 tablespoons flour, the coconut, the almonds, the eggs, the vanilla, and the salt and blend the mixture well. Spread the coconut mixture evenly over the crust and bake the mixture for 20 minutes, or until it is pale golden. Cool completely in the pan on a rack. If time allows, let these stand a day or two before serving in order to let the flavors develop. ***May be made 1 month in advance and kept frozen airtight.

Friday, January 27, 2012

Tia the "Baker" is Engaged!


I've been sitting on a piece of news for a little while now because this is a baking blog and I don't usually talk about personal stuff here. BUT... I can't keep a secret any longer. I'm too excited and I want to share it with everyone. I am engaged!!! My fiance's last name is Baker. Couldn't be more perfect for a girl like me who has always been a baker at heart.

I adore my amazingly sparkly solitaire engagement ring. Not only because it is GORGEOUS but because it symbolizes the life we have to look forward to and that I have found the kind of love that runs deep into your soul and brings tears of joy to your eyes.

We broke the news on facebook today too and it puts a smile on my face reading all the wonderful comments and seeing all the "likes" from friends and family.

Right now we are looking at a December wedding this year. That leaves us with 10 months of planning! I hope to still keep up with my baking, but with all the busy-ness ahead it might be a challenge. I look forward to being able to share some of the wedding planning here as well as lots of yummy treats (as usual).

xoxo

Easy Faux Petit Fours


"Petit Fours" literally means "Small Oven". French always makes everything sound fancier and prettier, doesn't it? These classy little cakes are traditionally eaten after a meal, served with coffee or tea. Please excuse the poor quality of the photos as they were taken with my Blackberry. I left my camera in a different purse that day.


The version I'm posting here is a fun, kid-friendly one. It is easy to make and relies on storebought vanilla frosting that you liquify in the microwave and tint with food coloring. Dip your cake cubes in to coat them and you are done! Easy and really really cute. We went all out with the color palette here as you can see.


Easy Faux Petit Fours
Makes 4 dozen cubes

1 recipe Classic Pound Cake <--click for recipe
1 can storebought vanilla frosting (not whipped)
food coloring
toothpicks

1. Cut the cooled pound cake into 1" cubes. Try to cut them as evenly as possible for the prettiest petit fours.

2. Scoop some frosting into a small bowl. Add a couple drops of food coloring and microwave for 15-20 seconds to melt. Stir to combine coloring.

3. Pierce a cake cube with the toothpick and dip it into the frosting to coat fully. Let the excess drip off. Place cubes on a cooling rack for a few hours to let the frosting set fully.

Thursday, January 26, 2012

Salty Sweet Peanut Butter Cookies


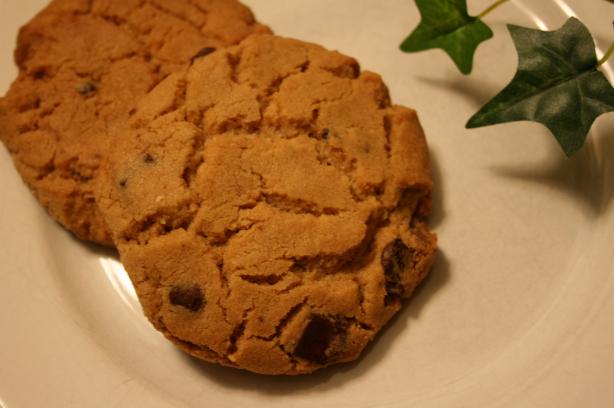
Have you ever noticed that Reese's PB Cups have a saltiness to them that harmonizes beautifully with the sweetness of the chocolate coating? I tried to copy that salty-sweet flavor in these cookies by using crushed pretzels. The dough surrounds chunks of milk chocolate in a giant cookie. These turned out to be 4-5" in diameter!


To make them even more decadent and a little bit fancier I suggest dipping them in melted chocolate before serving!


Salty Sweet Peanut Butter Cookies
Makes 12

1 1/2 cup flour
1/2 tsp baking soda
3/4 cup (1 1/2 sticks) butter, room temperature
1 1/4 cups sugar
1 cup creamy peanut butter
2 eggs, at room temperature
2 1/2 cups pretzels, crushed
1 cup milk chocolate chunks

1. Preheat oven to 350 degrees F.

2. In a large bowl, combine butter, sugar and peanut butter and beat with an electric mixer until light and fluffy. Add eggs and mix until combined. Add flour and baking soda and mix until combined. Mix in crushed pretzels and chocolate chunks.

3. Using a large cookie scoop, drop balls of dough onto cookie sheet and bake for 12 minutes or until lightly golden brown. Don't over bake!

Thursday, January 12, 2012

Copycat California Pizza Kitchen Kung Pao Spaghetti


One of my New Year’s resolutions this year is to do more cooking. I usually do a lot of baking and desserts and not a whole lot of cooking (thank God for fast food and pizza!). Here is my first step towards my resolution!

On our first visit to California Pizza Kitchen (CPK) the first weekend of December, we ordered this delicious pasta dish and I have been meaning to try replicating it ever since. I finally found a copycat recipe on Food.com and it was amazing. Tastes just like the original if not better. It looks like a long ingredient list but it is really easy to make. All you do is throw all the sauce ingredients into a pot and simmer, cook the chicken and pasta then toss it all together. I did omit coating the chicken with the egg white-cornstarch mixture and deep frying it and it tasted great.


CPK’s Kung Pao Spaghetti
Serves 4 | adapted from food.com

Kung Pao Sauce
1/2 cup chicken stock
2 tablespoons cornstarch
3/4 cup soy sauce
1/2 cup dry sherry
3 tablespoons red chili paste with garlic
1/4 cup sugar
2 tablespoons red wine vinegar or white vinegar
2 tablespoons toasted sesame oil

Egg White-Cornstarch Mixture (optional)
2 egg whites
2 tablespoons cornstarch
1/2 teaspoon salt

Pasta
1 lb spaghetti
2 tablespoons olive oil
1 lb boneless skinless chicken breast, cubed
10 -15 whole Chinese dried red chili peppers (optional)
1 cup dry roasted peanuts
1/4 cup minced garlic
3 cups green onions, chopped
1. Kung Pao Sauce: In a medium saucepan, whisk together the chicken stock and cornstarch until the cornstarch is fully dissolved. Stir in all the remaining sauce ingredients and bring to a boil over medium-high heat. Reduce the heat and simmer until the sauce is thick enough to coat the back of a spoon, 15 to 20 minutes. Set aside.

2. Egg White-Cornstarch Mixture: In a mixing bowl, use a whisk to stir together the egg whites, cornstarch, and salt until thoroughly blended; be careful not to beat them into a froth. Set aside.

3. Pasta: Bring a large pot of salted water to a rapid boil. Add the pasta and cook until al dente, 8 to 10 minutes.

4. Meanwhile, in a large nonstick frying pan over high heat, heat enough olive oil for deep-frying for about 1 minute. Add the chicken pieces to the Egg White-Cornstarch Mixture and toss to coat them. Taking care to avoid splattering, add the coated chicken to the pan and cook like a solid pancake until the egg mixture sets; then, using a large spatula, carefully flip the chicken pieces over together and, with a wooden spoon, gently separate the pieces. [NOTE: I didn’t do this step. I just pan-fried the chicken without the egg white/cornstarch mixture].

5. Gently stir the Chinese peppers and roasted peanuts into the pan. As soon as they darken in color, after no more than 1 minute, stir in the garlic and scallions. Once the garlic begins to brown, after no more than 30 seconds, add the Kung Pao Sauce and toss and stir to coat the ingredients.

6. When the pasta is ready, drain it well and, in a large mixing or serving bowl, toss it thoroughly with the sauce.