Showing posts with label Tips and Tricks. Show all posts

Monday, February 20, 2012

Recycling and Practical Use for Bottles

Yes, I'm a tree hugger. Yes, I'm that person who always reminds others to recycle. I'm a pack-rat at times, hoarding things that I could possibly use for some other purpose in the future. I load scrap paper in the printer so that I can print on the back side of page. My fiancé sent me this link last week. I loved the idea so much that I had to share it here.

It is a lot like the Copco gadget that you can buy in stores for $5-10. But isn't it more fun and economical to make it yourself? Some uses I can think of are: chocolate chips, shredded coconut, raisins, etc.


All you need to do is:
1. Clean out an empty bottle and cut the bottom of bottle off.
2. Slide the plastic bag through the inside and up through the mouth of the bottle.
3. Fold back the plastic.
4. Screw on the lid. Tada!

Here is the Copco version:


On another note, this is my 501st post!!! When I started this blog 3 years ago I had no idea I would ever reach five hundred posts! Tihs blog has brought me on such a wonderful journey. I have met food bloggers from all around the world. Thank you everyone for reading and commenting on my blog. I love you all!!!

Sunday, May 8, 2011

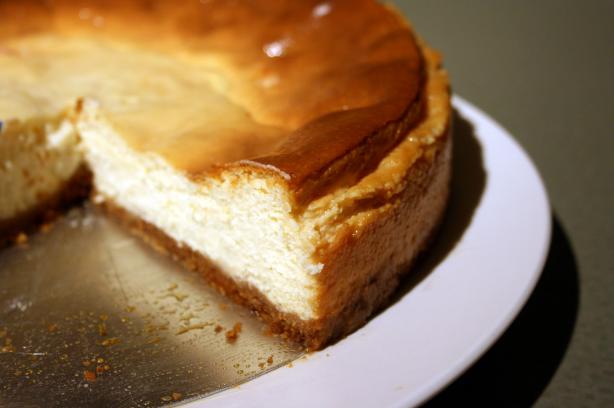
Light New York Cheesecake


My family loves cheesecake. Especially New York Cheesecake. However, my dad dislikes "low fat" baking. I made this cake for his birthday without telling him it was a "light" version. He loved it! I knew this recipe was a hit when he went back for seconds.

Most New York Cheesecakes call for 4 or 5 bricks of cream cheese whereas this one from Cooking Light only uses 2. Best of all, you can't even tell the difference. It is creamy, dense and everything a full-fat version should be. By using pureed cottage cheese (I used 2%) as a substitute for some of the cream cheese, you get the classic texture and tang but without the fat. Feel free to use low-fat cream cheese and low-fat sour cream in this recipe.

This recipe makes a tall - 3 inch - cake. Make sure your pan is deep enough to accommodate the filling. Alternately, use a 10" springform for a wider, shorter cake.


***Tip: Storing Cheesecake*** Put a paper towel between the cheesecake and the plastic wrap when storing the cheesecake in the fridge. This will absorb the condensation that forms on the plastic wrap, thus keeping your cheesecake top dry with no beads of moisture on top.


Light New York Cheesecake1 - 9" cake | adapted from Cooking Light

2 cups graham cracker crumbs
1/4 cup sugar
1/3 cup melted butter

4 cups 2% cottage cheese
2 cups sugar
Two 8-ounce blocks cream cheese, softened
1/4 cup flour
1/2 cup sour cream
1 tablespoon grated lemon rind
1 tablespoon vanilla extract
1/4 teaspoon salt
5 large eggs

1. Preheat oven to 325 degrees F. To prepare crust, combine graham crumbs, sugar and melted butter. Press evenly into bottom of a 9" springform pan with 3" sides. Note: If you don't have a pan with 3" sides, use a 10" springform instead.

2. To prepare filling, strain the cottage cheese well to remove excess liquid. Place strained cottage cheese in food processor; process until smooth.

3. Place 2 cups sugar and cream cheese in a large bowl; beat with a mixer at medium speed until smooth. Lightly spoon 1/4 cup flour into a dry measuring cup; level with a knife. Add 1/4 cup flour, sour cream, and remaining ingredients to cream cheese mixture; beat well. Add cottage cheese, stirring until well blended. Pour mixture into prepared crust.

4. Bake at 325 degrees for 1 hour and 30 minutes or until almost set. Turn oven off. Cool cheesecake in oven for 1 hour. Remove cheesecake from oven; run a knife around outside edge. Cool to room temperature. Cover and chill at least 8 hours.

Wednesday, February 9, 2011

Dulce de Leche Cheesecake


Despite its decadent-sounding name, this cheesecake wasn't overly sweet. It had a complex, full-bodied flavor and rich brown coloring from the dulce de leche (caramellized sweetened condensed milk). It is the perfect cake to make for your sweetheart to complete your romantic v-day dinner. Even if you are like me and you don't have a sweetheart, don't let that stop you. This is just as delicious eaten alone :) I drizzled some extra sweetened condensed milk over the top before serving and crowned it with a whipped cream rosette.

***TIP*** With all cheesecakes I get the best results when I bake them a day before serving so they have a chance to cool fully - first on the counter then in the fridge overnight where the flavors truly come together and the cake ripens to its best just in time for dessert.

To prevent condensation from forming on your saran wrap when you cover your cheesecake, put a paper towel between the wrap and the cake to absorb the moisture. This way, it won't drip back down onto the cake making it look like it's weeping.


Dulce de Leche Cheesecake
9" cake | 125 Best Cheesecake Recipes

1 1/4 cups graham cracker crumbs
1/4 cup melted butter

4 (8oz ea.) pkg cream cheese, room temperature
1 cup brown sugar
4 eggs
1 tsp vanilla extract
1 can (14 oz) dulce de leche

1. Preheat oven to 350 degrees F. Wrap foil around the outside of a 9" spring form pan (to keep water from water bath out of the cake). Make graham cracker crust and press into pan. Freeze. [I didn't freeze mine and it turned out fine].

2. Beat cream cheese until very smooth. Add brown sugar then eggs one at a time. Mix in vanilla and dulce de leche. Pour over prepared crust.

3. Place in a water bath and bake 45-55 minutes, until only a slight jiggle in the middle. Cool in pan for 2 hours or until room temperature then refrigerate overnight before serving.

Wednesday, December 15, 2010

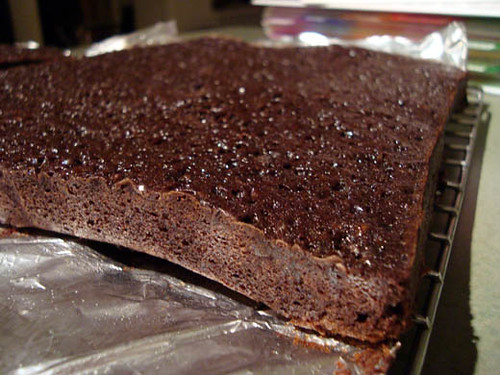
Guaranteed Fudge Brownies


You are most likely thinking - Oh no, not another brownie recipe - but before you click away, please note that these brownies are Incredible. So incredible that King Arthur Flour has designated them as "guaranteed" in the King Arthur Flour Cookie Companion. They have a crinkly, shiny, slightly crisp top layer that yields to a decadently fudgy (but not gooey) brownie layer. The generous chocolate chunks dispersed throughout the batter melt on your tongue giving you an extra burst of chocolate. There are no nuts to detract from the utterly rich and fudgy texture of these gems.

**Tip** In order to get the coveted shiny, crinkly top, make sure to heat your melted chocolate and butter together a SECOND time so the sugar dissolves fully and the chocolate-butter mixture is glossy.

King Arthur Flour's Guaranteed Fudge Brownies
9 x 13 pan | KAF Cookie Companion

3/4 cup butter
2 cups sugar
1 cup Dutch-process cocoa
1 teaspoon salt
1/2 teaspoon baking powder
1 tablespoon vanilla extract
3 large eggs
1 cup all-purpose flour
1 cup (6 ounces) chocolate chips

1. In a medium-sized microwave-safe bowl, or in a saucepan set over low heat, melt the butter, then add the sugar and stir to combine. Return the mixture to the heat (or microwave) briefly, just until it's hot (about 110 degrees to 120 degrees), but not bubbling; it'll become shiny looking as you stir it. Heating this mixture a second time will dissolve more of the sugar, which will yield a shiny top crust on your brownies.

2. Stir in the cocoa, salt, baking powder and vanilla. Whisk in the eggs, stirring until smooth; then add the flour and optional nuts and chips, again stirring until smooth. Spoon the batter into a lightly greased 9 x 13-inch pan.

3. Bake the brownies in a preheated 325 degree F oven for 29 to 32 minutes, until a cake tester inserted into the center comes out clean, or with just a tiny amount of crumb clinging to it. The edges of the brownies should be set, but the middle still soft. Remove the brownies from the oven, and cool them completely before cutting and serving.

Thursday, August 19, 2010

Brown Sugar Pound Cake


Martha, Martha, Martha, you never let me down. Your brown sugar cake is complex in a non-complex way requiring no adornments other than a cup of tea. Its crisp, raised, caramelly edges and shiny top beckon you to have a little taste. Your kitchen (and if you're lucky your entire house) will be filled with the aroma of sweet butter and sugar similar to the smell of those ice cream shops that make their own cones.

This recipe gets some of its lift from baking powder. It is a little sweeter and fluffier than the rich & buttery, non chemically leavened Classic Pound Cake which is a staple at my house (also a Martha recipe).

Slice with a sharp, serrated knife to get thin, delicate slices.


***Tip Re: Lining Cake Pans***
I use butter wrappers to line my cake pans. This saves money and works especially well for loaf cakes like the one here.

Brown Sugar Pound Cake
Makes 2 - 8x4 1/2" cakes | Martha Stewart Baking Handbook

1 cup butter, room temperature
2 1/4 cups brown sugar
3 cups flour
2 tsp baking powder
1/2 tsp salt
5 eggs
3/4 cup buttermilk

1. Preheat oven to 325 degrees F. Grease two 8 1/2 x 4 loaf pans. Combine dry ingredients.
2. Cream butter and brown sugar together until light and fluffy. (It's best to use an electric mixer for this to incorporate air for leavening). Add eggs 1 at a time, beating until combined.
3. Add flour mixture alternating with the buttermilk mixture. Beat until combined then scrape into prepared pans.
4. Bake until golden brown and cake tester comes out clean, rotating pans halfway through. Bake time is approximately 1 hour. Cool completely then store at room temperature, well wrapped, up to 3 days.

Tuesday, April 20, 2010

TWD: Sweet Cream Biscuits


The recipe for these sweet cream biscuits was selected by Melissa of Love at First Bite. I was so glad to see these come up on the TWD rotation. I have made them many many times. However, I call them scones.

You see, my dad lived in England during his college years and was spoiled by the scones they served for tea and at bake shops. He didn't like the other scone recipes I'd tried which were too dense or too dry or had so much spices added that so you couldn't taste the scone itself. For my dad, these scones are winners: lightly sweetened, tender & fluffy, not the least bit dry. They are buttery and flavorful without being overly rich. My dad is a traditionalist and favors raisin/currant scones. I personally like orange zest and dried cranberries or chopped dried apricots and almonds.

Scones vs. Biscuits?
I don't have a conclusive answer. To me it's all the same but some say that scones tend to be richer, including both eggs and cream in the recipe, though not always. Some biscuit recipes enrich the dough with eggs, but use milk or buttermilk instead of cream. Scones also use a bit more liquid than regular biscuits, which make them a bit more cake-like. While biscuit recipes may not call for sugar, scones typically use sugar. Lastly, scones are usually served with coffee and tea or as a dessert, biscuits are served more as a side bread often with breakfast.

**TIP** It helps to freeze these (and all other scones) on the baking sheet after shaping but prior to baking. This makes for a flakier biscuit/scone as the fat gets frozen and then melts into nice layers when it's baked.

**TIP**If you want to use fresh fruit you might want to reduce the liquid in the recipe by a couple tablespoons so the dough doesn't end up too wet.

Friday, February 19, 2010

Slow Cooker Dulce de Leche


I am now officially totally infatuated with my slow cooker. Not because it helps me get dinner on the table. No ma'am. The newest reason my crockpot rocks my world is because for virtually no effort it transforms sweetened condensed milk into a decadent foolproof dulce de leche. 8 hours of crock pot magic and voilà - heaven in a can. This method makes it so there are no more worries about popping pressurized cans or watching the stove for hours and hours. The first time I made this I had no idea what to expect when I opened up the can. To put it mildly, I was nothing short of overjoyed. To little ole me, it was like magic!

Now my only problem is deciding what to use my dulce de leche for - so many options!!! If you make this and remember, please rate it here at Dulce de Leche on Recipezaar.

Slow Cooker Dulce de Leche

1 can sweetened condensed milk, unopened
Water

1. Wash and remove the labels from your cans of sweetened condensed milk. Make sure the cans are undented and unopened.
2. Stand your cans up in the slow cooker and pour water in to cover cans fully.
3. Cook on low for at least 8 hours (I've gone up to 12 hours once when I forgot about the cans, results were still good). You could probably do this on high for 4-5 hours but I haven't tried it.
4. Allow to cool fully before opening the can. Store in refrigerator.
5. If you open the can and find that it's not golden enough (highly unlikely), scoop out contents into a saucepan and simmer on low until desired color.

Tuesday, February 9, 2010

TWD: Rick Katz's Brownies for Julia


Pardon the blurry picture, I was in a bit of a rush. My son got to have one of these for breakfast (hence the green froggy bowl in the picture). Im not fussy about what he eats as long as he eats something. My doctor told me that kids are smart that way - they know what they need and one week they might eat ONLY bread but then another week they might eat only meat and it ends up working out in the end. Our only responsibility as parents is to offer a variety of each food group at every meal and set good examples by eating a balanced diet ourselves. So there, I justified giving my kid a brownie for breakfast :)

They are great even without nuts! I think nuts would detract from their deliciousness. They are fudgy and moist, not cakey. I baked mine in a larger tray so they are thinner than a lot of the other TWD bakers' brownies this week. Mainly so they would bake faster and therefore I could eat them faster. Tsk tsk shame on me :)


I wish the picture could show you how dense and moist these are. Fudgy, dense, intensely chocolaty. For the recipe check out the host of this week's TWD: Tanya of Chocolatechic.

***TIP*** Use a plastic knife to cut brownies. The slippery surface of the plastic helps you get cleaner cuts. Some plastic knives can be quite sharp, depending on the serrations. Choose a sharp plastic knife if possible.

Tuesday, January 5, 2010

TWD: Tarte Tatin aux Pommes


Today's Tuesdays with Dorie recipe is Tarte Tatin. This week is extra special because it was picked by the person who started TWD in the first place - Laurie at Slush. Check out her website for the recipe.

I was super excited to make this. I love all apple baked goods and I've never made an upside-down anything before, not even an upside-down cake! so it was a nice challenge for me. The dish smelled sooo good as the apples bubbled away happily on the stove top. However, in the end I was so disappointed! I didn’t brown mine for long enough before bakingso they ended up pale and anemic looking. I was afraid of burning them as I couldn't see the color properly in my dark pan and so I was overly cautious. As I pulled it out of the oven and prepared to flip it, my heart was pounding. I just kept replaying the scene where Julia Child flips something over and it falls all over the place. Overall the flipping went well although a minimal amount of juice/caramel did fly out during the flip.

I ended up making a caramel sauce afterwards and pouring that over the apples (shown in the first picture) for more color and more caramel-ly taste. See the huge difference between the first and second pictures?

**Tip: Improvising the pan**
I had no idea how to execute this recipe since I didn't have an ovenproof pan. My cast iron skillet had a wooden handle which I wasn't sure could be put into the oven. After talking to a sales associate at a kitchen store, I found out that you can wrap your wooden handle in foil to protect it from the heat and proceed to put it in the oven! Worked for me!

The other option is to cook the apples on the stove then carefully slide them onto a bake-safe dish such as a pie plate (ceramic if you have it). Rearrange the apples nicely after transferring and proceed with covering them with pie dough and baking.


Tarte Tatin history: Tradition says that the Tarte Tatin was first created by accident at the Hotel Tatin in Lamotte-Beuvron, France in 1898. The hotel was run by two sisters, Stéphanie and Caroline Tatin. Stéphanie started to make a traditional apple pie but left the apples cooking in butter and sugar for too long. She tried to rescue the dish by putting the pastry base on top of the pan of apples, quickly finishing the cooking by putting the whole pan in the oven. After turning out the upside down tart, she was surprised to find how much the hotel guests appreciated the dessert. (Wikipedia)


Hotel Tatin

Monday, November 16, 2009

Best-Ever Shortbread


The shortbread cookie is a favorite in my house. What can I say, they love butter! My son could eat it off a spoon if I let him (which I don't). Because it's so well loved I have at least 25 recipes for shortbread, each one claiming to be "the best". It comes from Nancy Silverton's cookbook called Pastries from La Brea Bakery. I was going to skip it until I read her little blurb before the recipe which said basically that: don't skip this recipe just because you think you have enough shortbread recipes. She claims hers is better than all the rest. AND SHE'S RIGHT!!!

The dough is so easy to manage. I did the whole thing in my mixer, refrigerated it overnight and it baked up beautifully, filling my house with the sweet smell of butter. I think the icing sugar is the key to this recipe. I especially like that it doesn't call for corn starch like many other shortbread recipes do.

Some recipes are too crumbly to roll and cut while others are rollable but too moist, losing their flakiness. This one has the best of both worlds. You could easily roll it and cut out shapes or just do as I did - be lazy and make bars. Just let the dough sit on the counter for 10-15 minutes after you take it out of the fridge so it's easier to roll out.

There are some real gems in Nancy's book, such as this recipe and the one for her cinnamon buns - made using a croissant dough. OMG they are to die for.I have a few others bookmarked too for future baking. However, the book lacks pictures and is a little pricier considering how thin it is. Hmmm... quality over quantity? I only wish I had known about her bakery on La Brea Street, L.A. I went to California back in May. I even remember walking on that street! Now looking back I'm kicking myself for missing the chance to try one of her pastries.

Best-Ever Shortbread
20 fingers | Nancy Silverton of La Brea

1 cup unsalted butter
1/4 cup icing sugar
1/4 cup granulated sugar
2 cups flour
1/4 tsp salt

In a mixer (with the paddle attachment) cream together butter and sugars.
Combine flour and salt in a separate bowl. Gradually add into butter mixture on low. It should eventually come together into one ball. Turn out onto counter and roll into a ball. Saran wrap it and chill overnight.
The next day, remove from fridge and let sit for 15 minutes before rolling and cutting. (Preheat oven to 350 degrees F.
Roll out to 3/8" thick and cut into shapes or bars. Bake for 15 minutes then reduce heat to 300 degrees F and bake for another 15-20 minutes or until light golden brown around the edges.
Store airtight.


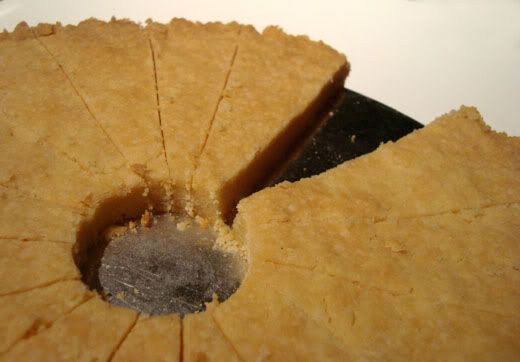
I got this tip from Cooks Illustrated and it works wonderfully!
When making shortbread (or other cookies) in a round pan, use a small 1" cookie cutter to cut out a circle in the centre of the pan.

This helps avoid the tips of the cookie wedges from crumbling in the centre of the pan when they are cut.

Tuesday, October 20, 2009

TWD: Banana Nut Biscuits


I deviated quite a bit from the original recipe which was for Sweet Potato Biscuits. I don't really like sweet potatoes unless they're cooked like fries with chipotle mayo or aioli. Mmmm... yum....

Anyways, back to the biscuits. A popular substitution other TWD bloggers used was pumpkin, but I finished my last can of that making pie and I'm a little pumpkin'd out to tell the truth. I was in the middle of raiding my pantry for substitution ideas when my son came up and asked me for a snack: a banana. Ping! A light went off. Mashed banana instead of mashed sweet potato! They're a similar starchy texture with a hint of sweetness just like the potatoes. My bananas were not overripe so the texture was just perfect. Next I threw in some nuts - pecans - because banana-nut is such a great combination. I sprinkled them with sugar to top and baked them to golden brown perfection.

Here is my adapted biscuit recipe. It is probably a bit sweeter than the original biscuits would have been. Check out Prudence Pennywise, our host for this week's TWD for the original recipe.

**TIP Re: Cleanup**
For easy clean-up put newspaper underneath your wire rack to catch crumbs. When you're done, roll up the newspaper and discard - no more crumbs on the counter! Plus, it's like recycling, right?


Banana Nut Biscuits
Makes 12 | adapted from Dorie Greenspan

2 cups flour
1 tbsp baking powder
1 tsp salt
2 1/2 tbsp brown sugar
1 tsp cinnamon
1/4 tsp nutmeg
3/4 cup very cold butter
1 cup mashed banana
1/3 cup chopped pecans
heavy cream or sour cream (if needed to reach desired consistency)
sugar for sprinkling tops

1. Preheat oven to 425 degrees F.
2. Combine all dry ingredients in a medium bowl. Mix to combine.
3. Cut in butter with pastry blender or two knives, until it resembles oat flakes.
4. Using a fork, stir in bananas and pecans. If the dough is too dry or won't come together, add sour cream or heavy cream, 1 tbsp at a time, to desired consistency.
5. Pat into a large rectangle about 3/4" thick and cut into triangles. Sprinkle tops with sugar. Bake for 15-18 minutes or until golden brown. Cool on wire rack.

Sunday, September 6, 2009

Mango Cheesecake

Today was my mom's birthday. For several years now I have been in charge of baking everyone's birthday cake. Unfortunately, my very unadventurous family always requests my New York Cheesecake. Plain, no topping, no garnish, no sauce... just pure, unadulterated cheesecake. While this has given me the opportunity to perfect my NY Cheesecake recipe, it's getting a little boring baking the same thing 4 times per year when my mind wanders to the multitude of fancy cake recipes I could be trying out. So... I was thrilled this year when my mom asked me to make a mango cheesecake for her birthday! And whaddyaknow...I'm happy to say that we have found a new family favorite! This mango cheesecake was exquisite. Everything from the vibrant orange color to the shiny mango mirror glaze on top and the slivered almonds along the side... It was so pretty. I never knew mango and cream cheese could go so well together! The cake recipe is from Nigella Lawson from the Food Network but the mango mirror, red piping gel and almond decorations are my contribution.


**TIP Re: Make your own Piping Gel** You can make your own piping gel easily by following the recipe below. It's so much cheaper and more customizable then the little tubes you buy in the store. For 1 cup of piping gel, combine 1 tbsp gelatin powder with 1 tbsp hot water. Stir to dissolve then mix in 1 cup of light corn syrup. Divide into desired portions and color with food coloring. I have successfully halved and quartered this recipe for smaller batches.

Mango Cheesecake
Makes one 9" cake | Adapted from Nigella Lawson

Crust
2 cups crushed digestive biscuits
3 tbsp sugar
1/2 cup butter, melted

Cake
3 pkg (8 oz each) cream cheese
3/4 cup sugar (or to taste, depends on how sweet your mango puree is)
2 cups mango puree
1 tsp lemon juice
4 large eggs

1/2 cup slivered almonds, for decorating

Mango Mirror
1 tsp gelatin powder
1 tsp hot water
1/2 cup mango puree

1. Preheat oven to 325 degrees F. Wrap your spring form pan with foil around the bottom and outside to prevent water from getting in when you put it in the water bath to bake. **Make sure all ingredients are at room temperature before you begin. I usually take them out of the fridge and put them on the counter at least 1 hour before I start baking.
2. Prepare crust: Mix all crust ingredients and press into a lightly greased 9" spring form pan, pressing slightly up the sides of the pan.
3. Cake: In a stand mixer, beat the cream cheese and mango puree until smooth. Add sugar then taste the mixture to see if it needs more sugar. I use canned mango puree which has sugar added so I use less than you would if you made your own mango puree from fresh mangoes. Add lemon juice then eggs, one at a time. Scrape down bowl often and beat until smooth but do not over beat.
4. Bake in a water bath - a large tray filled with hot water - for 1 hr 20 mins or until only about 1" in the center jiggles. Turn the oven off and let cool in the oven with the door open. Refrigerate overnight before decorating/serving.
5. Mango Mirror: Dissolve the gelatin in the hot water and stir it into the mango puree. Cool to room temperature or slightly cooler then spread over chilled cheesecake.
6. When mirror is set, press slivered almonds around the sides and pipe red dots on top or decorate as you wish.

Tuesday, August 25, 2009

TWD: Creamiest Lime Cream Cheese Tart

Today's Tuesdays with Dorie post is brought to you by Linda of Tender Crumb who selected the recipe Creamiest Lime Cream Meringue Pie. My twist is a cream cheese topping instead of meringue. Check out her blog for the original recipe (the one I have included here is my adaptation).

Whenever I see the word "meringue" in a recipe I tend to skip over it and pick another recipe, which is exactly what I was tempted to do today, but then I remembered that when I joined TWD I made the commitment to make the majority of the recipes, like 'em or not, for the experience of widening my baking horizons and being open to new tastes. I'm glad I persevered because this one was a hit!

Side note: I don't like meringue for a few reasons


  • It leaves you with the question of what to do with the yolks
  • It doesn't keep well
  • I am not overly fond of the texture

  • However, I was intrigued by the lime cream part of the recipe as I'd never made lemon cream but it has been something on my "to bake" list. See that little orange gadget in the picture below? It works surprisingly well. Another Tupperware gadget that I can't live without. All you do is insert and squeeze.

    *TIP* Re: Juicing Citrus: I microwave my lemons/limes (whole, uncut fruit) for 20 seconds then roll them on the counter to soften them before juicing. You get so much more juice that way!

    The original plan was to make mini tarts and serve them with whipped cream, but at the last minute, inspiration struck and I slathered on an easy cream cheese topping, much like the one on Marie Callender's Lemon Cream Cheese Pie. The result was a delicious tart. The lime added an unexpected flavor dimension but balanced out perfectly with the sweet-tart cream cheese layer and buttery, flaky pie crust.

    My adaptation of Dorie's recipe is below. What a great recipe to end the month of August with for TWD. And, unlike meringue, this tart tastes even better the next day as the cheese and lime flavors mellow and mature.

    Creamiest Lime Cream Cheese Tart
    Adapted from Dorie Greenspan | 9" tart

    1 recipe basic single crust pastry

    LIME CREAM:
    1/2 cup sugar
    Grated zest of 2 limes
    2 large eggs, preferably at room temp
    1/2 cup fresh lime juice
    1/2 inch chunk fresh ginger, peeled and finely grated
    1 tsp cornstarch
    1/2 cup unsalted butter, cubed and at room temperature

    CREAM CHEESE LAYER:
    1 pkg (8 oz.) cream cheese
    1/4 cup sugar
    1 egg

    1. Lime Cream: Put the sugar and zest into a heatproof bowl that can be set over a double boiler or pan of simmering water. Off the heat, rub the sugar and zest between your fingertips for a few minutes, until the sugar is moist and the fragrance of lime is strong. Whisk in the eggs, then whisk in the juice, ginger and cornstarch.

    2. Set the bowl over the pan and start stirring with the whisk as soon as the mixture feels is tepid. Cook until it reaches 180 degrees F. Whisk constantly to keep the eggs from scrambling. You’ll see that the cream will start out light and foamy, then the bubbles will get bigger, and then, as it gets closer to 180 degrees F, it will start to thicken and the whisk will leave tracks. The tracks mean the cream is almost ready. Don’t stop whisking or checking the temperature, and have patience – getting to temp can take as long as 10 minutes.

    3. As soon as it reaches 180 degrees F, remove from the heat and strain into a blender/food processor (I used my mini Braun hand blender). Let it cool until it reaches 140 degrees F, about 10 minutes. Turn the blender to high speed and add the butter a few pieces at a time. Scrape down the sides of the container as needed as you incorporate the butter. After all the butter is in, continue to blend the cream for another 3 minutes. If you find the machine is getting really hot, work in 1-minute intervals, giving the machine a little rest in between beats.

    4. Pour the cream into a container, press a piece of plastic wrap against the surface and refrigerate for at least 4 hours or overnight. It can be frozen airtight for up to 2 months; thaw overnight in the refrigerator.

    5. Cream Cheese Layer: Beat cream cheese until smooth and creamy. Add in sugar and beat until fully incorporated. Add in egg and beat just until mixed in. Do not overbeat.

    6. Assembly: Preheat oven to 350 degrees F. Roll out pastry dough and place in 9" fluted tart pan. Spread chilled lime cream over pastry then spread cream cheese layer on top. Smooth with a rubber spatula. Bake for 50-55 minutes until top is golden brown. Cool on a cooling rack then refrigerate to chill thoroughly before serving. Store refrigerated.

    Tuesday, August 4, 2009

    TWD: Classic Banana Bundt Cake

    I was going through my really old Photobucket account and came across this picture. I decorated these bananas in Gwen Stefani's Harajuku style as part of a Christmas gift for my sister (who is Gwen-obsessed). Remember that song, "This shit is Bananas, B-A-N-A-N-A-S" from a few years ago?

    Well, I drew all the little Harajuku symbols on these bananas and put them in a gift bag alongside the "real" gift which was a make-up case with little bananas on it. She thought they were adorable and those bananas sat on her desk until they started to go black and I had to steal them from her to make banana bread. If you into fashion, check out my sister's blog: China Doll. I wish I were even half as artistic and talented as she is. When it comes to style, make-up/hair, fashion, etc. she just has a nose for what's hot and a knack for putting together amazing outfits. She's the first person I go to when I'm not sure what to wear. It also helps that I have easy access to her closet so I can "borrow" outfits.

    twd banana bundt

    Okay, enough chatter. On to today's real entry. This week's Dorie-recipe was chosen by Mary of The Food Librarian. I am so impressed by this recipe. I, like most home bakers, have a go-to banana bread recipe. I didn't think any recipe could take the place of this 'gold standard' recipe in my books, but I must say, I was wowed by this Classic Banana Bundt Cake. It uses butter and sour cream unlike my original recipe which uses oil. My whole family was wowed by the moist texture, intense banana flavor and crisp yet chewy crust all around. I even caught my father sneaking a second piece and slicing off a big piece the next morning for breakfast. He is the pickiest person when it comes to baked goods, so it's gotta be damn good for him to want seconds.

    *TIP* re: Bananas
    Bake the bananas (skin and all) at 300 degrees F or lower for about 10-20 minutes or until skins blacken. This is to soften them, ripen them and bring out even more sweetness and to make them super-easy to slip out of their skins and mash. Sometimes they get so soft and wonderful that I can just cut the top off and squeeze out the banana.

    bananatip

    twd banana bundt

    I highly recommend that you
    1) Buy Dorie's book, Baking: From My Home to Yours
    2) Join us at the Tuesdays with Dorie baking group. We rock!

    Classic Banana Bundt Cake
    Makes one 10" Bundt | Baking: From My Home to Yours
    3 cups all-purpose flour
    2 teaspoons baking soda
    1/2 teaspoon salt
    1 cup unsalted butter, at room temperature
    2 cups sugar
    2 teaspoons pure vanilla extract
    2 large eggs, preferably at room temperature
    1 3/4 cups (approx. 4 large) very ripe bananas, mashed
    1 cup sour cream or plain yogurt

    Center a rack in the oven and preheat to 350 degrees F. Generously grease a 10-inch (12 cup) Bundt pan. Don’t place the pan on a baking sheet - you want the oven’s heat to circulate through the Bundt’s inner tube.

    Whisk the flour, baking soda and salt together.

    Working with a stand mixer, preferably fitted with a paddle attachment, or with a hand mixer in a large bowl, beat the butter until creamy. Add the sugar and beat at medium speed until pale and fluffy. Beat in the vanilla, then add the eggs one at a time, beating for about 1 minute after each egg goes in. Reduce the mixer speed to low and mix in the bananas. Mix in half the dry ingredients, all the sour cream and then the rest of the flour mixture. Scrape the batter into the pan, rap the pan on the counter to debubble the batter and smooth the top.

    Bake for 65 to 75 minutes, or until a thin knife inserted deep into the center of the cake comes out clean. Check the cake after about 30 minutes - if it is browning too quickly, cover it loosely with a foil tent. Transfer the cake to a rack and cool for 10 minutes before unmolding onto the rack to cool to room temperature.