Saturday, June 5, 2010

Sweet Potato Focaccia Bread


Apparently potatoes are really good in bread-making because they are starchy and give the bread a nice softness and airyness. I pretty much followed the recipe in the America's Test Kitchen family baking book just swapping sweet potato for regular potato. I was really happy with the result and the dough was not difficult to handle at all, despite the high hydration which is typical of focaccia doughs.

Sweet potato vs regular potato:
-Helps blood sugar remains more stable than regular potatoesa because they have more fiber.
-Good source of copper, vitamin B6, potassium and iron.
-High in Vitamin A, C and antioxidants
-Grown by vine or root cuttings (instead of seeds)
-The flower "Morning Glory" belongs to the same botanical family
-Completely different family from a yam
-Lastly, it makes cool looking orange-tinted bread

Sweet Potato Focaccia Bread
10" x 14" x 1" | adapted from Cook's Illustrated

Dough:
1 1/3 cup cooked sweet potato, mashed
1 1/2 teaspoons instant yeast
3 1/2 cups unbleached all-purpose flour
1 cup water (warm, 105 to 115 degrees)
2 tablespoons olive oil , plus more to grease bowl/pan
1 1/4 teaspoons salt

Topping:
2 tablespoons extra-virgin olive oil
2 tablespoons fresh rosemary
3/4 teaspoon sea salt , coarse

1. In large bowl of electric mixer or work-bowl of food processor fitted with steel blade, mix or pulse yeast, 1/2 cup flour, and 1/2 cup warm water until combined. Cover tightly with plastic wrap (or put work-bowl lid on) and set aside until bubbly, about 20 minutes. Add remaining dough ingredients, including sweet potato. If using mixer, fit with paddle attachment and mix on low speed (number 2 on KitchenAid) until dough comes together. Switch to dough hook attachment and increase speed to medium (number 4 on KitchenAid); continue kneading until dough is smooth and elastic, about 5 minutes. For food processor, process until dough is smooth and elastic, about 40 seconds.

2. Transfer dough to lightly oiled bowl, turn to coat with oil, and cover tightly with plastic wrap. Let rise in warm, draft-free area until dough is puffy and doubled in volume, about 1 hour.

3. With wet hands (to prevent sticking), press dough flat into generously oiled 15 1/2-by-10 1/2-inch jelly roll pan or halve and flatten each piece of dough into 8-inch round on large (at least 18" long), generously oiled baking sheet. Cover dough with lightly greased or oil-sprayed plastic wrap; let rise in warm, draft-free area until dough is puffy and doubled in volume, 45 minutes to 1 hour.

4. Meanwhile, adjust oven rack to lower-middle position and heat oven to 425 degrees F. With two wet fingers, dimple risen dough. For the topping: Drizzle dough with oil and sprinkle evenly with rosemary and coarse salt, landing some in pools of oil.

5. Bake until focaccia bottom is golden brown and crisp, 23-25 minutes. Transfer to wire rack to cool slightly. Cut rectangular focaccia into squares or round focaccia into wedges; serve warm. Can store on counter for several hours and reheated just before serving. Or, wrap cooled focaccia in plastic and then foil and freeze for up to 1 month; unwrap and defrost in 325-degree oven until soft, about 15 minutes.

Wednesday, June 2, 2010

Apricot Cranberry All-Bran Muffins


Call me nostalgic or a sucker for advertising - I ca't help but look at 'back of the box' recipes and cookbooks put out by big brands like Jell-O or Philadelphia Cream Cheese or Hershey's. It's all a strategy to get you to buy more of their product by producing recipes that call for it as an ingredient.

Some are so obviously product plugs that it's comical, like the dessert that calls for Jell-O powder, Cool-Whip and a pre-made graham crust. Hmm... could this be Kraft Foods? Cheeeeeeezy. Puh-leaze. Reminds me of those soap pumps that say "Only refill with Brand X" as if it wouldn't work if you used a different brand. lol.

Other brands like Kellogg's actually have a lot of great muffins, breads and biscuits that can be made using its cereals as a base. It's done subtly and the recipes taste good!


All-Bran Apricot Cranberry Muffins
Makes 12 | adapted from kelloggs.com

1 1/4 cups all-purpose flour
1/3 cup sugar
3 tbsp brown sugar
1/2 teaspoon salt
1/2 tsp baking soda
3 cups All-Bran/Bran Flakes/Raisin Bran dry cereal
1 1/4 cups buttermilk (or use regular milk and sub 1 tbsp baking powder for the baking soda)
1 egg
1/3 cup vegetable oil
1/2 cup chopped dried apricots
1/2 cup dried cranberries

1. Preheat oven to 375 degrees F. Prepare twelve 2 1/2-inch muffin tins - grease or line.

2. Stir together flour, the 1/2 cup sugar, salt and baking powder. Set aside. In large mixing bowl, combine cereal and milk. Let stand 2 minutes or until cereal softens slightly. Add egg, oil and dried fruit. Beat well. Add flour mixture, stirring only until combined. Portion into prepared tins.

3. Bake for about 20 minutes or until lightly browned.

Tuesday, June 1, 2010

TWD: (Not) White Chocolate Brownies with Brown Butter Frosting


Marthe of Culinary Delights selected White Chocolate Brownies on pages 110 and 111 of THE BOOK. I am the hugest white chocolate fan ever. I'll pick vanilla over chocolate hands-down anyday. I should have been all over these but silly me, I forgot to buy white chocolate. The lack of white chocolate combined with my aversion to meringue meant that these evolved into milk chocolate brownies with brown butter frosting. I also added a crushed Ritz cracker crust for that salty/sweet balance. I'm glad I did as the brownie itself was pretty sweet.

On a side note to White Chocolate Lovers (or Haters, we'll convert you lol ): I beg you to try a warm (Copycat) Moxie's Restaurant White Chocolate Brownie dressed up with whipped cream, vanilla ice cream and hot fudge sauce. Let me just say one more thing to convince you: the recipe for a 9" pan calls for 1/2 lb. white chocolate plus 1/2 cup more chocolate chips!


Brownies with Brown Butter Frosting
9x13 pan | Adapted significantly from Dorie Greenspan

2 cups crushed Ritz crackers
1/2 cup sugar
1/3 cup butter, melted

2/3 cup all-purpose flour
1/2 cup finely ground almonds
1/2 teaspoon salt
1/2 cup butter, cut into 8 pieces
4 ounces milk chocolate, coarsely chopped
1 cup sugar
4 large eggs
1 teaspoon pure vanilla extract
1 cup raspberries

1. Center a rack in the oven and preheat the oven to 325 degrees F. Butter a 9-x-13-inch pan. Combine crushed crackers, sugar and melted butter. Press into bottom of pan.

2. Whisk together the flour, ground almonds and salt. Melt butter and white chocolate using a double boiler.

3. Cream together butter and sugar. Add the eggs and beat on medium-high speed for about 3 minutes, or until pale and foamy. Beat in the vanilla. Reduce the mixer speed to low and blend in the melted butter and chocolate. Still working on low, mix in the dry ingredients, stirring only until they disappear into the batter. Scrape the batter into the prepared pan and sprinkle the raspberries evenly over the batter.
Bake for 30 to 35 minutes, or until the brownies pull away from the sides of the pan. Transfer the pan to a rack and allow to cool to room temperature in the pan. Frost with brown butter frosting when completely cool.

*Kept in the pan and covered lightly with plastic wrap, the brownies can be kept at room temperature overnight. Or wrap the brownies airtight and keep them at room temperature for up to 3 days and frozen for up to 2 months.

Brown Butter Frosting
Real Simple, May 2007

6 tablespoons unsalted butter
1 pound confectioners' sugar
1/4 cup whole milk
1 teaspoon corn syrup

1.Brown the butter: Melt the butter in a skillet or small saucepan over medium heat. Swirl or stir the butter with a wooden spoon as it starts to foam and sputter. Remove the butter from the heat as soon as it begins to turn golden brown and smells nutty, about 1 minute. Strain through a fine sieve or coffee filter and let cool to room temperature.

2.Meanwhile, place the confectioners' sugar, milk, and corn syrup in the bowl of an electric mixer fitted with a whisk. Beat to combine.

3.With the mixer on medium, drizzle in the brown butter a little at a time, waiting until it is absorbed before adding more. Beat in another teaspoon of milk to make the frosting creamier, if necessary.

Sunday, May 30, 2010

Chocolate Chunk Banana Muffins


This was a nice small-sized recipe adapted from America's Test Kitchen. They use an 8" square pan but I made muffins and got 8 from the recipe. These had tons of banana flavor peppered with burts of chocolate. They probably leaned closer to being a cupcake than a muffin, lol. If you want to be healthier, just leave out the chocolate or swap for nuts. Simple, fast, tasty, perfect for lunchbox planning.

Maybe this makes me seem odd but I'll say it anyway. I am genuinely happy to know when others eat and enjoy the food I make, even if I'm not there to 'witness' it or to hear any compliments from it. Even the simple fact of knowing that my son will be eating a muffin at preschool which I have baked with love makes me feel closer to him. And of course it doesn't hurt when he proclaims to the world, "I love my mommy's cooking. She makes good bread." Way to make my day!

Chocolate Chunk Banana Muffins
Makes 12 | America's Test Kitchen

2 cups flour
2 1/2 tsp baking powder
1/2 tsp salt
1/2 cup butter, softened
2 eggs
1 1/4 cup sugar
1 tsp vanilla
1 cup (2 lg.) mashed bananas
1 cup (6 oz.) semi-sweet chocolate chunks/chips

1. Preheat oven to 350 degrees F. Grease 8" square pan or line 8 muffin cups. Combine flour, powder and salt.
2. Cream together butter, sugar, eggs, vanilla and mashed bananas until well combined. Add flour mixture to butter mixture and combine. Stir in chocolate chips and scrape into prepared pan.
3. Bake 45-55 minutes (35-45 for muffins) or until toothpick comes out clean. Cool before removing from pan.

Friday, May 28, 2010

Ricotta-Topped Blueberry Cake


This cake is like a layer of not too sweet cheesecake on top of a dense, blueberry studded cake. A little reminiscent of danish filling in a blueberry muffin. The original recipe says to serve at room temperature but I found them also really nice after a few hours in the fridge, fully chilled. They cut nicely into neat squares and they also store well. These are a nice twist on cheesecake - lighter and more subtle. The cake base is like a dense, sweet blueberry muffin. I thoroughly enjoyed the cake alone and I would honestly be happy just eating the cake without the ricotta layer too.


Ricotta-Topped Blueberry Cake
9" Square Cake

1 cup (4 1/4 ounces) King Arthur Unbleached All-Purpose Flour
3/4 cup (5 1/5 ounces) sugar
1 1/4 teaspoons baking powder
1/2 teaspoon salt
1/3 cup (2 5/8 ounces) milk
1/4 cup (1 3/4 ounces) vegetable oil
1 large egg
1/2 teaspoon vanilla
1 1/2 cups (7 1/2 ounces) fresh or frozen blueberries

2 large eggs
1 1/4 cups (10 ounces) ricotta cheese
1/3 cup (2 1/4 ounces) sugar
1/4 teaspoon vanilla

Preheat the oven to 350 degrees F. Grease a 9" Square Pan.

Batter: In a small bowl, combine the flour, sugar, baking powder and salt. Add the milk, oil, egg and vanilla, beating till smooth. Spoon the batter into the prepared pan and sprinkle the blueberries on top.

Topping: In a small bowl, beat the eggs till frothy, then beat in the cheese, sugar and vanilla. Spread this mixture evenly over the blueberries.

Bake for 55 to 60 minutes or until golden brown around the edges. Remove from the oven and cool to lukewarm then refrigerate to chill fully before cutting into squares.

Thursday, May 27, 2010

DB: Piece Montée, deconstructed


The May 2010 Daring Bakers’ challenge was hosted by Cat of Little Miss Cupcake. Cat challenged everyone to make a piece montée, or croquembouche, based on recipes from Peter Kump’s Baking School in Manhattan and Nick Malgieri.

I must apologize... I am under a ton of stress right now so I didn't make this the real Daring Baker's way. I did cream puffs and a separate batch of toffee that I crumbled into bits to sprinkle on top of the whipped cream/ice cream to serve.

My stress is due to a HUGE due date coming up - the final report for my Accounting designation. If I pass this (last year's pass rate was 70%), I will be done done done with school. I will be a full fledged accountant!

I really enjoyed making the choux pastry and wondered why I don't make it more often! It's one of those little things that brings a smile to my face as the choux pastry "magically" rises in the oven into a light, fluffy, hollow pouf that is ready to be filled with whatever you can dream up. I've seen them used in savory applications although I think being the sugar-addict I am, I'll stick to sweet fillings.

I filled these with a simple vanilla pastry cream and made a separate batch of toffee brittle (instead of the hard caramel sauce). I think I'm going to fill the extra puffs with vanilla ice cream and freeze them for anytime-treats. I used Martha Stewart's recipes for both the pastry and pastry cream.

Check out the DB blogroll for real awesome croquembouches, unlike my cheater version.

Choux Pastry
Makes 2 dozen | Martha Stewart's Baking Handbook

1/2 cup (1 stick) unsalted butter, cut into 1/2-inch pieces
1 teaspoon sugar
1/2 teaspoon salt
1 1/4 cups all-purpose flour
4 large eggs, plus 1 large egg white if needed

1. Bring butter, sugar, salt, and 1 cup water to a boil in a medium saucepan. Remove from heat. Using a wooden spoon, quickly stir in flour. Cook over medium-high heat, stirring constantly, until mixture pulls away from sides and a film forms on bottom of pan, about 3 minutes.

2. Transfer to the bowl of an electric mixer fitted with the paddle attachment. Mix on low speed until slightly cooled, about 1 minute. Raise speed to medium; add whole eggs, 1 at a time, until a soft peak forms when batter is touched with your finger. If peak does not form, lightly beat remaining egg white, and mix it into batter a little at a time until it does. Use immediately.

3. Using a large plain piping tip, pipe 2" circles of pastry onto parchment paper or silicone-lined baking sheet. They don't need to be spaced very far apart as they don't spread, they just puff! Freeze for at least 30 minutes or once frozen, transfer to an airtight container and freeze for up to 3 weeks. Bake from frozen at 375 degrees F for 25-30 minutes until golden brown. Store air tight at room temperature. You can also freeze these after they are baked and then to serve later, bring to room temperature and re-crisp in the oven for a few minutes.

4. Slice them in half and fill with sweetened whipped cream or pastry cream (recipe follows).

Pastry Cream
Makes 1 1/2 cups | Martha Stewart's Cupcakes

4 large egg yolks
1/2 cup sugar
1/4 cup cornstarch
Pinch of salt
2 cups milk
1 1/4 teaspoons pure vanilla extract

1. Whisk egg yolks until smooth in a large bowl. Combine sugar, cornstarch, and salt in a medium saucepan, and heat over medium. Stirring constantly, gradually add milk in a slow, steady stream, and cook until mixture thickens and begins to bubble, about 5 minutes.

2. Whisking constantly, slowly pour one third of the milk mixture into egg yolks (this step is called tempering, which keeps the yolks from curdling). Pour mixture into remaining milk mixture in saucepan. Cook over medium heat, whisking constantly, until mixture comes to a full boil and is thick enough to hold its shape when lifted with a spoon, 2 to 4 minutes. Remove from heat; stir in vanilla.

3. Strain mixture through a fine sieve into a heatproof bowl. Cover with parchment paper or plastic wrap, pressing it directly on surface to prevent a skin from forming. Refrigerate until chilled and firm, at least 2 hours (or up to 2 days).

Toffee Recipe from Recipezaar

Tuesday, May 25, 2010

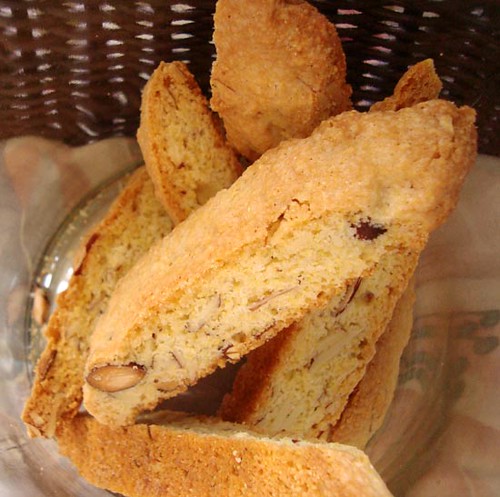
TWD Rewind: Lenox Biscotti (Almond Biscotti)


Today is my TWD 1-year anniversary! Almost exactly 1 year ago or just about. The cinnamon squares were my first TWD-bake. To celebrate, I have opted to do a TWD rewind and make something that was chosen before I was a member. Lenox Biscotti. Originally chosen on Oct. 14, 2008. It's still likely going to be 1 yr before I get a chance to pick, but I'm having a great time. Thank you all for being so awesome and inspiring and encouraging.

I love making and giving biscotti as gifts. They look gorgeous piled into a pretty jar, balanced on the rim of a coffee mug or simply wrapped up in a cellophane bag and tied with a brightly colored ribbon. They are always so expensive to buy from the store yet so easy to make at home.

There are so many variations of biscotti that I have yet to make the same recipe twice, however, I may make an exception for these Lenox biscotti (The Lenox is one of Dorie Greenspan's favorite restaurants in New York City) from her book, Baking: from my home to yours. I whipped up this batch to give to my amazing co-workers. They say I spoil them with my baking. I say, thank Goodness I have peple to pawn my baking off on otherwise I don't know what I'd do with it all.

The cornmeal in the recipe gives a nice little crunch. Unlike some biscotti, these are crisp yet not so hard that they are difficult to bite into. I enjoyed them even without dunking them in coffee or tea. I hope you try these. they are really delicious in a simple, no frills kind of way. However, if you wanted to dress them up you could easily drizzle them with melted chocolate. My quest for the perfect almond biscotti recipe ends here.

Lenox (Almond) Biscotti
adapted from Dorie Greenspan

1 1/2 cups flour
1 1/2 tsp baking powder
1/4 tsp. salt
1/2 cup cornmeal
1/2 cup butter, at room temperature
1 cup sugar
2 eggs
1 1/2 tsp vanilla
3/4 cup sliced almonds

1. In stand mixer cream the butter and sugar. Add the eggs, beating well after each addition. Add the vanilla.
2. Sift together the flour, baking powder, salt and cornmeal and add to the butter mixture. Fold in the almonds.
3. Scrape half the dough onto a parchment paper lined baking sheet. Using a spatula and your fingers, form the dough into a log, 12 inches long and 1 1/2 inches wide. Repeat with the second portion of the dough.
4. Bake at 350 for 15 minutes or until the logs are light golden but still soft to the touch. Let cool for 30 minutes but keep the oven on.
5. With a long serrated knife cut 3/4 inch slices diagonally from each log and stand them up, spaced slightly apart, on the baking sheet. Return to the oven for another 15 minutes until firm and golden. Store airtight for up to 2 weeks.

Sunday, May 23, 2010

Linzer Tart


When I pulled this out of the oven, my heart did a little jump because of how pretty it was. I was definitely proud to serve this tart and I got a lot of "you MADE that" comments because apparently it looked storebought!

The fragrant nutty tart pastry comes together in seconds and the filling is nothing more than simple raspberry jam with a splash of lemon. This tart is much more than the sum of its parts.


Linzertorte originated in Linz, Austria and is often served around Christmas. But... knowing me, I often make recipes out of season, like pumpkin cheesecake in the summer! This torte has stood the test of time since the 1700's with only a minor change that now many people include ground hazelnuts in the crust (I stuck to almonds though). Blackcurrant jam is most traditional but nowadays most common is raspberry.

The recipe comes straight from the book Baking for All Occasions by Flo Braker. No alterations and none needed next time either except that her recipe makes one 11" tart but I made one 9" tart and a baby 3". They were soooo cute beside each other. Of course my 3 year old had the baby one and it was 'just the right size'.


Linzer Tart
11" Tart | Flo Braker

Pastry:
2 cups flour
2/3 cup dried bread crumbs, fine
1 1/2 cups ground almonds
1 tsp ground cinnamon
1/4 tsp nutmeg
2/4 tsp allspice (optional)
1 cup butter, room temperature
2/3 cup sugar
1 egg
zest from 1 lemon

Filling:
1 cup raspberry jam
1 tbsp lemon juice

Egg Wash:
1 egg, beaten

Directions:
1. For Pastry, combine all dry ingredients. In a mixer with the paddle attachment, cream butter and sugar until smooth. Add egg and lemon zest then flour mixture until it comes together into a dough. Divide in half and wrap each half in plastic wrap for 1 hour or until firm enough to roll. You can also freeze it for up to 1 month and just bring to room temp before rolling out.
2. Preheat oven to 350 degrees F. Combine lemon juice and raspberry preserves.
3. Assembly: Roll out 1/2 the dough. Line your tart pan with the pastry and chill for 30 minutes (or up to 1 day). Spoon preserves into pastry-lined pan. Using a pastry wheel or knife, cut dough into strips to form lattice. Arrange lattice strips on top. Note: Linzer tarts do not have the lattice strips interwoven, they are instead laid all one way and then the rest laid on top of them going the other direction or diagonally.
4. If desired, brush tart edges and strips with egg wash. Bake 35-45 minutes or until pastry is done and golden brown. Cool fully before removing from tart pan and serving.

Thursday, May 20, 2010

Sour Cream Lemon Snacking Cake


A bunch of great quickbreads or snack cakes are a wonderful thing to have in your baking repertoire. They are easier than cookies (no need to portion them into individual portions), faster than yeast breads (no rising) and healthier than cakes (usually) but just as pleasing. Sometimes simple is really best. This cake is not overpoweringly lemony or sweet. The original recipe from Cake Keeper Cakes: 100 Simple Recipes for Extraordinary Bundt Cakes, Pound Cakes, Snacking Cakes and Other Good-To-The-Last-Crumb Treats is sans poppy seeds but in my world, lemon and poppyseeds go hand in hand so I threw in a couple tablespoons. When I received this book in the mail from Amazon I was a little surprised at how small and thin it was. Don't judge a book by its size! Do not be deceived! I was soon blown away by the range and simplicity of the recipes that turn ordinary ingredients into everyday indulgences while staying true to the theme of simplicity.

The cake flour gives a particularly tender crumb but is not necessary (in my opinion).
**Tip** Re: Cake Flour: For 1 cup cake flour substitute you can use 2 tbsp corn starch to replace 2 tbsp of the flour in the recipe. Not as good as the real thing but better than subbing straight all purpose for cake flour.

Sour Cream Lemon Snacking Cake
8" Square Cake

1 cup sour cream, room temperature
4 eggs
1 tsp vanilla
2 1/4 cups cake flour
1 tsp baking powder
1/2 tsp baking soda
1/4 tsp salt
2 tbsp poppy seeds (optional)
4 tbsp butter, softened
1 1/4 cups sugar
2 tsp lemon zest
1/4 cup lemon juice

1. Preheat oven to 325 degrees F. Grease an 8" square baking dish. Combine sour cream, eggs, vanilla in a
small bowl.
2. In a separate bowl combine flour, powder, soda poppy seeds and salt.
3. Cream together butter, sugar and zest. Add in flour mixture and sour cream alternatingly. Drizzle in lemon juice and stir in just to combine. Scrape into prepared pan and bake for 45-60 minutes or until toothpick comes out with just a few crumbs attached. Cool fully then sprinkle with icing sugar or a simple glaze or serve plain.]

I recommend using the glaze recipe from the Lemon Ricotta Cookies for a sour-sweet punch.

Tuesday, May 18, 2010

TWD: Bread Pudding Muffins


Bread Pudding. Judging by the name alone, I have always veered away from this dessert. The name Bread Pudding invokes images of British puddings filled with suet or soggy white bread. It is a real stretch for me to even conceive of such a thing as being appetizing, therefore, I have never had an urge to eat let alone make it. Given my existing mindset, this week's pick was a real challenge.

Until... a mental shift took place and a lightbulb went off: bread pudding is a lot like French Toast (which I love). The ingredients are essentially the same - bread that gets coated with an egg/cream/sugar custard mixture. All of a sudden I was inspired to get baking. Instead of a large dish I made mine into muffins. Some TWD bakers found the puddings a little on the dry side but baked as muffins, this was just right.


I served them with a sprinkle of powdered sugar, a side of maple syrup and a mountain of whipped cream. They turned out pretty well and now the words "Bread Pudding" have taken on a slightly more positive image in my head.

Today's recipe was chosen by Elizabeth (blog: Cake or Death).