Showing posts with label Desserts. Show all posts

Monday, December 5, 2011

Junior's Strawberry Shortcake Cheesecake


This tall cake cannot be described any other way besides "statuesque". It stands a stunning 5" high - crowned with rosettes of piped whipped cream. It consists of a strawberry cheesecake layer sandwiched between two fluffy sponge cakes. It is not too sweet and very impressive in both appearance and taste.


I made this cake for Thanksgiving, since we are not big fans of pumpkin pie. It was so refreshing and light that it didn't weigh us down even after a huge meal! My sister's boyfriend doesn't usually like cheesecake but he went back for seconds of this one. I can't say enough to recommend this recipe.

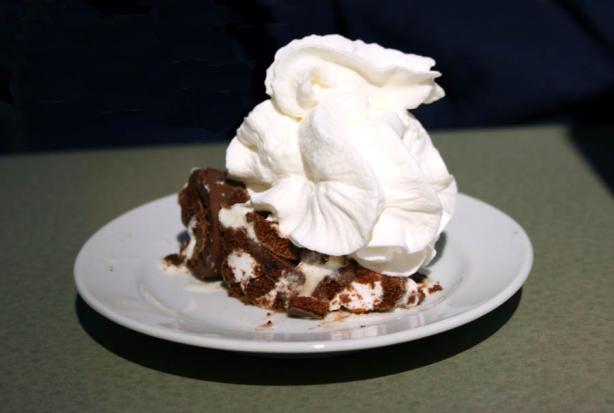
Don't be deterred by the seemingly long and labor intensive recipe. While it does have a lot of steps, they are all easy. Essentially you are making 2 sponge cakes, 1 cheesecake and whipping some cream and slicing strawberries then assembling. It can be broken up over a few days. I made the cheesecake first (this can be made ahead and frozen) then the sponge cake. I whipped the cream just before assembling it on the same day it was served. Below is a picture of the first layer of cake, cream and strawberries, before the cheesecake layer gets put on.


The recipe comes from Junior's Cheesecake Cookbook. It is one of their "Too Tall" recipes - aptly named as these are indeed skyscraping cakes!


Strawberry Shortcake Cheesecake
tall 9" cake | Junior’s Cheesecake Cookbook

Cheesecake layer:
10 oz (1 cup) frozen whole strawberries, thawed and drained well
1/3 cup plus 1 tsp cornstarch
3 (8 oz) packages of cream cheese at room temperature
1 1/3 cups sugar
1 tbsp pure vanilla extract
2 extra large eggs
2/3 cup heavy or whipping cream

For the sponge cake (2 layers):
2/3 cup sifted cake flour
1 1/2 tsp baking powder
1/2 tsp salt
5 extra large eggs, separated and at room temperature
2/3 cup sugar
1 ½ tsp pure vanilla extract
¼ tsp pure lemon extract
¼ cup (1/2 stick) unsalted butter, melted
½ tsp cream of tartar

to assemble and frost:
2 quarts fresh strawberries
1 tbsp unflavored granulated gelatin
3 tbsp cold water
1 quart heavy or whipping cream
1/3 cup sugar
1 tbsp pure vanilla extract

1. Preheat the oven to 350 degrees F. Generously butter the bottom and sides of one 9-inch springform pan and two 9 inch round layer cake pans. Wrap the outside of the springform (but not the cake pans) with aluminum foil, covering the bottom and extending all the way up the sides. Very important: line the bottom of all three pans with parchment or waxed paper (do not let the paper come up the sides).

2. Pulse the thawed strawberries in your food processor until smooth (you need 3/4 cup of puree). Stir in the 1 tsp of cornstarch and set aside. It will thicken slightly as it stands.

3. Put one package of the cream cheese, 1/3 cup of the sugar, and the cornstarch in a large bowl. Beat with an electric mixer on low until creamy, about 3 minutes, scraping down the bowl a few times. Beat in the remaining cream cheese, one package at a time, scraping down the bowl after each. Increase the mixer speed to medium and beat in the remaining 1 cup sugar, then the vanilla. Blend in the eggs, one at a time, beating well after adding each. Beat in the cream just until it’s completely blended. Be careful not to overmix! Fold in the strawberry puree.

4. Gently spoon the batter into the springform, then place it in a large shallow pan containing hot water that comes 1 inch up the sides of the springform. Bake the cake until the edges are light golden brown and the top is set, about 1 ¼ hours. Remove the cake from the water bath, transfer the tin to a wire rack, and let cool in the pan for 2 hours, then cover with plastic wrap and refrigerate until completely cold, about 4 hours. Then freeze overnight until ready to assemble the cake.

5. While the cheesecake is cooling, make the sponge cake layers. Check that the oven is preheated to 350 degrees and that the water bath has been removed. In a small bowl, sift the flour, baking powder, and salt together. Beat the egg yolks in a large bowl with an electric mixer on high for 3 minutes. While the mixer is still running, slowly add 1/3 cup of the sugar and continue beating until thick, light yellow ribbons form in the bowl, about 5 minutes more. Beat in the extracts. Sift the flour mixture over the batter and stir it in by hand, just until no white flecks are visible. Blend in the melted butter.

6. Put the egg whites and cream of tartar in a clean medium size bowl and, using clean, dry beaters, beat the mixer on high until frothy. Gradually add the remaining 1/3 cup sugar and continue beating until stiff peaks form. (the whites will stand up and look glossy, not dry). Fold about 1/3 of the whites into the batter, then add the remaining whites. Don’t worry if you still see a few white specks-they’ll disappear during baking. Divide the batter evenly between the two layer cake pans and bake until golden (not wet or sticky) and the center springs back when lightly pressed, about 12 minutes. Let the cakes cool in the pan on a wire rack for 15 minutes, then turn them out onto the rack and gently peel off the paper liners. Let cool completely, then cover with plastic wrap and refrigerate overnight or until ready to assemble the cake.

7. on the day you plan to assemble the cake, hull 1 quart of the strawberries, then cut them into 1/2 inch pieces (you need 2 cups). Reserve the remaining berries for decorating the cake.

8. Make the frosting. Place the gelatin in a heatproof measuring cup, stir in the cold water, and let stand until it swells and thickens. Cook in the microwave on high for about 30 seconds or over a pan of simmering water for about 1 minute, until clear and completely melted. In a medium size bowl, whip the cream with an electric mixer on high until it thickens and soft peaks just begin to form. With the mixer still running, add the sugar and beat just until the cream stands up in peaks (don’t overmix or the cream will curdle). Beat in the vanilla. Add the melted gelatin all at once and beat until thoroughly incorporated. Refrigerate the cream for at least 30 minutes (preferably no longer than 1 hour) in two bowls: 2 cups in a small bowl for piping decorations on the top of the cake and the remainder in a second larger bowl for frosting the cake. Meanwhile, remove the frozen strawberry cheesecake from the freezer and let stand at room temperature for 10 minutes.

9. Place one layer of the sponge cake, top side down, on a cake plate. Spread evenly with a thin layer of whipped cream frosting from the large bowl and half of the strawberry pieces. Release and remove the ring of the springform, then remove the frozen cheesecake from the bottom of the pan. Peel away the paper liner and place top side down on top of the frosted bottom layer. Press the cheesecake down gently, just enough so the two layers stick together but not enough for the filling to come out the sides. Top the cheesecake layer with some more whipped cream from the large bowl, and sprinkle evenly with the remaining strawberry pieces. Top with the second cake layer of sponge cake, top side up. Frost the top and sides of the cake with the rest of the whipped cream in the large bowl.

10. To decorate, hull the remaining quart of berries and halve them, from top to tip. Place a ring of berries around the bottom edge of the cake, tip ends up. Using 5 or 6 berry halves, make a star in the center of the cake, pointing the tips of the berries away from the center. Fit a pastry bag with a medium closed star tip or medium open star tip and fill the cream from the small bowl. Pipe shells or rosettes around the top edge of the cake and make a large rosette on top of the strawberry pieces.

11. Refrigerate the cake until serving time (it takes at least 2 hours to allow the cheesecake to thaw enough to slice easily. Use a sharp straight edge knife, not a serrated one. Cover and leftover cake and refrigerate.

Thursday, November 17, 2011

Cherry Cheese Pie


Cherry Cheese Pie
9" Pie | adapted from Eagle Brand

I have a soft spot for brand name recipes like those from Pillsbury, Betty Crocker, Campbell's and Eagle Brand that are intended to get you to use more of their products. They are usually convenient, use common pantry ingredients and are fast and easy to prepare.

This dessert starts out with either a graham cracker crust or a baked pie crust. The filling is no-bake. The recipe comes from Eagle Brand and uses sweetened condensed milk of course. They describe this pie as: "Introduced in the 1950's as "Cherry-O Cheese Pie, this unbelievably easy and creamy refrigerator pie can be dressed up for company, or brought to the table for an after dinner treat." 1 (8 ounce) package cream cheese, softened
1 (14 ounce) can sweetened condensed milk
1/3 cup lemon juice
1 teaspoon vanilla extract
1 - 9" baked pie shell or graham cracker crust
1 (21 ounce) can cherry pie filling, chilled

1. In large bowl, beat cream cheese until fluffy. Gradually beat in sweetened condensed milk until smooth. Stir in lemon juice and vanilla.

2. Put a thin layer of cherry filling into the crust, then pour all the cheesecake filling over the cherries into the crust. Chill 4 hours or until set. Top with cherry pie filling [or fresh fruit] before serving. Store in refrigerator.

Friday, October 28, 2011

White Chocolate Espresso Cheesecake


I made this cheesecake for my mother's birthday. It was inspired by some marbled white chocolate covered espresso beans from Everett, WA. Courtesy of my thoughtful boyfriend. He lives across the border and I only get to see him on weekends. Anyone who knows me knows how much I like sugar and how much I adore grocery shopping in the States. I'm in awe of the variety and pricing of everything compared to Canada. So, when my sweetie visits me in Canada he always brings me something sweet and this past weekend it was these chocolate espresso beans.


This cake has melted white chocolate mixed right into the filling and a swirl of espresso to accent both taste and appearance. It's not to sweet and the chopped nuts suspended throughout provide a nice textural contrast to the creamy cheesecake.


White Chocolate Espresso Cheesecake
9" cake | adapted from George Greary

1 1/4 cups vanilla/graham cookie crumbs
1/4 cup butter, melted

3 pkg (8 oz each) cream cheese, softened
1 1/2 cups sour cream
1/2 cup sugar
4 eggs
1/2 oz white chocolate, melted and cooled
1 cup toasted walnuts, chopped
1 tbsp vanilla
1/2 tsp salt
2 tbsp instant coffee powder
1 tbsp cream

1. Preheat oven to 400 degrees F. Combine cookie crumbs and butter and press into a greased 9" spring form pan.

2. Beat together cream cheese, sour cream, vanilla, salt and sugar until very smooth. Add eggs, one at a time, beating after each addition. Pour in melted chocolate and continue beating. Fold in chopped nuts with a rubber spatula.

3. Pour filling over prepared crust, reserving 1 cup of the mixture. In a small bowl dissolve the instant coffee granules in the 1 tbsp cream. Add this coffee mixture to the reserved filling mixture and stir to combine. Drop by the tablespoonfuls over filling in the spring form pan. Marble gently with a knife.

4. Bake for 10 minutes at 400 degrees F then reduce heat to 350 degrees F and continue baking until top is light brown and centre has a slight jiggle. 45-55 mins. Cool in pan on wire rack for at least 2 hours, then refrigerate for at least 6 hours before serving.

Friday, October 14, 2011

Mini White Chocolate Macadamia Cheesecakes


These adorable mini cheesecakes are a twist on my favorite cookie: white chocolate chunk with macadamia nuts. Instead of a graham cracker crust, these are made with a vanilla wafer crust. Creamy white chocolate chunks and richly flavored macadamias are suspended in the cheesecake batter. Because the white chocolate camouflages itself amid the filling, it is a sweet and unexpected surprise when one takes a fork-ful and finds delicious chunks, like hidden treasures, inside the cake.

For me, it's all about the cuteness factor for these cheesecakes. However, you could make one large (8" round) cake from this recipe. To make them even prettier, you could use chocolate curls instead of chunks for decoration. I got lazy and opted for the chunks. For tips on making chocolate curls and other decorations, check out Chocolate Garnish Basics from Better Homes and Gardens.

Mini White Chocolate Macadamia Cheesecakes
approx 6 minis | inspired by The Cheesecake Factory

1 1/2 cup vanilla wafer crumbs
1/4 cup melted butter

2 pkg (8oz each) cream cheese
3/4 cups sugar
3 large eggs
8 ounces sour cream
1 tbsp flour
1 teaspoon vanilla extract
1 cup white chocolate chunks
1/2 cup chopped macadamia nuts

2 tbsp chopped macadamia nuts
White chocolate chunks

1. Crust: Mix vanilla wafer crumbs with melted butter and press into six 3" mini springform pans or lined large muffin tins. Set aside. You may end up with more or less cheesecakes depending on the size of your tins.

2. Filling: Note that all ingredients should be at room temperature before you begin. Remember to scrape down bowl occasionally. Beat cream cheese until light and fluffy. Add the sugar gradually and continue beating until creamy. Add one egg at a time and beat after each egg.

3. When eggs have been mixed into the cream cheese add flour and vanilla. Add the sour cream last and beat well, then fold in white chocolate and macadamia nuts. Pour filling over the crust in the prepared mini pans. Bake until almost set. Approx 35-50 minutes. Cool fully to room temperature then refrigerate overnight before garnishing and serving.

4. Serving: Unmold each cheesecake then arrange chopped macadamia nuts and white chocolate chunks on top. Drizzle with caramel sauce if desired.

Friday, May 27, 2011

Strawberry Marble Cheesecake


Pretty swirls of pink run through this mousse-like cheesecake. It is lighter and fluffier than most cheesecakes, making it a perfect spring dessert. This makes use of the fresh strawberries available this time of year. However, feel free to use frozen berries (thaw and drain excess water first) or raspberries or blueberries or a mixture.


The only change I would recommend to the recipe is that rather than dropping the strawberry topping all on top before swirling it in, I would alternate the layers between cheesecake, pureed berries, cheesecake, berries, for a better distribution of strawberry throughout.


Strawberry Marble Cheesecake
9" Cake | adapted from Cooking Light

3/4 cup graham cracker crumbs
1/3 cup sugar
1/3 cup melted butter 2 cups cottage cheese, well drained
1/4 cup flour
2 cups (16 ounces) light cream cheese, well softened
1/2 cup sugar
2 teaspoons vanilla extract
3 eggs
1/2 cup strawberries
1 teaspoon water

1. Preheat oven to 450 degrees F. Combine graham crackers with 1/3 cup sugar and 1/3 cup butter. Press into bottom of a 9-inch springform pan.

2. Place cottage cheese in a food processor, and process until smooth. Lightly spoon flour into a dry measuring cup; level with a knife. Combine flour, cream cheese, and sugar in a large bowl; beat with a mixer at low speed until smooth. Beat in cottage cheese and vanilla. Add eggs 1 at a time, beating well after each addition. Pour cheese mixture into prepared pan.

3. Combine strawberries and water in a blender, and process until smooth. Swirl strawberry mixture into cheese mixture using the tip of a knife. Bake at 450 degrees F for 15 minutes. Reduce oven temperature to 250 degrees F (do not remove cheesecake from oven); bake an additional 45 minutes or until cheesecake center barely moves when pan is touched. Remove cheesecake from oven; run a knife around the outside edge. Cool to room temperature then cover and chill fully - overnight is best.

Sunday, February 27, 2011

DB: Panna Cotta and Florentines


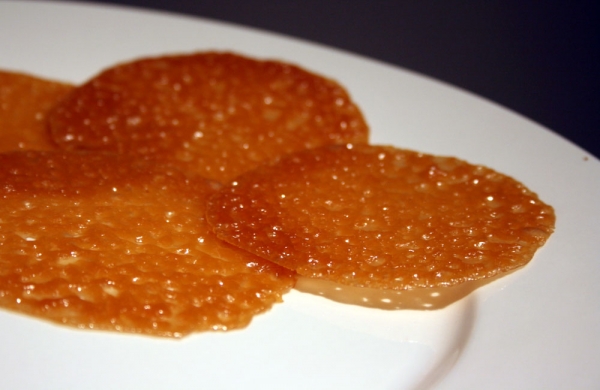
The February 2011 Daring Bakers’ challenge was hosted by Mallory from A Sofa in the Kitchen. She chose to challenge everyone to make Panna Cotta from a Giada de Laurentiis recipe and Nestle Florentine Cookies.


I made mine lemon-flavored by using lemon gelatin powder instead of plain and throwing in some lemon zest. I made mine in a spring form pan atop a graham cracker crust, much like a no-bake cheesecake. It was delicious, but next time I will let it set a little longer in the fridge before digging in.


The florentines were delicate, crisp and lacy. Word of caution: You absolutely need a silicone mat or parchment for easy removal from the baking tray.

Lemon Panna Cotta
adapted from Giada de Laurentiis

1 cup whole milk
2 tablespoons lemon flavored Jell-o powder
3 cups whipping cream
1/3 cup honey
1 tablespoon sugar
zest from 1 lemon
Pinch salt

Place the milk in a small bowl. Sprinkle the gelatin over. Let stand for 3 to 5 minutes to soften the gelatin. Pour milk mixture into a heavy saucepan and stir over medium heat just until the gelatin dissolves but the milk does not boil, about 5 minutes. Add the cream, honey, sugar, zest and salt. Stir until the sugar dissolves, 5 to 7 minutes. Remove from the heat. Pour into serving dishes. Cool slightly. Refrigerate until set, at least 6 hours.

Florentines
Nestle

2/3 cup unsalted butter
2 cups quick oats
1 cup granulated sugar
2/3 cup flour
1/4 cup dark corn syrup
1/4 cup whole milk
1 tsp vanilla extract
pinch of salt
1 1/2 dark or milk chocolate

Preheat oven to 375 degrees F. Prepare your baking sheet with silpat or parchment paper. Melt butter in a medium saucepan, then remove from the heat.

To the melted butter add oats, sugar, flour, corn syrup, milk, vanilla, and salt. Mix well. Drop a tablespoon full, three inches apart, onto your prepared baking sheet. Flatten slightly.

Bake in preheated oven for 6-8 minutes, until cookies are golden brown. Cool completely on the baking sheets.

While the cookies are cooling melt your chocolate until smooth either in the microwave (1 1/2 minutes), or stovetop (double boiler).

Peel the cookies from the silpat or parchment and place face down on a wire rack set over a sheet of wax/parchment paper. Spread a tablespoon of chocolate on the bottom of your cookie, sandwiching another cookie atop the chocolate.

Sunday, February 6, 2011

Junior's Famous Cheesecake


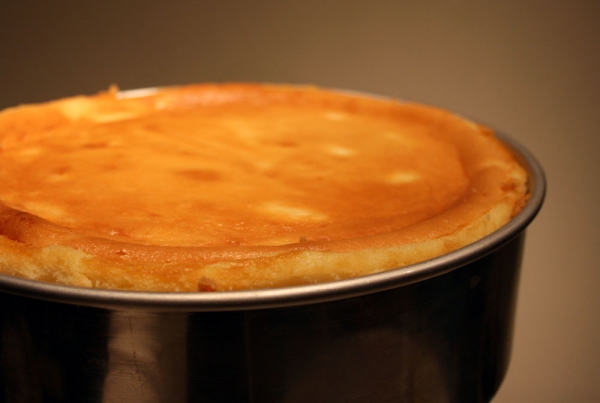
This has got to be THE BEST New York Cheesecake that I have ever tasted. It is a clone of the famous Junior's Cheesecake from New York of course! The most important part when making any cheesecake is to make sure the cream cheese, eggs, heavy cream are all at room temperature so they combine smoothly and homogonously. The more subtle the changes in temperature, the less likely your cake is to crack. That's why a water bath helps - because it stabilizes the temperature of the cheesecake.


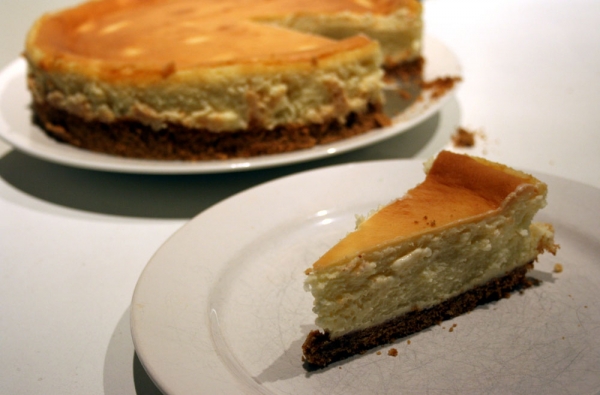
This is the ultimate pure cheesecake. I'm not exaggerating. Cheesecake lovers, you MUST try this. There's no chocolate marble or strawberry swirl to take the glory away from the ultra-dreamy filling. The top is slightly sweeter from the beautiful caramellization while the inside is smooth and creamy. The only change I made to the original recipe is that I used a graham cracker crust instead of a sponge cake crust.

I will also be including this in my Copycat Club Feb/11 round-up. Please join me - see link above :)

Junior's Original New York Cheesecake
10" Cake | Junior's Cheesecake Cookbook

Sponge Cake Layer
1/2 cup sifted cake flour
1 teaspoon baking powder
1 pinch salt
3 large eggs, seperated
1/3 cup sugar
2 tablespoons sugar
1 teaspoon pure vanilla extract
3 drops lemon extract
3 tablespoons unsalted butter, melted
1/4 teaspoon cream of tartar

Cheesecake Filling
4 (8 ounce) packages cream cheese
1 2/3 cups sugar
1/4 cup cornstarch
1 tablespoon pure vanilla extract
2 large eggs
3/4 cup heavy whipping cream

SPONGE CAKE BASE:
Preheat the oven to 350 F and generously butter a 9-inch springform pan. Sift the cake flour, baking powder, and salt together ina medium sized bowl and set aside.

Beat the egg yolks together in a large bowl with an electric mixer on high for 3 minutes. Then, with the mixer still running, gradually add the 1/3 cup of sugar and continue beating until thick light-yellow ribbons form in the bowl, about 5 minutes more. Beat in the vanilla and lemon extracts.

Sift the flour mixture over the batter and stir it in by hand until mo more white flecks appear then blend in the butter. In a clean bowl, using clean dry beaters, beat the egg whites and cream of tartar together on high until frothy. Gradually add the remaining 2 tablespoons sugar and continue beating until stiff peaks form (the whites should stand up in stiff peaks, but not be dry). Stir about 1/3 cup of the whites into the batter, then gently fold in the remaining whites (don't worry if a few white specks remain). Gently spoon the batter into the pan.

Bake the cake just until the center of the cake springs back when lightly touched, only about 10 minutes (watch carefully!) Let the cake cool in the pan on a wire rack while you continue making the cheesecake filling. Do not remove the cake from the pan.

FILLING:
Place one 8-ounce package of the cream cheese, 1/3 cup of the sugar, and the cornstarch in a large bowl. Beat with an electric mixer on low until creamy, about 3 minutes, then beat in the remaining 3 packages of the cream cheese. Increase the mixer speed to high and beat in the remaining 1 1/3 cups of the sugar, then beat in the vanilla. Blend in the eggs, one at a time, beating the batter well after each one. Blend in heavy cream. At this point mix the filling only until completely blended (just like they do at Junior's) Be careful not to overmix the batter.

Gently spoon the cheese filling on top of the baked sponge cake layer. Place the springform pan in a large shallow pan containing hot water that comes about 1 inch up the side of the pan.

Bake the cheesecake until the center barely jiggles when you shake the pan, about 1 hour. Cool the cake on a wire rack for 1 hour. Then cover the cake with plastic wrap and refrigerate until it's completely cold, at least 4 hours or overnight. Remove the sides of the springform pan. Slide the cake off of the bottom of the pan onto a serving plate. Or, if you wish, simply leave the cake on the removable bottom of the pan and place it on a serving plate.

Store any leftover cheesecake in the refrigerator.

Friday, August 27, 2010

DB: Petit Fours


The August 2010 Daring Bakers’ challenge was hosted by Elissa of 17 and Baking. For the first time, The Daring Bakers partnered with Sugar High Fridays for a co-event and Elissa was the gracious hostess of both. Using the theme of beurre noisette, or browned butter, Elissa chose to challenge Daring Bakers to make a pound cake to be used in either a Baked Alaska or in Ice Cream Petit Fours. The sources for Elissa’s challenge were Gourmet magazine and David Lebovitz’s “The Perfect Scoop”.


I didn't do the ice-cream filling because I am not a fan of cake and ice cream together. Last month's challenge was also a cake/ice cream combo so I thought I'd skip that part this time around. Sorry Elissa!

Instead of chocolate, I covered these cute little cakes with a poured fondant. 1/2 white, 1/2 pink then a drizzle of the opposing color on top of each of them. It was a fun, slightly messy and utterly delicious project.

I also used a Brown Sugar Pound Cake recipe from Martha Stewart instead of the Brown Butter Pound Cake from Gourmet. This cake had a nice, tight crumb, sliced wonderfully even into the thinnest of layers and held its shape and sharp corners when it was cut.

Thursday, August 5, 2010

Blueberry Lemon Cream Cake


After anxiously waiting for the marks to be released, I found out that I PASSED my accounting exam! I can add those 3 little letters - CMA - after my name. It feels fantastic and this cake was a great way to celebrate!

It has 4 thin layers of lemon flavored sponge cake sandwich 3 layers of fresh, plump blueberries suspended in a slightly tart lemon cream filling. This was a delightfully light and summery dessert. Fancy enough for a special occasion yet not overly fussy.

The recipe comes from The Complete Canadian Living Baking Book: The Essentials of Home Baking.

Note: It's important to use an electric mixer for the cake to get the maximum rise by beating the eggs thoroughly.


Blueberry Lemon Cream Cake
1 - 10" Caks | adapted from Canadian Living

3 cups (750 mL) raspberries (or any fresh berries)
1 tbsp (15 mL) icing sugar

Sponge Cake:
6 eggs
1 cup (250 mL) granulated sugar
1 tsp (5 mL) vanilla
1 cup (250 mL) all-purpose flour
1/2 tsp (2 mL) baking powder
1/4 tsp salt
1/3 cup (75 mL) butter, melted

Lemon Cream:
1 pkg unflavoured gelatin
3 eggs
2 egg yolks
1-1/4 cup (300 mL) granulated sugar
1 tbsp (15 mL) grated lemon rind
2/3 cup (150 mL) lemon juice
1-1/3 cups (325 mL) whipping cream

1. Sponge Cake: Line bottom of 10" springform pan with parchment paper; grease side. Set aside. Set eggs in bowl of warm (100°F/40°C) water for 5 minutes.

2. In electric stand mixer on medium-high speed, beat eggs until foamy. Gradually beat in sugar until pale yellow and batter falls in ribbons when beaters are lifted, about 10 minutes. Fold in lemon rind and vanilla.

3. Sift together flour, baking powder and salt ; sift one-third over egg mixture and fold in. Repeat twice. Transfer one-quarter to bowl; fold in butter. Fold back into remaining batter. Pour into prepared pan.

4. Bake in centre of 325°F (160°C) oven until cake springs back when lightly touched in centre, 45 to 50 minutes. Let cool in pan on rack for 10 minutes. Remove side of pan; let cool on rack. (Make-ahead: Wrap in plastic wrap and store for up to 24 hours, or overwrap with heavy-duty foil and freeze for up to 2 weeks.)

5. Lemon Cream: In small bowl, sprinkle gelatin over 3 tbsp (50 mL) water; set aside. In heatproof bowl, whisk together eggs, egg yolks, sugar, lemon rind and lemon juice. Place over simmering water; cook, stirring frequently, until translucent and thick enough to softly mound on spoon, about 20 minutes.

6. Strain into large bowl. Stir in gelatin mixture until melted. Place plastic wrap directly on surface; refrigerate, stirring every 10 minutes, until cool and mixture can mound on spoon, about 1 hour. In bowl, beat cream; fold one-third into lemon mixture. Fold in remaining cream. Fold in 2-1/3 cups (575 mL) of the berries; set aside.

7. Assembly: Line bottom and side of same pan with waxed/parchment paper. Cut cake horizontally into thirds. Place top cake layer, cut side up, in pan. Spread with half of the lemon cream. Top with middle cake layer, remaining lemon cream and remaining cake layer, cut side down. Cover and refrigerate until set, about 4 hours. (Make-ahead: Refrigerate for up to 24 hours.)

8. To serve, remove side of pan. Sprinkle top with icing sugar. Arrange remaining berries around top edge.

Monday, July 26, 2010

DB: Swiss Swirl Ice Cream Cake


The July 2010 Daring Bakers’ challenge was hosted by Sunita of Sunita’s world – life and food. Sunita challenged everyone to make an ice-cream filled Swiss roll that’s then used to make a bombe with hot fudge. Her recipe is based on an ice cream cake recipe from Taste of Home.


For a PDF of this month's challenge including the recipe, click here.


*My Changes*
I have a very small freezer and do not have the luxury of having a deep freezer, so I have to constantly calculate and plan ahead to allocate freezer space. For this reason, I only made a fraction of the recipe. My finished product was assembled in a 1.5 quart bowl! I think there was no more than 2 cups of ice cream in my cake. With this small amount of ice cream I didn't bother doing chocolate and vanilla. I did all vanilla with a layer of chocolate syrup in the middle. It was just right for 4 servings and no leftovers.

I made and baked the cake on a swiss roll pan just like how you make normal swiss rolls. When it is baked, I divided the whole sheet into thirds then filled and rolled as usual, thus making mini swiss rolls. I loved how easy the sponge cake was to roll up. I have never made a swiss roll before and it always seemed quite daunting. Now, I'm all ready to experiment with different fillings and sizes. I'm now on the lookout for a not too sweet filling that will hold well at room temperature so I can save on fridge/freezer space :)

Sunday, July 4, 2010

Junior's Caramel Apple Cheesecake


If you often experience the problem of cheesecakes cracking along the top, this recipe is perfect for you. The apple topping hides any potential cracks in the cake while adding a wonderful, homey, comforting flare to this deliciously smooth cheesecake. It's like the best of both worlds - apple pie and creamy cheesecake, all topped off with a drizzle of caramel.

The flavors seem more suited to autumn than to summer, but with the weather we've been having, it sure feels more like October than July! I'm sitting indoors wrapped up in 2 blankets with the heater on wearing a fleece hoodie for goodness sake!


Junior’s Apple Caramel Cheesecake
1 - 9" Cake | adapted from Junior's Cheesecake Cookbook

1 prepared 9" graham crust

Apple Topping:
3 large firm, crisp red-skinned apples
1/2 cup apple cider or apple juice
1 tablespoon cornstarch
1/4 teaspoon ground cinnamon

Cheesecake:
Three 8-ounce packages cream cheese (use only full fat), room temperature
1 1/3 cups sugar
1/4 cup cornstarch
1 tablespoon pure vanilla extract
2 extra-large eggs
2/3 cup heavy or whipping cream

1 cup caramel or butterscotch ice cream topping

1. Filling, peel and core the apples for the filling into 1/2" bite-size pieces. Combine the cider, cornstarch, sugar, and cinnamon in a small saucepan and whisk until completely dissolved. While stirring constantly, bring to a full boil over medium heat and continue to boil until thickened, about 2 minutes. Remove from the heat and stir in the apples. Set aside to cool while you make the cake.

2. Put one package of the cream cheese, 1/3 cup of the sugar, and the cornstarch in a large bowl. Beat with an electric mixer on low until creamy, about 3 minutes, scraping the bowl down several times. Blend in the remaining cream cheese, one package at a time, scraping down the bowl after each one. Increase the mixer speed to medium and beat in the remaining 1 cup of sugar, then the vanilla. Blend in the eggs, one at a time, beating well after adding each one. Beat in the cream just until completely blended. Be careful not to over mix! Gently spoon the batter on top of the crust, then spoon the apple mixture over the batter, gently spreading it almost to the edge of the pan, completely covering the cake.

3. Place the cake in a large shallow pan containing hot water that comes about 1 inch up the sides of the springform. Bake until the edges are light golden brown and the top is slightly golden tan, about 1 1/4 hours. Remove the cheesecake from the water bath, transfer to a wire rack, and let cool for 2 hours (just walk away—don’t move it). Leave the cake in the pan, cover loosely with plastic wrap, and refrigerate until completely cold, preferably overnight or at least 4 hours.

4. Warm the caramel ice cream topping then drizzle it from the tip of a small spoon in stripes across the top of the cake, all around the edges, and some down the sides. Return the cake to the freezer until the caramel has set, 30 minutes. Refrigerate the cake until ready to serve. Slice with a sharp straight-edge knife, not a serrated one. Cover any leftover cake and refrigerate.

Sunday, June 27, 2010

DB: Pink Pavlova Cookies


The June 2010 Daring Bakers’ challenge was hosted by Dawn of Doable and Delicious. Dawn challenged the Daring Bakers’ to make Chocolate Pavlovas and Chocolate Mascarpone Mousse. The challenge recipe is based on a recipe from the book Chocolate Epiphany by Francois Payard.

I took some liberties with this recipe because of the group I was cooking for. They are not chocolate fans so I had to adapt and also to fit the them
e of a 21st birthday. It turned out pretty well and I'm pretty pleased.
1) I didn't do the chocolate part of this recipe. Instead I went with vanilla flavoring and colored these pretty in pink.
2) They were filled with a whipped sweetened cream cheese filling.
3) I made them cookie sized - individual sizes pavlovas.

Next time I'll try the chocolate version. Thanks for a great challenge! I made these ahead of time and only put the filling in at the last minute. Sorry, no pics of the filled version, it was too rushed at serving time to snap any pictures.

Tuesday, June 8, 2010

TWD: Strawberry Shortcakes


Random info: the Strawberry Shortcake doll was updated in 2008: She has a cell phone now, doesn't wear blush and has a tinge of lipstick. She also has forgone gumdrops in favor of freah fruit. Those marketing people must have so much fun dreaming up all this stuff.


These are delicate and crumbly and wonderful. I cut mine into rectangles to avoid having leftover pieces to squish together. I didn't serve them warm out of the oven as recommended. I only served them later in the day and I zapped them for 15-20 seconds each in the microwave to heat before filling with ice cream (instead of whipped cream) and sugar-tossed sliced strawberries. It tasted like the embodiment of summer. I almost forgot about our erratic BC weather. I have yet to put away my winter jackets because some days it's still so cold here!


I read that this recipe made a big batch so I made 1/2 a batch with less sugar and used them to make ham and cheese 'sandwiches' that got toasted in the oven just until the cheese melted. The slight sweetness actually went really well with the cheese and ham. My son's not a big sandwich eater but he actually ate them without bribery! Sweet or savory, these are yummy!

Thanks to Cathy for a yummy treat that will hopefully kick off more good weather in the weeks to come.

Tuesday, June 1, 2010

TWD: (Not) White Chocolate Brownies with Brown Butter Frosting


Marthe of Culinary Delights selected White Chocolate Brownies on pages 110 and 111 of THE BOOK. I am the hugest white chocolate fan ever. I'll pick vanilla over chocolate hands-down anyday. I should have been all over these but silly me, I forgot to buy white chocolate. The lack of white chocolate combined with my aversion to meringue meant that these evolved into milk chocolate brownies with brown butter frosting. I also added a crushed Ritz cracker crust for that salty/sweet balance. I'm glad I did as the brownie itself was pretty sweet.

On a side note to White Chocolate Lovers (or Haters, we'll convert you lol ): I beg you to try a warm (Copycat) Moxie's Restaurant White Chocolate Brownie dressed up with whipped cream, vanilla ice cream and hot fudge sauce. Let me just say one more thing to convince you: the recipe for a 9" pan calls for 1/2 lb. white chocolate plus 1/2 cup more chocolate chips!


Brownies with Brown Butter Frosting
9x13 pan | Adapted significantly from Dorie Greenspan

2 cups crushed Ritz crackers
1/2 cup sugar
1/3 cup butter, melted

2/3 cup all-purpose flour
1/2 cup finely ground almonds
1/2 teaspoon salt
1/2 cup butter, cut into 8 pieces
4 ounces milk chocolate, coarsely chopped
1 cup sugar
4 large eggs
1 teaspoon pure vanilla extract
1 cup raspberries

1. Center a rack in the oven and preheat the oven to 325 degrees F. Butter a 9-x-13-inch pan. Combine crushed crackers, sugar and melted butter. Press into bottom of pan.

2. Whisk together the flour, ground almonds and salt. Melt butter and white chocolate using a double boiler.

3. Cream together butter and sugar. Add the eggs and beat on medium-high speed for about 3 minutes, or until pale and foamy. Beat in the vanilla. Reduce the mixer speed to low and blend in the melted butter and chocolate. Still working on low, mix in the dry ingredients, stirring only until they disappear into the batter. Scrape the batter into the prepared pan and sprinkle the raspberries evenly over the batter.
Bake for 30 to 35 minutes, or until the brownies pull away from the sides of the pan. Transfer the pan to a rack and allow to cool to room temperature in the pan. Frost with brown butter frosting when completely cool.

*Kept in the pan and covered lightly with plastic wrap, the brownies can be kept at room temperature overnight. Or wrap the brownies airtight and keep them at room temperature for up to 3 days and frozen for up to 2 months.

Brown Butter Frosting
Real Simple, May 2007

6 tablespoons unsalted butter
1 pound confectioners' sugar
1/4 cup whole milk
1 teaspoon corn syrup

1.Brown the butter: Melt the butter in a skillet or small saucepan over medium heat. Swirl or stir the butter with a wooden spoon as it starts to foam and sputter. Remove the butter from the heat as soon as it begins to turn golden brown and smells nutty, about 1 minute. Strain through a fine sieve or coffee filter and let cool to room temperature.

2.Meanwhile, place the confectioners' sugar, milk, and corn syrup in the bowl of an electric mixer fitted with a whisk. Beat to combine.

3.With the mixer on medium, drizzle in the brown butter a little at a time, waiting until it is absorbed before adding more. Beat in another teaspoon of milk to make the frosting creamier, if necessary.

Thursday, May 27, 2010

DB: Piece Montée, deconstructed


The May 2010 Daring Bakers’ challenge was hosted by Cat of Little Miss Cupcake. Cat challenged everyone to make a piece montée, or croquembouche, based on recipes from Peter Kump’s Baking School in Manhattan and Nick Malgieri.

I must apologize... I am under a ton of stress right now so I didn't make this the real Daring Baker's way. I did cream puffs and a separate batch of toffee that I crumbled into bits to sprinkle on top of the whipped cream/ice cream to serve.

My stress is due to a HUGE due date coming up - the final report for my Accounting designation. If I pass this (last year's pass rate was 70%), I will be done done done with school. I will be a full fledged accountant!

I really enjoyed making the choux pastry and wondered why I don't make it more often! It's one of those little things that brings a smile to my face as the choux pastry "magically" rises in the oven into a light, fluffy, hollow pouf that is ready to be filled with whatever you can dream up. I've seen them used in savory applications although I think being the sugar-addict I am, I'll stick to sweet fillings.

I filled these with a simple vanilla pastry cream and made a separate batch of toffee brittle (instead of the hard caramel sauce). I think I'm going to fill the extra puffs with vanilla ice cream and freeze them for anytime-treats. I used Martha Stewart's recipes for both the pastry and pastry cream.

Check out the DB blogroll for real awesome croquembouches, unlike my cheater version.

Choux Pastry
Makes 2 dozen | Martha Stewart's Baking Handbook

1/2 cup (1 stick) unsalted butter, cut into 1/2-inch pieces
1 teaspoon sugar
1/2 teaspoon salt
1 1/4 cups all-purpose flour
4 large eggs, plus 1 large egg white if needed

1. Bring butter, sugar, salt, and 1 cup water to a boil in a medium saucepan. Remove from heat. Using a wooden spoon, quickly stir in flour. Cook over medium-high heat, stirring constantly, until mixture pulls away from sides and a film forms on bottom of pan, about 3 minutes.

2. Transfer to the bowl of an electric mixer fitted with the paddle attachment. Mix on low speed until slightly cooled, about 1 minute. Raise speed to medium; add whole eggs, 1 at a time, until a soft peak forms when batter is touched with your finger. If peak does not form, lightly beat remaining egg white, and mix it into batter a little at a time until it does. Use immediately.

3. Using a large plain piping tip, pipe 2" circles of pastry onto parchment paper or silicone-lined baking sheet. They don't need to be spaced very far apart as they don't spread, they just puff! Freeze for at least 30 minutes or once frozen, transfer to an airtight container and freeze for up to 3 weeks. Bake from frozen at 375 degrees F for 25-30 minutes until golden brown. Store air tight at room temperature. You can also freeze these after they are baked and then to serve later, bring to room temperature and re-crisp in the oven for a few minutes.

4. Slice them in half and fill with sweetened whipped cream or pastry cream (recipe follows).

Pastry Cream
Makes 1 1/2 cups | Martha Stewart's Cupcakes

4 large egg yolks
1/2 cup sugar
1/4 cup cornstarch
Pinch of salt
2 cups milk
1 1/4 teaspoons pure vanilla extract

1. Whisk egg yolks until smooth in a large bowl. Combine sugar, cornstarch, and salt in a medium saucepan, and heat over medium. Stirring constantly, gradually add milk in a slow, steady stream, and cook until mixture thickens and begins to bubble, about 5 minutes.

2. Whisking constantly, slowly pour one third of the milk mixture into egg yolks (this step is called tempering, which keeps the yolks from curdling). Pour mixture into remaining milk mixture in saucepan. Cook over medium heat, whisking constantly, until mixture comes to a full boil and is thick enough to hold its shape when lifted with a spoon, 2 to 4 minutes. Remove from heat; stir in vanilla.

3. Strain mixture through a fine sieve into a heatproof bowl. Cover with parchment paper or plastic wrap, pressing it directly on surface to prevent a skin from forming. Refrigerate until chilled and firm, at least 2 hours (or up to 2 days).

Toffee Recipe from Recipezaar

Wednesday, April 28, 2010

Mini Caramilk (Chocolate n' Caramel) Tarts


You might never have heard of a Caramilk bar if you aren't Canadian. You're missing out!!! This milk chocolate bar features creamy Cadbury chocolate that encases a soft, flowing caramel filling in each square. Caramilk was first developed at the Masson Street plant in Montreal and currently is manufactured at the Cadbury Gladstone Chocolate Factory in downtown Toronto – the only place in the world where Caramilk is made.

These tarts are inspired by the Caramilk chocolate bar. They are a simple sweet fully baked pastry shell filled with melted milk chocolate ganache swirled together with creamy caramel. It's a good thing they're bite sized because they sure are rich! Note: Caramilk bars don't have almonds, I just garnished using an almond because they're pretty ;)


Mini Caramilk (Chocolate n' Caramel) Tarts
Makes 12

12 Mini Fully Baked Sweet Tartlet Shells (recipe follows)

Caramel
1 cup granulated sugar
1/4 cup water
1/2 cup unsalted butter, cubed
1/2 tsp salt
3 tbsp heavy cream

Ganache
200g milk chocolate, chopped
3 tbsp heavy cream
1 tbsp unsalted butter, cubed
1/4 tsp salt

1. Bake the shells ahead of time and cool fully.

2. Make the caramel: In a heavy based frying pan, dissolve the sugar in water over low heat. Increase the heat until the syrup turns a deep amber colour. Don't stir the pan or the sugar will crystallise - you can swirl the pan a little to cook the caramel evenly. Take off the heat and leave to cool for 1-2 minutes, then stir in the butter with the salt. Set aside for 2 minutes and then whisk in the cream, beating until smooth and glossy. Transfer to a glass bowl and chill for 15 minutes to cool and thicken.

3. Make the ganache: Heat the chocolate, cream, butter and salt in a heatproof bowl over a pan of simmering water, stirring until smooth.
Set aside to cool a little.

4. Loosely swirl the caramel and chocolate mixtures together and to fill each tart case with a generous tablespoon. Decorate with a nut on top or a dusting of fleur de sel or leave plain as is. Serve at room temperature.

Miniature Tartlet Shells
Makes 12 – 1" shells | Adapted from Sweet Miniatures, Flo Braker

1 1/2 cups flour
1/8 tsp salt
1/3 cup sugar
1 cup (2 sticks) cold unsalted butter, cut into small cubes
1 large egg
1 tsp pure vanilla extract

1. Put the flour, salt and sugar in a food processor bowl. Pulse a few times to blend. Scatter all the butter over the flour, pulse until the mixture has the consistency of cornmeal.
2. Whisk egg and vanilla together in a small bowl. With the motor on, pour the egg mixture down the feed tube. Process until the mixture forms a ball. Remove to the lightly floured work surface, press the dough together until it is smooth and cohesive.

3. Grease 12 mini muffin tins. Either roll out the dough then fit into the tartlet tins. Or, pinch about 1 tsp of dough and press into the tins to distribute the dough evenly. Don't make shells too thick. Freeze for 15-30 minutes while the oven is preheating.

4. Bake for 10-12 minutes at 350 degrees F or until lightly golden and fully baked. Cool. When cool enough to touch, remove from tins and fill as desired. The pre-baked, unfilled shells can be kept at room temperature for up to 1 week airtight.