I love Asian style breads. They are so soft and fluffy with a hint of sweetness. I also like the perfect square shape of the loaves which are often baked in Pullman Loaf Tins. However, I don't have one of those, so I bake mine in a regular loaf pan. This is a super easy recipe with wonderful results. There are other more complex recipes that look like they produce great breads using the Tang Zhong Method but they are time consuming. One day I intend to delve into the world of Tang Zhong, but for now these are an easy way to enjoy some delicious milk bread.
This time I decided to make the milk bread dough into buns for burgers or sandwiches. They sweetness of milk bread reminds me of those Hawaiian Rolls that are oh so good for burgers, so that's where I took my inspiration for these buns from.
It is also a wonderful way to use up extra milk you might have. I often have too much milk in the house because my son doesn't like drinking it but I keep buying it and hounding him to drink it for the calcium. The recipe calls for 3/4 cup heavy cream but you could use all milk instead and add 1/4 cup melted butter to make up for the loss of the milk fat from the cream.
Here are our grilled chicken breast burgers stuffed to the max with sauteed onions, lettuce, tomato, cheese and honey mustard! A sprinkling of flavored sea salt goes a long way, just like this Sea Salt with Chili for a hint of smoky flavor and kick on your burger.

Hokkaido Milk Bread
Makes 2 loaves | Adapted from Rasa Malaysia
1 cup milk
3/4 cup whipping cream
4 tbsp sugar
3 tsp active dry yeast or bread machine yeast
1 large egg
4 1/2 cups bread flour
1/2 cup all purpose flour
1/2 tbsp salt
1. Bread Machine: Put milk, whipping cream, egg, flour, milk powder, salt, sugar and yeast into the bread machine. Set to Dough function. After the dough has finished it’s kneading cycle, let it proof inside the machine for 45-50 minutes or till it is double in size.
Non-Bread Machine: Warm the milk and cream to 105 degrees F (slightly warmer than body temperature). Stir in sugar to dissolve. Stir in yeast. Let sit for 5 minutes or until yeast is foamy, then beat in egg. In the meantime, mix 4 cups bread flour and salt in a large bowl. Add the yeast mixture to the flour mixture. It will be stick. Add the remaining 1/2 cup of flour if needed. Try to add as little flour as possible to keep your loaf soft. Too much flour will make it dry. Turn the dough out onto a floured surface and knead it into a smooth ball. Put the ball in a greased bowl and cover. Let rise for 1 hour (almost doubled in size).
2. Shaping:
Remove from the pan and divide dough into 2 equal portions. On a lightly floured surface, flatten the ball and roll out in a rectangle shape. Roll it up again tightly like swiss roll. Place dough in the prepared bread tin. Repeat with the second ball.
Set aside and let rise 1 hr or until it fills 75% of the bread tin. {I shaped mine into 8 balls and put them on a cookie sheet to rise. They made buns approximately the same size as kaiser rolls.}
3. Bake the loaves at 350 degrees F for approximately 40-50 minutes or until golden brown. {I baked my buns for only 20 mins}.


 Sometimes when life is stressful, hectic and overwhelming I like to go back to simpler things in life like kneading bread dough and making something wholesome and practical, such as this loaf of sandwich bread. The powdery flour beneath my hands as I work the dough into a smooth, silky ball. The sensation grounds me and my efforts are rewarded by a beautiful, perfectly domed loaf of bread. Delicious, soft, amazing.This sunflower-seed studded bread is approx 60% whole wheat. It is very easy to handle and almost all the mixing is done in a stand mixer. Not dense or heavy in the least. With its golden-brown crust and light texture, this bread goes is good anytime but impossible to stay away from when it is fresh from the oven.The recipe is adapted from
  Honey Whole Wheat Sunflower Bread1 loaf | adapted from ATK
1 cup warm whole milk (about 110 degrees)
1/3 cup warm water (about 110 degrees)
6 tablespoons unsalted butter, melted
3 tablespoons honey
2 1/4 tsp active dry yeast
1 3/4 cup whole wheat flour
2 cups all-purpose flour
2 teaspoons salt
3/4 cup salted sunflower seeds
1. Mix flours and the salt in the bowl of a standing mixer fitted with the dough hook. Mix the milk, water, butter, honey, and yeast in a liquid measuring cup. Turn the machine to low and slowly add the liquid. When the dough comes together, increase the speed to medium and mix until the dough is smooth and satiny, stopping the machine two or three times to scrape dough from hook, if necessary, about 10 minutes. (After 5 minutes of kneading, if the dough is still sticking to the sides of the bowl, add flour, 1 tablespoon at a time and up to 1/4 cup total, until the dough is no longer sticky.) Turn the dough onto a lightly floured work surface; knead to form as mooth, round ball, about 15 seconds.
2. Place the dough in a very lightly oiled large bowl, rubbing the dough around the bowl to coat lightly. Cover the bowl with plastic wrap and place in the warmed oven until the dough doubles in size, 40 to 50 minutes.
3. Roll dough into a rectangle 1" thick. With the long side facing you, roll the dough firmly into a cylinder, pressing with your fingers to make sure the dough sticks to itself. Pinch it closed. Place the dough seam-side down in a greased 9 x 5" loaf pan and press it gently so it touches all four sides of the pan. Cover and set aside in a warm spot until the dough almost doubles in size, 20-30 minutes.
4. While dough is rising, preheat oven to 350 degrees F. Bake until an instant-read thermometer inserted at an angle from the short end just above the pan rim into the center of the loaf read 190 degrees, 40-50 minutes. Remove from oven and cool in pan for a few minutes then remove the bread from the pan and cool fully on wire rack.
Honey Whole Wheat Sunflower Bread1 loaf | adapted from ATK
1 cup warm whole milk (about 110 degrees)
1/3 cup warm water (about 110 degrees)
6 tablespoons unsalted butter, melted
3 tablespoons honey
2 1/4 tsp active dry yeast
1 3/4 cup whole wheat flour
2 cups all-purpose flour
2 teaspoons salt
3/4 cup salted sunflower seeds
1. Mix flours and the salt in the bowl of a standing mixer fitted with the dough hook. Mix the milk, water, butter, honey, and yeast in a liquid measuring cup. Turn the machine to low and slowly add the liquid. When the dough comes together, increase the speed to medium and mix until the dough is smooth and satiny, stopping the machine two or three times to scrape dough from hook, if necessary, about 10 minutes. (After 5 minutes of kneading, if the dough is still sticking to the sides of the bowl, add flour, 1 tablespoon at a time and up to 1/4 cup total, until the dough is no longer sticky.) Turn the dough onto a lightly floured work surface; knead to form as mooth, round ball, about 15 seconds.
2. Place the dough in a very lightly oiled large bowl, rubbing the dough around the bowl to coat lightly. Cover the bowl with plastic wrap and place in the warmed oven until the dough doubles in size, 40 to 50 minutes.
3. Roll dough into a rectangle 1" thick. With the long side facing you, roll the dough firmly into a cylinder, pressing with your fingers to make sure the dough sticks to itself. Pinch it closed. Place the dough seam-side down in a greased 9 x 5" loaf pan and press it gently so it touches all four sides of the pan. Cover and set aside in a warm spot until the dough almost doubles in size, 20-30 minutes.
4. While dough is rising, preheat oven to 350 degrees F. Bake until an instant-read thermometer inserted at an angle from the short end just above the pan rim into the center of the loaf read 190 degrees, 40-50 minutes. Remove from oven and cool in pan for a few minutes then remove the bread from the pan and cool fully on wire rack.
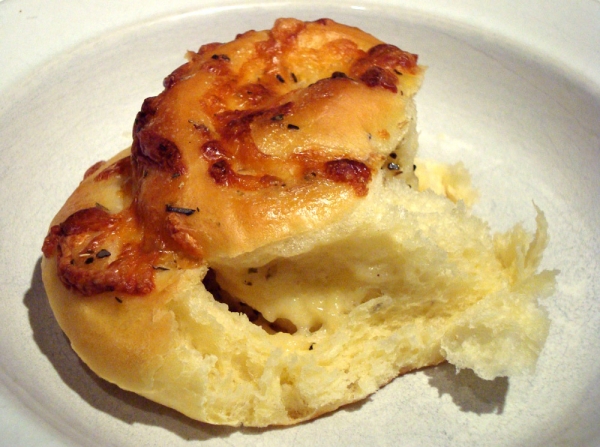
 These rolls start out with regular plain pizza dough (homemade or storebought) and get filled with a delicious mixture of crispy, crumbled bacon, and then sprinkled with tex-mex cheese (or use a mixture of sharp cheddar and jalapeno jack cheeses).They can be made bigger for a portable meal or smaller for irresistable appies. Nobody can resist these tasty littflavor-packed bite-sized treats. Cheese, bread and bacon. What's not to love?
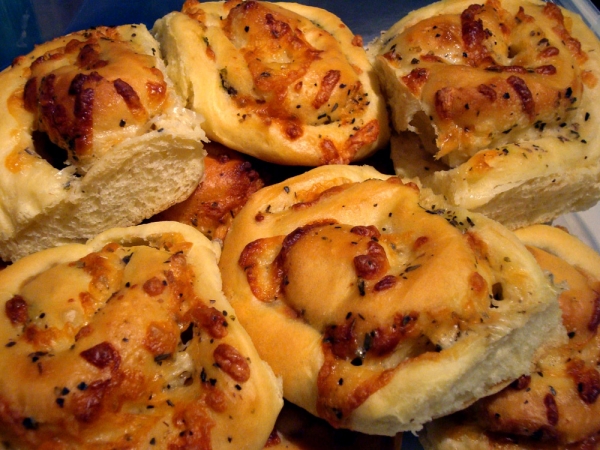
 Jalapeno Bacon Cheese BitesMakes 141 lb pizza dough, homemade or storebought2 Jalapeno Peppers, halved, seeded, blanched, and sliced
1 1/2 tsp Olive Oil
Sea Salt
Coarsely Ground Black Pepper
1 tsp Mixed Dried Herbs (Oregano, Parsley, Basil)
3 slices cooked, crumbled bacon
1/2 cup Tex-Mex Shredded Cheese Blend
1. Center a rack in the oven and preheat the oven to 400 degrees F.
2. Press down the dough on a lightly flour surface. Then pull and stretch the dough into a rectangular shape.
3. Spread the oil onto the dough, and gently press it into 14 x 8 inch rectangle. Then sprinkle some sea salt, mixed herbs, bacon, black pepper, and scatter the cheese, and Jalapeno peppers on top.
4. Roll up the dough as tightly as you can. Pinch both ends, and slice the log into 3/4 to 1-inch rounds. Place the rolls on the baking sheet, cut side up, and bake for about 18 to 20 minutes, or until the cheese has melted, and light golden brown in color.
Jalapeno Bacon Cheese BitesMakes 141 lb pizza dough, homemade or storebought2 Jalapeno Peppers, halved, seeded, blanched, and sliced
1 1/2 tsp Olive Oil
Sea Salt
Coarsely Ground Black Pepper
1 tsp Mixed Dried Herbs (Oregano, Parsley, Basil)
3 slices cooked, crumbled bacon
1/2 cup Tex-Mex Shredded Cheese Blend
1. Center a rack in the oven and preheat the oven to 400 degrees F.
2. Press down the dough on a lightly flour surface. Then pull and stretch the dough into a rectangular shape.
3. Spread the oil onto the dough, and gently press it into 14 x 8 inch rectangle. Then sprinkle some sea salt, mixed herbs, bacon, black pepper, and scatter the cheese, and Jalapeno peppers on top.
4. Roll up the dough as tightly as you can. Pinch both ends, and slice the log into 3/4 to 1-inch rounds. Place the rolls on the baking sheet, cut side up, and bake for about 18 to 20 minutes, or until the cheese has melted, and light golden brown in color.
 Fluffy, super-soft and slightly sweet. This Wonderbread clone is perfect for grilled cheese sandwiches or toasted with butter and jam.
 It must be a nostalgia thing, but every now and I again I love a slice of white Wonderbread despite all the wonderful artisnal breads I have been exposed to and the fancy breads I have baked in my own kitchen.Wonderbread White Bread CloneMakes 1 loaf2 1/2 teaspoons active dry yeast
1 1/4 cup warm water (110 degrees F)
1 tablespoon white sugar
3 tbsp melted cooled butter
4 cups all-purpose flour
1/4 cup instant potato flakes
1/4 cup powdered milk
2 teaspoons salt
1/4 cup white sugar
2 tablespoons butter for brushing the top
1. Whisk together the yeast, 1/4 cup warm water and sugar in the bowl of a stand mixer with the dough hook attachment. Allow to sit for 15 mins. Stir in melted butter.
2. In a separate bowl combine the flour, potato flakes, powdered milk, salt and 1/4 cup sugar. Add this mixture to the yeast mixture using dough hook. Add more flour if needed. Dough should clear the sides of the bowl but stick to the bottom. Try not to add too much flour.
3. Knead dough by hand a few times and place in greased bowl, covered, to rise for 1 hour or until doubled in size. After rising, gently deflate and turn out onto a floured surface to knead and shape into a loaf (roll it out into a rectangle and roll it up starting at the short end). Place the roll in a buttered 9x5 inch loaf pan. Cover loosely with a tea towel and let rise until approximately 1-2" above the rim of the pan, 30-40 mins. Brush top with melted butter.
4. Preheat oven to 350 degrees F. 15 mins before rising is complete. Bake for 30-45 minutes or until thermometer reads 190.
It must be a nostalgia thing, but every now and I again I love a slice of white Wonderbread despite all the wonderful artisnal breads I have been exposed to and the fancy breads I have baked in my own kitchen.Wonderbread White Bread CloneMakes 1 loaf2 1/2 teaspoons active dry yeast
1 1/4 cup warm water (110 degrees F)
1 tablespoon white sugar
3 tbsp melted cooled butter
4 cups all-purpose flour
1/4 cup instant potato flakes
1/4 cup powdered milk
2 teaspoons salt
1/4 cup white sugar
2 tablespoons butter for brushing the top
1. Whisk together the yeast, 1/4 cup warm water and sugar in the bowl of a stand mixer with the dough hook attachment. Allow to sit for 15 mins. Stir in melted butter.
2. In a separate bowl combine the flour, potato flakes, powdered milk, salt and 1/4 cup sugar. Add this mixture to the yeast mixture using dough hook. Add more flour if needed. Dough should clear the sides of the bowl but stick to the bottom. Try not to add too much flour.
3. Knead dough by hand a few times and place in greased bowl, covered, to rise for 1 hour or until doubled in size. After rising, gently deflate and turn out onto a floured surface to knead and shape into a loaf (roll it out into a rectangle and roll it up starting at the short end). Place the roll in a buttered 9x5 inch loaf pan. Cover loosely with a tea towel and let rise until approximately 1-2" above the rim of the pan, 30-40 mins. Brush top with melted butter.
4. Preheat oven to 350 degrees F. 15 mins before rising is complete. Bake for 30-45 minutes or until thermometer reads 190.
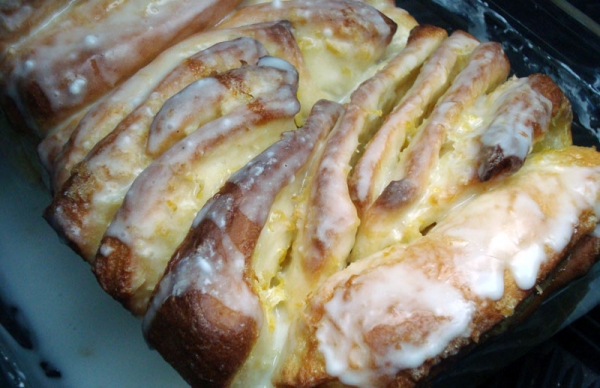
 These cinnamon buns are livened up with bright, perky orange flavor. They are not too heavy nor too rich. The light lemony glaze provides a little sugar jolt adds a hint of sweetness which makes them just right for a breakfast treat.
 The texture is light, fluffy and tender from the milk and eggs. You can also freeze the baked rolls for a few weeks and thaw on the day you want to eat it. A quick heat in the microwave makes them almost as good as the day they were baked. I like to wrap them individually so I can quickly pull out one at a time for easy lunchbag treats. By lunchtime they are thawed and ready to be eaten!
 Sunshine Cinnamon Rollsmakes 12 | adapted from Southern LivingROLLS
1 (1/4 ounce) package yeast
1/4 cup warm water
1 cup warm milk
1/4 cup shortening [or softened butter]
1/4 cup sugar
1 teaspoon salt
1 egg, lightly beaten
3 1/2 to 3 3/4 cups flour
FILLING
1 cup sugar
1/2 cup butter, softened
2 tablespoons orange zest
2 tsp cinnamon
GLAZE
1 cup powdered sugar
4 teaspoons butter, softened
4-5 teaspoons milk
1/2 teaspoon lemon extract
1. In small bowl, dissolve yeast in water. In a large bowl, mix milk, shortening, sugar, salt, and egg. Add yeast mix; blend well. Stir in enough flour to make a soft dough. Knead on floured board for about 7 minutes.
2. Put in greased bowl and turn to grease top. Cover and let rise until doubled, about 1 hour. While the dough is rising, mix filling ingredients until smooth.
3. After the hour, punch dough down. Roll out into a large rectangle. Spread the filling on the rectangle. Roll up tightly starting with the long end. Cut into 12 rolls. Place rolls side by side a 9x13" baking pan or two round 9" pans. Cover and let rise until doubled, about 45 minutes.
4. Bake at 375 degrees F for 25-30 minutes, until golden brown and bread is fully cooked through. While the rolls are baking mix glaze ingredients. Spread over warm rolls.
Sunshine Cinnamon Rollsmakes 12 | adapted from Southern LivingROLLS
1 (1/4 ounce) package yeast
1/4 cup warm water
1 cup warm milk
1/4 cup shortening [or softened butter]
1/4 cup sugar
1 teaspoon salt
1 egg, lightly beaten
3 1/2 to 3 3/4 cups flour
FILLING
1 cup sugar
1/2 cup butter, softened
2 tablespoons orange zest
2 tsp cinnamon
GLAZE
1 cup powdered sugar
4 teaspoons butter, softened
4-5 teaspoons milk
1/2 teaspoon lemon extract
1. In small bowl, dissolve yeast in water. In a large bowl, mix milk, shortening, sugar, salt, and egg. Add yeast mix; blend well. Stir in enough flour to make a soft dough. Knead on floured board for about 7 minutes.
2. Put in greased bowl and turn to grease top. Cover and let rise until doubled, about 1 hour. While the dough is rising, mix filling ingredients until smooth.
3. After the hour, punch dough down. Roll out into a large rectangle. Spread the filling on the rectangle. Roll up tightly starting with the long end. Cut into 12 rolls. Place rolls side by side a 9x13" baking pan or two round 9" pans. Cover and let rise until doubled, about 45 minutes.
4. Bake at 375 degrees F for 25-30 minutes, until golden brown and bread is fully cooked through. While the rolls are baking mix glaze ingredients. Spread over warm rolls.
 The March 2011 Daring Baker’s Challenge was hosted by Ria of Ria’s Collection and Jamie of Life’s a Feast. Ria and Jamie challenged The Daring Bakers to bake a yeasted Meringue Coffee Cake.
I love love loved this month's
The March 2011 Daring Baker’s Challenge was hosted by Ria of Ria’s Collection and Jamie of Life’s a Feast. Ria and Jamie challenged The Daring Bakers to bake a yeasted Meringue Coffee Cake.
I love love loved this month's  I opted to "Canadianize" the sweet, nutty, cinnamonny filling by adding maple extract. Maple-Walnut is a tried and true flavor pairing. The walnuts also provided a texturally interesting contrast to the creamy, fluffy meringue and soft yeast bread. Thanks for a great challenge this month. It's one of my favorites thus far!
 Maple Walnut Meringue Coffee Cake
2 round 10" cakes
For the yeast coffee cake dough:
4 cups flour
1/4 cup sugar
3/4 tsp salt
1 package active dried yeast
3/4 cup whole milk
1/4 cup water, any temperature
1/2 cup butter, room temperature
2 large eggs at room temperature
For the meringue:
3 large egg whites at room temperature
1/4 tsp salt
1/2 tsp vanilla
1/2 cup sugar
For the filling:
1 tsp maple extract
1 cup chopped walnuts
2 tbsp sugar
1/2 tsp cinnamon 1. Prepare the dough:
In a large mixing bowl, combine 1 1/2 cups of the flour, the sugar, salt and yeast. In a saucepan, combine the milk, water and butter and heat over medium heat until warm and the butter is just melted. With an electric mixer on low, gradually add the warm liquid to the flour/yeast mixture, beating until well blended. Increase mixer speed to medium and beat 2 minutes. Add the eggs and 1 cup flour and beat for 2 more minutes. Stir in enough of the remaining flour to make a dough that holds together. Turn out onto a floured surface (use any of the 1 1/2 cups of flour remaining) and knead the dough for 8 to 10 minutes until the dough is soft, smooth, and elastic, keeping the work surface floured and adding extra flour as needed.
Place the dough in a lightly greased bowl, turning to coat all sides. Cover the bowl with plastic wrap and a kitchen towel and let rise until double in bulk, 45 – 60 minutes. Prepare your filling by combining all the filling ingredients in a small bowl.
2. Once the dough has doubled, make the meringue and filling: In a plastic or metal bowl so the egg whites adhere to the side (they slip on glass) beat the egg whites with the salt, first on low speed for 30 seconds, then increase to high and continue beating until foamy and opaque. Add the vanilla then start adding the 1/2 cup sugar, a tablespoon at a time as you beat, until very stiff, glossy peaks form. Combine all filling ingredients in a separate small bowl.
3. Assembly:
Line 2 baking/cookie sheets with parchment paper. Punch down the dough and divide in half. On a lightly floured surface, working one piece of the dough at a time (keep the other half of the dough wrapped in plastic), roll out the dough into a 20 x 10-inch rectangle. Spread half of the meringue evenly over the rectangle up to about 1/2-inch from the edges. Sprinkle half of your filling evenly over the meringue.
Roll up the dough jellyroll style, from the long side. Pinch the seam closed to seal. Very carefully transfer the filled log to one of the lined cookie sheets, seam side down. Bring the ends of the log around and seal the ends together, forming a ring, tucking one end into the other and pinching to seal. Using kitchen scissors or a sharp knife (scissors are easier), make cuts along the outside edge at 1-inch intervals. Don't be afraid to cut deep into the ring. Repeat with the remaining dough, meringue and fillings. Cover the 2 coffee cakes with plastic wrap and allow them to rise again for 45 to 60 minutes.
4. Baking: Preheat the oven to 350 degrees F. Brush the tops of the coffee cakes with the egg wash. Bake in the preheated oven for 25 to 30 minutes until risen and golden brown. The dough should sound hollow when tapped. Remove from the oven and slide the parchment paper off the cookie sheets onto the table. Very gently loosen the coffee cakes from the paper with a large spatula and carefully slide the cakes off onto cooling racks. Just before serving, dust the tops of the coffee cakes with confectioner’s sugar.
Maple Walnut Meringue Coffee Cake
2 round 10" cakes
For the yeast coffee cake dough:
4 cups flour
1/4 cup sugar
3/4 tsp salt
1 package active dried yeast
3/4 cup whole milk
1/4 cup water, any temperature
1/2 cup butter, room temperature
2 large eggs at room temperature
For the meringue:
3 large egg whites at room temperature
1/4 tsp salt
1/2 tsp vanilla
1/2 cup sugar
For the filling:
1 tsp maple extract
1 cup chopped walnuts
2 tbsp sugar
1/2 tsp cinnamon 1. Prepare the dough:
In a large mixing bowl, combine 1 1/2 cups of the flour, the sugar, salt and yeast. In a saucepan, combine the milk, water and butter and heat over medium heat until warm and the butter is just melted. With an electric mixer on low, gradually add the warm liquid to the flour/yeast mixture, beating until well blended. Increase mixer speed to medium and beat 2 minutes. Add the eggs and 1 cup flour and beat for 2 more minutes. Stir in enough of the remaining flour to make a dough that holds together. Turn out onto a floured surface (use any of the 1 1/2 cups of flour remaining) and knead the dough for 8 to 10 minutes until the dough is soft, smooth, and elastic, keeping the work surface floured and adding extra flour as needed.
Place the dough in a lightly greased bowl, turning to coat all sides. Cover the bowl with plastic wrap and a kitchen towel and let rise until double in bulk, 45 – 60 minutes. Prepare your filling by combining all the filling ingredients in a small bowl.
2. Once the dough has doubled, make the meringue and filling: In a plastic or metal bowl so the egg whites adhere to the side (they slip on glass) beat the egg whites with the salt, first on low speed for 30 seconds, then increase to high and continue beating until foamy and opaque. Add the vanilla then start adding the 1/2 cup sugar, a tablespoon at a time as you beat, until very stiff, glossy peaks form. Combine all filling ingredients in a separate small bowl.
3. Assembly:
Line 2 baking/cookie sheets with parchment paper. Punch down the dough and divide in half. On a lightly floured surface, working one piece of the dough at a time (keep the other half of the dough wrapped in plastic), roll out the dough into a 20 x 10-inch rectangle. Spread half of the meringue evenly over the rectangle up to about 1/2-inch from the edges. Sprinkle half of your filling evenly over the meringue.
Roll up the dough jellyroll style, from the long side. Pinch the seam closed to seal. Very carefully transfer the filled log to one of the lined cookie sheets, seam side down. Bring the ends of the log around and seal the ends together, forming a ring, tucking one end into the other and pinching to seal. Using kitchen scissors or a sharp knife (scissors are easier), make cuts along the outside edge at 1-inch intervals. Don't be afraid to cut deep into the ring. Repeat with the remaining dough, meringue and fillings. Cover the 2 coffee cakes with plastic wrap and allow them to rise again for 45 to 60 minutes.
4. Baking: Preheat the oven to 350 degrees F. Brush the tops of the coffee cakes with the egg wash. Bake in the preheated oven for 25 to 30 minutes until risen and golden brown. The dough should sound hollow when tapped. Remove from the oven and slide the parchment paper off the cookie sheets onto the table. Very gently loosen the coffee cakes from the paper with a large spatula and carefully slide the cakes off onto cooling racks. Just before serving, dust the tops of the coffee cakes with confectioner’s sugar.
 I just bought this wonderful little book called
 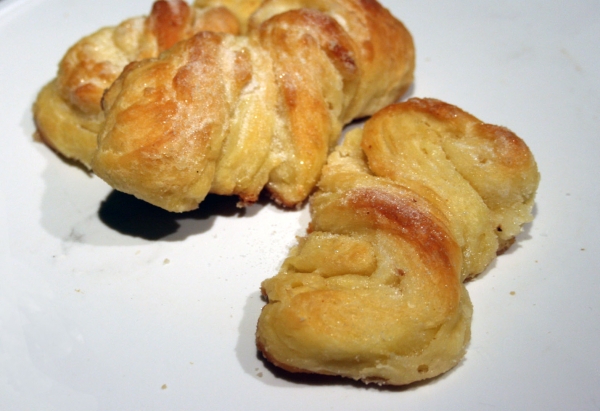 Sugared Brioche TwistsMakes 12 | Adapted from
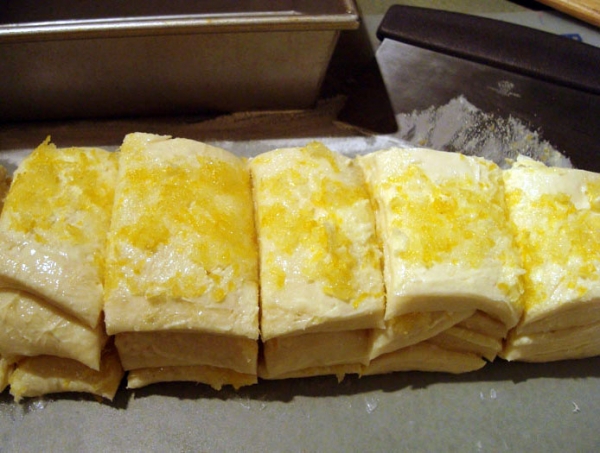
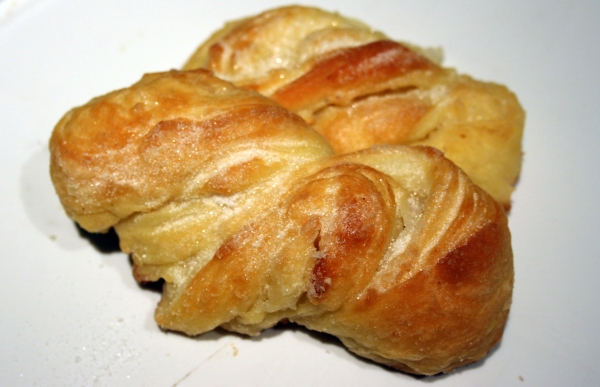
  This yeast dough is great for beginners to yeast baking. It only needs one rise and it produces a rich, tender pastry. I love the flakiness combined with the crunchy cinnamon-brown sugar filling.
The recipe is from the
This yeast dough is great for beginners to yeast baking. It only needs one rise and it produces a rich, tender pastry. I love the flakiness combined with the crunchy cinnamon-brown sugar filling.
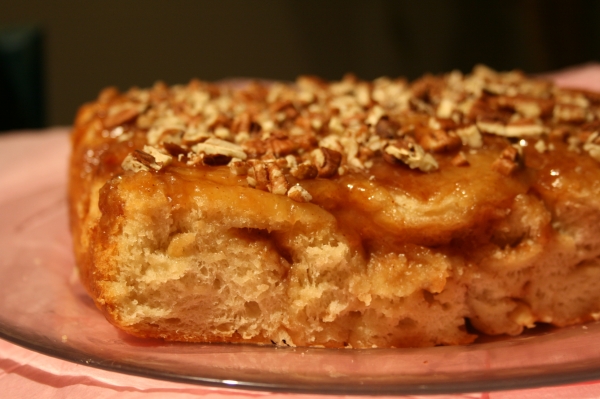
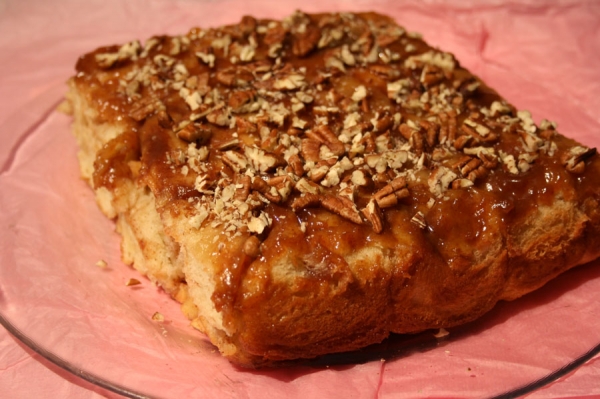
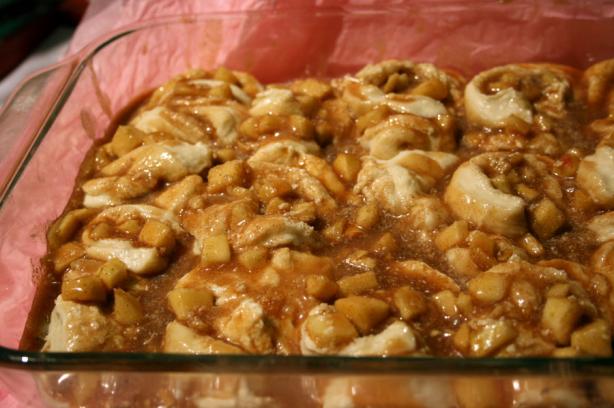
The recipe is from the  The sticky, nutty topping on these buns is to die for! With brown sugar, heavy cream and a touch of honey, they are rich and complex in flavor. The dough get its touch of sweetness from honey instead of sugar. You can easily have freshly baked cinnamon buns in the morning by making these right before bed and popping them in the fridge to rise. Then all you do is bake them straight outta the fridge the next morning and voila!According to the Rachel Ray Magazine's February 2011 issue, 29% of people shy away from recipes involving yeast. I used to be one of these people, but not anymore! Now yeast is one of my favorite things to work with. It's not difficult at all - in fact yeast breads can fit completely around YOUR schedule with the use of your fridge or freezer to slow the rising process until you're ready to shape and bake. You will be rewarded with freshly made sticky buns and the most amazing aroma throughout your house.On the topic of houses, I'm super-excited to have the opportunity to do a review of one of CSN Stores' products. There is so much to choose from in their stores and you can also read customer reviews of their products right on their website. I know from personal experience that their shipping is quick and their products are high quality. Lots of their products also have free shipping if you spend > $69. I'm in the midst of house-hunting (condo-hunting actually) and I've fallen in love with several of their furniture pieces. One piece I am eying is this
  Honey-Nut Sticky Buns
Makes 12 | Adapted from "
Honey-Nut Sticky Buns
Makes 12 | Adapted from " Tangy and full of bright apricot flavor from the chewy, plump diced dried apricots strewn throughout these rolls. They are a wonderful morning not-too-sweet treat. Sour cream, like buttermilk, adds a certain beauty to the dough. It's one of those ingredients that brings so much to a recipe - both savory and sweet, cakes and breads alike - moistness, flavor and tenderness.
 Oh yeah, don't forget to email/msg me your Copycat Club submissions for January! Check back on the 7th for everyone's yummy cloned concoctions.
Sour Cream Apricot Orange Buns
Makes 16 | adapted from King Arthur Flour
1/2 cup (4 ounces) sour cream
2 large eggs
3/4 cup (6 ounces) orange juice
3 1/2 cups (14 7/8 ounces) all purpose flour
1/4 cup (1 3/4 ounces) sugar
1 tablespoon instant yeast
1 1/2 teaspoons salt shopping list
1/3 cup instant potato flakes
3/4 cup (3 3/8 ounces) diced apricots
1/3 cup butter, melted
1/2 cup sugar
1 tbsp cinnamon
1. Place all of the ingredients into the pan of your bread machine in the order recommended by the manufacturer. Program the machine for the dough setting and press Start. Check the dough's consistency about 10 minutes before the end, adding additional water or flour to form a soft, smooth ball of dough. Let the dough rise until doubled in volume.
2. Gently punch down and roll out into a large rectagle - 11 x 17 inches - and spread melted butter over tip. Sprinkle with sugar and cinnamon and spread out evenly. Roll it up and pinch seams together. Slice into 1 1/2" thick rolls and place close but not touching each other on a greased or lined cookie sheet. Cover and let rise until puffy and almost doubled in size.
3. Bake at 350 degrees until golden and fully baked.
Oh yeah, don't forget to email/msg me your Copycat Club submissions for January! Check back on the 7th for everyone's yummy cloned concoctions.
Sour Cream Apricot Orange Buns
Makes 16 | adapted from King Arthur Flour
1/2 cup (4 ounces) sour cream
2 large eggs
3/4 cup (6 ounces) orange juice
3 1/2 cups (14 7/8 ounces) all purpose flour
1/4 cup (1 3/4 ounces) sugar
1 tablespoon instant yeast
1 1/2 teaspoons salt shopping list
1/3 cup instant potato flakes
3/4 cup (3 3/8 ounces) diced apricots
1/3 cup butter, melted
1/2 cup sugar
1 tbsp cinnamon
1. Place all of the ingredients into the pan of your bread machine in the order recommended by the manufacturer. Program the machine for the dough setting and press Start. Check the dough's consistency about 10 minutes before the end, adding additional water or flour to form a soft, smooth ball of dough. Let the dough rise until doubled in volume.
2. Gently punch down and roll out into a large rectagle - 11 x 17 inches - and spread melted butter over tip. Sprinkle with sugar and cinnamon and spread out evenly. Roll it up and pinch seams together. Slice into 1 1/2" thick rolls and place close but not touching each other on a greased or lined cookie sheet. Cover and let rise until puffy and almost doubled in size.
3. Bake at 350 degrees until golden and fully baked.
 The 2010 December Daring Bakers’ challenge was hosted by Penny of Sweet Sadie’s Baking. She chose to challenge Daring Bakers’ to make Stollen. She adapted a friend’s family recipe and combined it with information from friends, techniques from Peter Reinhart’s book.........and Martha Stewart’s demonstration.
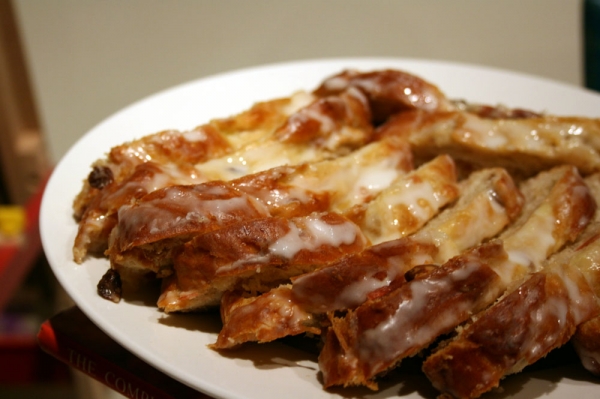
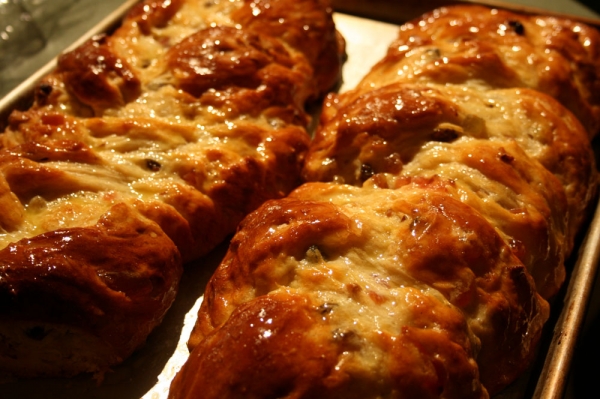 Stollen is a fruitcake made with yeast, water and flour, and usually dried citrus peel, dried fruit, almonds, and spices (cinnamon, cardamom, mace). The dough is rich with butter and eggs and slightly sweetened with sugar. The fruits are soaked in brandy or rum and the finished cake is sprinkled with icing sugar.I used a combination of recipes from the kitchen staple cookbooks: The Fannie Farmer Baking Book and the Joy of Cooking.I made a non-traditional shape - a braid instead of a wreath or loaf. I just couldn't bring myself to cover up the beautiful, golden-brown, fruit-studded bread, so I opted out of the powdered sugar on top.
 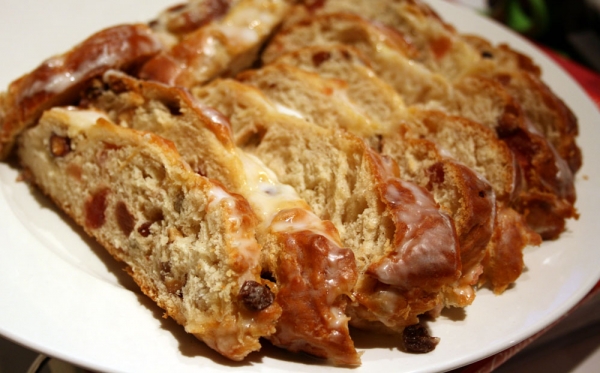 It was very festive looking and very tasty and reminded me of hot cross buns! This was the first stollen I've made, but I'm sure it will make my holiday list in years to come. Thank you, Penny, for opening my eyes and tastebuds to this delicious sweet bread!

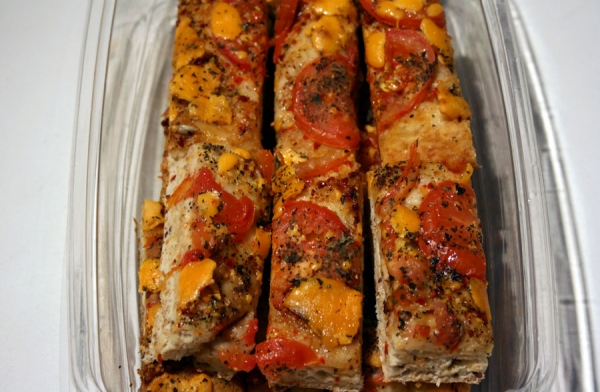
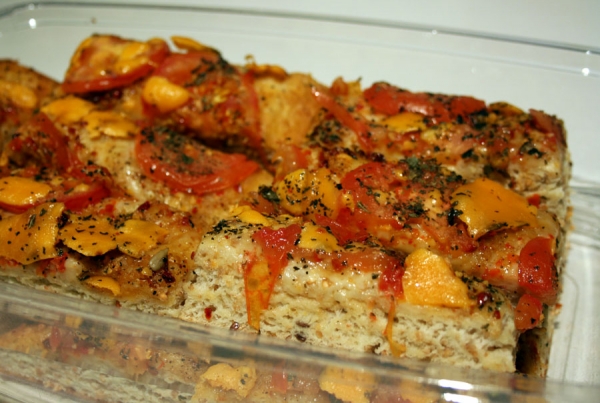
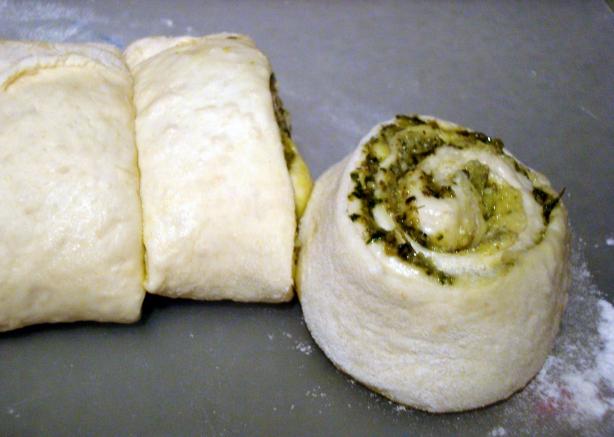
 These rolls are a pretty variation of pizza pretzels, recipe from Sandra Lee of the Food Network. I like to think of them as a savory version of cinnamon buns, since it's the same shaping method. They are full of classic flavors loved by all. They start out with storebought or homemade pizza dough and can be filled as simply or as extravagantly as you'd like. I went minimalistically with just a filling of tomato sauce and parmesan cheese. I think they'd also make for a portable, kid-friendly meal on the go if you opted for a filling of pepperoni and mozzarella or ham and pineapple. Be creative and go gourmet if you'd like with a greek-inspired spinach and feta, for example. Whatever you put on pizza is fair game.I like to make a batch then freeze half the rolls, individually wrapped, after baking. This makes it easy to pack them in my son's lunch box on hectic mornings. They thaw in the lunch box and are just right by lunchtime.
Tomato Parmesan Roll-Ups
adapted from Sandra Lee of the Food Network
3 tablespoons olive oil
1 tablespoon crushed garlic
2 tablespoons Italian seasoning
1 pound pizza dough or bread dough
1 cup tomato sauce or pizza sauce
1 cup shredded fresh parmesan
1 egg + 2 tablespoons water for egg wash
1. In a small bowl, whisk together the olive oil, garlic, and Italian seasoning.
2. On a lightly floured surface, roll out the pizza dough into a 12-inch square. Brush the entire surface with the seasoned olive oil. Top with 1 cup of shredded cheese. Reserve some cheese for sprinkling on top just before baking, if desired.3. Starting from the bottom edge, tightly roll up the dough to form a log. Using a sharp serrated knife, slice the roll on the bias into 1-inch thick pieces. Arrange the rolls on their side on a nonstick or lightly oiled baking sheet. Cover loosely with plastic wrap and allow to sit at room temperature for 30 minutes to proof. 4. Preheat the oven to 375 degrees F. 5. In a small bowl, whisk together the egg with 2 tablespoons of water. Brush the tops and sides of the rolls with the egg wash. Bake until golden brown, about 30 to 35 minutes. 6. Remove from the oven, transfer to a serving platter and serve.
These rolls are a pretty variation of pizza pretzels, recipe from Sandra Lee of the Food Network. I like to think of them as a savory version of cinnamon buns, since it's the same shaping method. They are full of classic flavors loved by all. They start out with storebought or homemade pizza dough and can be filled as simply or as extravagantly as you'd like. I went minimalistically with just a filling of tomato sauce and parmesan cheese. I think they'd also make for a portable, kid-friendly meal on the go if you opted for a filling of pepperoni and mozzarella or ham and pineapple. Be creative and go gourmet if you'd like with a greek-inspired spinach and feta, for example. Whatever you put on pizza is fair game.I like to make a batch then freeze half the rolls, individually wrapped, after baking. This makes it easy to pack them in my son's lunch box on hectic mornings. They thaw in the lunch box and are just right by lunchtime.
Tomato Parmesan Roll-Ups
adapted from Sandra Lee of the Food Network
3 tablespoons olive oil
1 tablespoon crushed garlic
2 tablespoons Italian seasoning
1 pound pizza dough or bread dough
1 cup tomato sauce or pizza sauce
1 cup shredded fresh parmesan
1 egg + 2 tablespoons water for egg wash
1. In a small bowl, whisk together the olive oil, garlic, and Italian seasoning.
2. On a lightly floured surface, roll out the pizza dough into a 12-inch square. Brush the entire surface with the seasoned olive oil. Top with 1 cup of shredded cheese. Reserve some cheese for sprinkling on top just before baking, if desired.3. Starting from the bottom edge, tightly roll up the dough to form a log. Using a sharp serrated knife, slice the roll on the bias into 1-inch thick pieces. Arrange the rolls on their side on a nonstick or lightly oiled baking sheet. Cover loosely with plastic wrap and allow to sit at room temperature for 30 minutes to proof. 4. Preheat the oven to 375 degrees F. 5. In a small bowl, whisk together the egg with 2 tablespoons of water. Brush the tops and sides of the rolls with the egg wash. Bake until golden brown, about 30 to 35 minutes. 6. Remove from the oven, transfer to a serving platter and serve.