
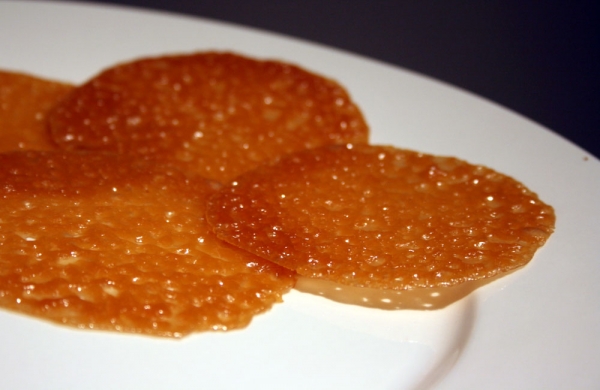
 The February 2011 Daring Bakers’ challenge was hosted by Mallory from A Sofa in the Kitchen. She chose to challenge everyone to make Panna Cotta from a Giada de Laurentiis recipe and Nestle Florentine Cookies.

I made mine lemon-flavored by using lemon gelatin powder instead of plain and throwing in some lemon zest. I made mine in a spring form pan atop a graham cracker crust, much like a no-bake cheesecake. It was delicious, but next time I will let it set a little longer in the fridge before digging in.

The florentines were delicate, crisp and lacy. Word of caution: You absolutely need a silicone mat or parchment for easy removal from the baking tray.
Lemon Panna Cotta
adapted from Giada de Laurentiis
1 cup whole milk
2 tablespoons lemon flavored Jell-o powder
3 cups whipping cream
1/3 cup honey
1 tablespoon sugar
zest from 1 lemon
Pinch salt
Place the milk in a small bowl. Sprinkle the gelatin over. Let stand for 3 to 5 minutes to soften the gelatin. Pour milk mixture into a heavy saucepan and stir over medium heat just until the gelatin dissolves but the milk does not boil, about 5 minutes. Add the cream, honey, sugar, zest and salt. Stir until the sugar dissolves, 5 to 7 minutes. Remove from the heat. Pour into serving dishes. Cool slightly. Refrigerate until set, at least 6 hours.
Florentines
Nestle
2/3 cup unsalted butter
2 cups quick oats
1 cup granulated sugar
2/3 cup flour
1/4 cup dark corn syrup
1/4 cup whole milk
1 tsp vanilla extract
pinch of salt
1 1/2 dark or milk chocolate
Preheat oven to 375 degrees F. Prepare your baking sheet with silpat or parchment paper. Melt butter in a medium saucepan, then remove from the heat.
To the melted butter add oats, sugar, flour, corn syrup, milk, vanilla, and salt. Mix well. Drop a tablespoon full, three inches apart, onto your prepared baking sheet. Flatten slightly.
Bake in preheated oven for 6-8 minutes, until cookies are golden brown. Cool completely on the baking sheets.
While the cookies are cooling melt your chocolate until smooth either in the microwave (1 1/2 minutes), or stovetop (double boiler).
Peel the cookies from the silpat or parchment and place face down on a wire rack set over a sheet of wax/parchment paper. Spread a tablespoon of chocolate on the bottom of your cookie, sandwiching another cookie atop the chocolate.

 This week's Tuesdays with Dorie recipe was chosen by Christine of Black Cat Cooking.I swapped out the bittersweet chocolate in favor of white chocolate (and reduced the sugar by 2 tbsp to compensate for the extra sugar in the white chocolate). What can I say... I love white chocolate so much that I will find any excuse to use it over regular chocolate. I also attempted to make this a little healthier by using 2% milk instead of whole. They were delicious and reminded me of vanilla pudding! I served 'em up with a sprinkling of cinnamon which added dimension to the flavor. I also used foil rather than saran wrap as advised by several other bloggers.The recipe below includes my changes to the recipe. Check out Christine's blog (link above) for the original.
 [White] Chocolate Pots de Crème
8 servings | adapted from Baking: From My Home To Yours
4 ounces white chocolate, finely chopped
1 1/2 cups heavy cream
1 1/2 cups 2% milk
1 large egg
5 large egg yolks
2 tbsp sugar
pinch of salt
Center a rack in the oven and preheat the oven to 300 degrees F. Line a large roasting pan with a double thickness of paper towels, then put eight 4-ounce (1/2 cup) custard cups, ramekins, espresso or pot de creme cups in the pan. Fill a teakettle with water and put it on to boil; when the water boils turn off the heat.
Put the chopped chocolate in a 2-quart glass measuring cup or a large heatproof bowl. Bring 1/2 cup of the heavy cream to a boil. When the cream is just at a boil, pour it over the chocolate and wait for 1 minute. Using a rubber spatula and starting in the center of the bowl, gently stir the cream and chocolate until the ganache is smooth; set aside.
Stir the remaining 1 cup cream and the milk together in a small saucepan and bring to a boil.
Meanwhile, in a large glass measuring cup or bowl, whisk the egg, yolks, sugar and salt together until pale and slightly thickened. Still whisking, drizzle in a little of the hot liquid - this will temper, or warm, the eggs so they won't curdle. Whisking all the while, slowly pour in the remaining liquid. Finally, slowly whisk the egg mixture into the ganache, stirring gently to incorporate.
With a spoon, skim the foam off the top of the custard, then pour the custard into the cups. Pour enough hot water from the teakettle into the roasting pan to come halfway up the sides of the cups. Cover the top of the pan snugly with foil, poke two holes in opposite corners and very carefully and steadily slide the setup into the oven.
Bake the custards for 35-40 minutes, or until the custards jiggle a little only in the center when tapped or lightly shaken.
Gingerly remove the roasting pan from the oven and place it on a cooling rack. Allow the custards to rest in their warm bath for 10 minutes, then peel off the foil and transfer the cups from the water to the cooling rack. Refrigerate when they reach room temperature. When cool, cover tightly with plastic wrap.
[White] Chocolate Pots de Crème
8 servings | adapted from Baking: From My Home To Yours
4 ounces white chocolate, finely chopped
1 1/2 cups heavy cream
1 1/2 cups 2% milk
1 large egg
5 large egg yolks
2 tbsp sugar
pinch of salt
Center a rack in the oven and preheat the oven to 300 degrees F. Line a large roasting pan with a double thickness of paper towels, then put eight 4-ounce (1/2 cup) custard cups, ramekins, espresso or pot de creme cups in the pan. Fill a teakettle with water and put it on to boil; when the water boils turn off the heat.
Put the chopped chocolate in a 2-quart glass measuring cup or a large heatproof bowl. Bring 1/2 cup of the heavy cream to a boil. When the cream is just at a boil, pour it over the chocolate and wait for 1 minute. Using a rubber spatula and starting in the center of the bowl, gently stir the cream and chocolate until the ganache is smooth; set aside.
Stir the remaining 1 cup cream and the milk together in a small saucepan and bring to a boil.
Meanwhile, in a large glass measuring cup or bowl, whisk the egg, yolks, sugar and salt together until pale and slightly thickened. Still whisking, drizzle in a little of the hot liquid - this will temper, or warm, the eggs so they won't curdle. Whisking all the while, slowly pour in the remaining liquid. Finally, slowly whisk the egg mixture into the ganache, stirring gently to incorporate.
With a spoon, skim the foam off the top of the custard, then pour the custard into the cups. Pour enough hot water from the teakettle into the roasting pan to come halfway up the sides of the cups. Cover the top of the pan snugly with foil, poke two holes in opposite corners and very carefully and steadily slide the setup into the oven.
Bake the custards for 35-40 minutes, or until the custards jiggle a little only in the center when tapped or lightly shaken.
Gingerly remove the roasting pan from the oven and place it on a cooling rack. Allow the custards to rest in their warm bath for 10 minutes, then peel off the foil and transfer the cups from the water to the cooling rack. Refrigerate when they reach room temperature. When cool, cover tightly with plastic wrap.
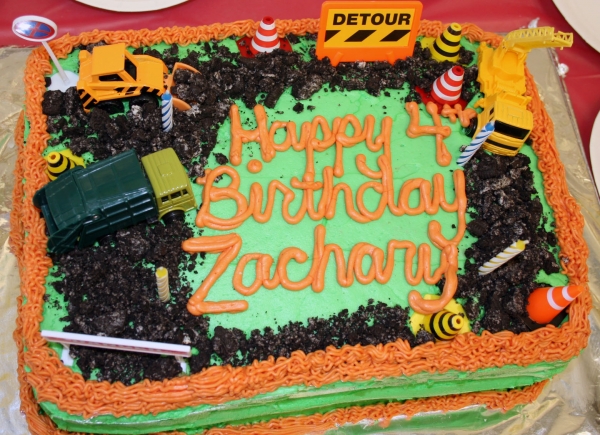 Happy 4th birthday Zachary! I made this construction-site cake for his birthday party. We had so much fun decorating it together. I let him pick out which construction vehicle toys he wanted to put on top and he helped crush up the oreo cookies for the "dirt" on top.
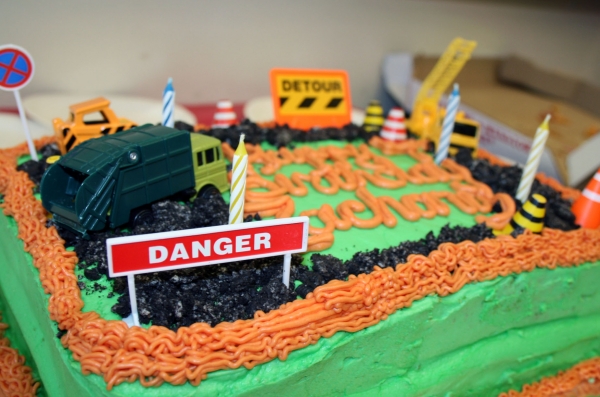 Instead of buying a cake mix, I decided to give this copycat recipe from Todd Wilbur's Top Secret Recipes a shot. The texture was spot on. and everyone raved about the taste. I doubled the recipe to make a 2-layer cake and filled the cake with raspberry jam.The beautiful part of this recipe is that you can make this mix ahead of time and store in a zip-lock bag. When you are ready to make the cake, just add the same amount of water, oil and eggs just as you would with a storebought mix.
 Duncan Hines Yellow Cake Mix CloneMakes equivalent of 1 box of mix3 cups cake flour
2 cups superfine sugar
2 teaspoons baking powder
2 teaspoons baking soda
1 1/4 teaspoons salt
1/2 cup shortening
2 teaspoons vanilla
2 teaspoons imitation butter flavoring
10 drops yellow food coloring
1 1/3 cups water
1/3 cup vegetable oil
3 large eggs
To make the mix: Combine flour, sugar, baking powder, baking soda, and salt in a large bowl. Stir to combine. Combine shortening, vanilla, and food coloring with an electric mixer in a small bowl.
Spoon shortening mixture into dry ingredients and beat well with mixer on medium speed. Mix until no chunks of shortening are visible. The mix should resemble cornmeal. This is your cake mix, which you can keep in a sealed container for several months until you are ready to make the cake.
To make the cake: Preheat oven to 350 degrees F. Grease the sides and bottom of two 9 inch baking pans or one 13x9 inch pan. Lightly flour pans.
Blend dry cake mix with the water, oil, and eggs in a large bowl on low speed until moistened. Increase to medium speed and beat for two minutes.
Pour batter into pans and bake for 30-33 minutes for 9 inch pan, 35-38 minutes for 13x9 pan. Cupcakes take 19-22 minutes.
Duncan Hines Yellow Cake Mix CloneMakes equivalent of 1 box of mix3 cups cake flour
2 cups superfine sugar
2 teaspoons baking powder
2 teaspoons baking soda
1 1/4 teaspoons salt
1/2 cup shortening
2 teaspoons vanilla
2 teaspoons imitation butter flavoring
10 drops yellow food coloring
1 1/3 cups water
1/3 cup vegetable oil
3 large eggs
To make the mix: Combine flour, sugar, baking powder, baking soda, and salt in a large bowl. Stir to combine. Combine shortening, vanilla, and food coloring with an electric mixer in a small bowl.
Spoon shortening mixture into dry ingredients and beat well with mixer on medium speed. Mix until no chunks of shortening are visible. The mix should resemble cornmeal. This is your cake mix, which you can keep in a sealed container for several months until you are ready to make the cake.
To make the cake: Preheat oven to 350 degrees F. Grease the sides and bottom of two 9 inch baking pans or one 13x9 inch pan. Lightly flour pans.
Blend dry cake mix with the water, oil, and eggs in a large bowl on low speed until moistened. Increase to medium speed and beat for two minutes.
Pour batter into pans and bake for 30-33 minutes for 9 inch pan, 35-38 minutes for 13x9 pan. Cupcakes take 19-22 minutes.
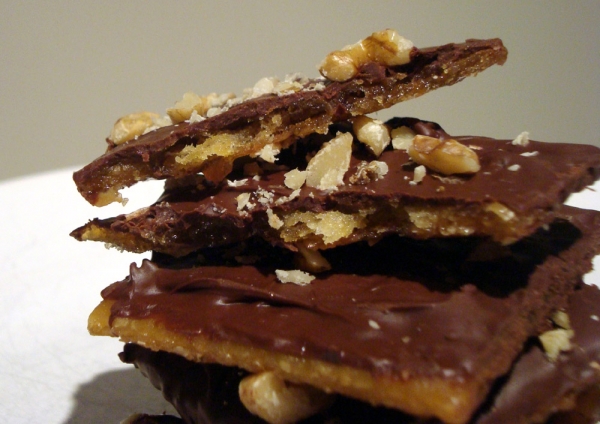 I am in love with these cookies. Kinda like Heath Bars. You have probably heard of them before or made them in home ec class. They are the easiest thing in the world to make. The effort is minimal and the results are delicious. The soda cracker base gives a light, airy texture and their slight saltiness plays off the sweetness of the chocolate and caramel. The crackers absorb the caramel and creates a delightfully flaky, sticky, chewy cookie. Then they are covered in melted chocolate and chopped nuts.
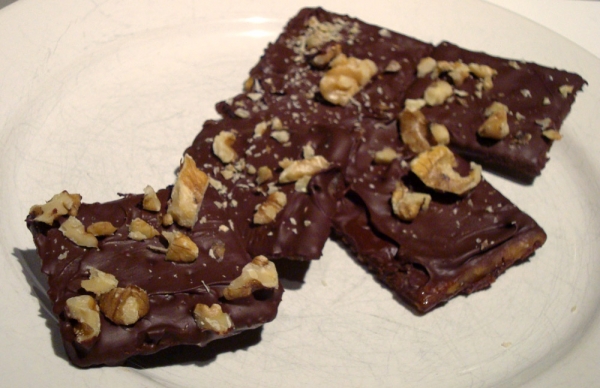 This recipe is easily doubled, but if I were you, I would quadruple it because they are really addictive! I like to make a ton of them at once and store them airtight in a glass jar. They look pretty, keep for a long time and are always a nice treat to have on hand or to take to potlucks.Saltine Toffee Cookies4 dozen4 ounces lightly salted or unsalted saltine crackers 1 cup butter1 cup dark brown sugar 2 cups semi-sweet chocolate chips 3/4 cup chopped pecans, walnuts or almonds1. Preheat oven to 400 degrees F. Line a cookie sheet with a silicone liner or parchment paper. Place a single layer of saltine crackers on the cookie sheet.
2. In a saucepan, combine sugar and butter. Bring to a boil and boil for about 3 minutes. Remove from heat and pour evenly over crackers. Bake 5-6 minutes. Remove from the oven and sprinkle with the chocolate chips. Let sit for 5 minutes to soften chocolate. Spread the melted chips on the crackers and top with chopped pecans.
3. Cool completely (a few hours) and break into pieces to serve.
This recipe is easily doubled, but if I were you, I would quadruple it because they are really addictive! I like to make a ton of them at once and store them airtight in a glass jar. They look pretty, keep for a long time and are always a nice treat to have on hand or to take to potlucks.Saltine Toffee Cookies4 dozen4 ounces lightly salted or unsalted saltine crackers 1 cup butter1 cup dark brown sugar 2 cups semi-sweet chocolate chips 3/4 cup chopped pecans, walnuts or almonds1. Preheat oven to 400 degrees F. Line a cookie sheet with a silicone liner or parchment paper. Place a single layer of saltine crackers on the cookie sheet.
2. In a saucepan, combine sugar and butter. Bring to a boil and boil for about 3 minutes. Remove from heat and pour evenly over crackers. Bake 5-6 minutes. Remove from the oven and sprinkle with the chocolate chips. Let sit for 5 minutes to soften chocolate. Spread the melted chips on the crackers and top with chopped pecans.
3. Cool completely (a few hours) and break into pieces to serve.
 This week's recipe was chosen by Mike of
  I couldn't help but add some yummy diced dried apricots and dried mangoes that I had on hand. The sweet, plump fruit really accentuated the nutty flavor and tender texture of these scones. They were very much enjoyed around here!
 These were like two classic baked goods combined into one delicious bar. A chewy walnut blondide topped with a layer of creamy new york cheesecake and cut into delicious squares of heaven. In one word: amazing.
 If you're not up for making your own blondie dough, feel free to use a chocolate chip cookie mix or canned dough.Cheesecake Blondie BarsMakes 9" Square Pan
1 cup flour
1/2 teaspoon baking powder
1/8 teaspoon baking soda
1/2 teaspoon salt
1/2 cup chopped walnuts
1/3 cup butter
1 cup packed brown sugar
1 egg
1 tablespoon vanilla extract
2/3 cup semisweet chocolate chips
1 (8 ounce) package cream cheese1 egg
1/3 cup white sugar
1. Preheat oven to 350 degrees F. Grease/line a 9" square pan.
2. BLONDIE LAYER: Combine flour, baking powder, baking soda, salt and nuts. Mix well and set aside. Melt butter. Add brown sugar and mix well. Cool slightly. Add egg and vanilla and blend well. Add flour mixture, a little at a time, mixing well. Spread into pan. Sprinkle chocolate chips on top.
3. CHEESECAKE LAYER: Using an electric mixer, beat together the cream cheese, egg and sugar until smooth. Spread the cream cheese mixture on top of the blondie batter.
4. Bake for 30-40 minutes or until cheesecake is almost set in the middle when you jiggle the pan. Cool fully in pan then cut into bars and serve.
If you're not up for making your own blondie dough, feel free to use a chocolate chip cookie mix or canned dough.Cheesecake Blondie BarsMakes 9" Square Pan
1 cup flour
1/2 teaspoon baking powder
1/8 teaspoon baking soda
1/2 teaspoon salt
1/2 cup chopped walnuts
1/3 cup butter
1 cup packed brown sugar
1 egg
1 tablespoon vanilla extract
2/3 cup semisweet chocolate chips
1 (8 ounce) package cream cheese1 egg
1/3 cup white sugar
1. Preheat oven to 350 degrees F. Grease/line a 9" square pan.
2. BLONDIE LAYER: Combine flour, baking powder, baking soda, salt and nuts. Mix well and set aside. Melt butter. Add brown sugar and mix well. Cool slightly. Add egg and vanilla and blend well. Add flour mixture, a little at a time, mixing well. Spread into pan. Sprinkle chocolate chips on top.
3. CHEESECAKE LAYER: Using an electric mixer, beat together the cream cheese, egg and sugar until smooth. Spread the cream cheese mixture on top of the blondie batter.
4. Bake for 30-40 minutes or until cheesecake is almost set in the middle when you jiggle the pan. Cool fully in pan then cut into bars and serve.
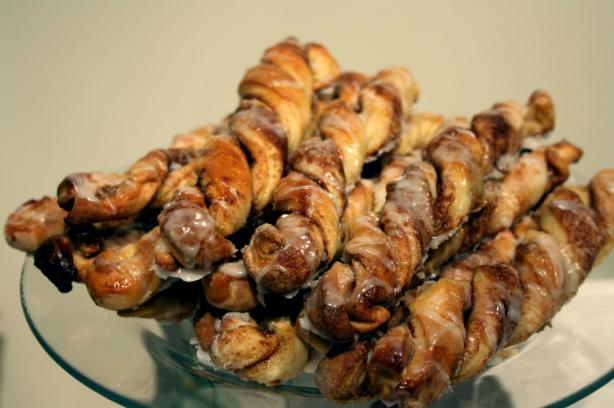 This yeast dough is great for beginners to yeast baking. It only needs one rise and it produces a rich, tender pastry. I love the flakiness combined with the crunchy cinnamon-brown sugar filling.
The recipe is from the
This yeast dough is great for beginners to yeast baking. It only needs one rise and it produces a rich, tender pastry. I love the flakiness combined with the crunchy cinnamon-brown sugar filling.
The recipe is from the 
 Here is a delicious use for cookie crumbs. I like using Nilla wafers or gingersnaps but you can use any kind you like - storebought or homemade. Once I made this with low-fat lemon cranberry cookies and used lemon extract instead of vanilla. It turned out fantastic! Just pulverize the cookies in a food processor or crush them in a plastic bag with a rolling pin. (This can be quite therapeutic, lol).I have made this with and without nuts and it's good either way. Slivered almonds work really well, as do walnuts.
 Vanilla Cookie Crumb Cake1 loaf | adapted from Kellogg's Kitchens1 1/2 cups finely crushed cookie crumbs1/2 cup flour1/3 cup brown sugar 2 tsp baking powder
1/8 tsp baking soda
1/8 tsp salt
1 egg
2/3 cup milk
2 tbsp oil
1/2 tsp vanilla
3/4 cup toasted, chopped nuts
1. Preheat oven to 350 degrees F. Stir together cookie crumbs, flour, brown sugar, baking powder, soda, salt and nuts.
2. In a separate bowl combine the liquid ingreedients then add to dry ingredients all at once.
3. Pour batter into an 8.5 x 4.5 inch loaf pan. Bake for 35-45 minutes or until a toothpick comes out clean. Drizzle a simple glaze on top if desired or serve plain.
Vanilla Cookie Crumb Cake1 loaf | adapted from Kellogg's Kitchens1 1/2 cups finely crushed cookie crumbs1/2 cup flour1/3 cup brown sugar 2 tsp baking powder
1/8 tsp baking soda
1/8 tsp salt
1 egg
2/3 cup milk
2 tbsp oil
1/2 tsp vanilla
3/4 cup toasted, chopped nuts
1. Preheat oven to 350 degrees F. Stir together cookie crumbs, flour, brown sugar, baking powder, soda, salt and nuts.
2. In a separate bowl combine the liquid ingreedients then add to dry ingredients all at once.
3. Pour batter into an 8.5 x 4.5 inch loaf pan. Bake for 35-45 minutes or until a toothpick comes out clean. Drizzle a simple glaze on top if desired or serve plain.
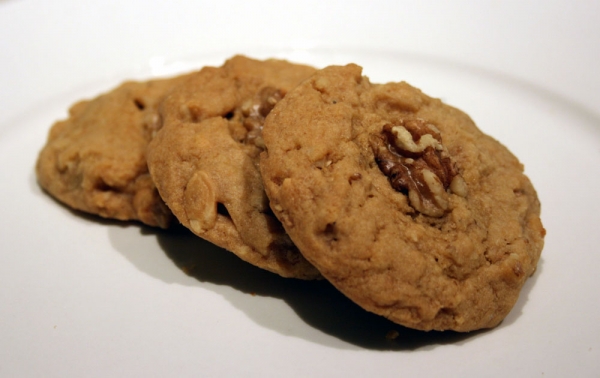 Subtly sweet, the walnuts shine in this recipe with their delectable crunch contrasting against the chewiness of the surrounding cookie. They are a delicately flavored cookie and a nice change from chocolate chip. In this book,
  Besides being yummy in cookies, walnuts do wonders for your health and include the following benefits:-A rich source of omega-3 fatty acids which improve cardiovascular health and provide anti-inflammatory benefits.-Ellagic acid in walnuts is an antioxidant compound that boosts the immune system and has anticancer properties.-Contain melatonin which is a powerful antioxidant and induces a good night's sleep.-Reduce total cholesterol in the body.-Excellent source of a proteins, fiber, B-vitamins and minerals (iron, magnesium, phosphorus, copper and manganese).
-Walnuts are also called 'brain food' not only due to their wrinkled appearance that resembles the brain, but also due to the fact that they contain high levels of omega-3 fatty acids. Nearly 60% of our brain is rimarily omega-3 fatty acids.
-Improve bone health.
-Reduce the risk of Alzheimer's by arresting the formation of the amyloid plaques that are found in the brains of patients.-Has the perfect ratio of omega-6 to omega-3 fatty acids, which is 4:1.
Besides being yummy in cookies, walnuts do wonders for your health and include the following benefits:-A rich source of omega-3 fatty acids which improve cardiovascular health and provide anti-inflammatory benefits.-Ellagic acid in walnuts is an antioxidant compound that boosts the immune system and has anticancer properties.-Contain melatonin which is a powerful antioxidant and induces a good night's sleep.-Reduce total cholesterol in the body.-Excellent source of a proteins, fiber, B-vitamins and minerals (iron, magnesium, phosphorus, copper and manganese).
-Walnuts are also called 'brain food' not only due to their wrinkled appearance that resembles the brain, but also due to the fact that they contain high levels of omega-3 fatty acids. Nearly 60% of our brain is rimarily omega-3 fatty acids.
-Improve bone health.
-Reduce the risk of Alzheimer's by arresting the formation of the amyloid plaques that are found in the brains of patients.-Has the perfect ratio of omega-6 to omega-3 fatty acids, which is 4:1.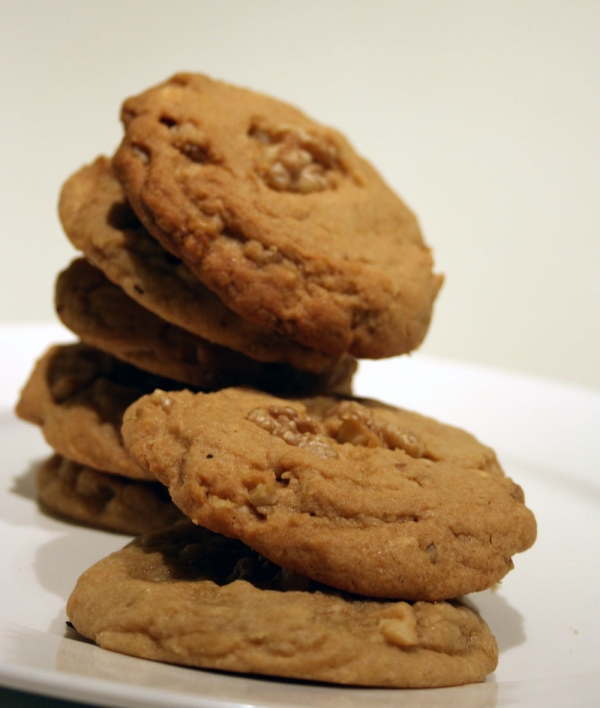 Maple Walnut Dream CookiesMakes 36 |
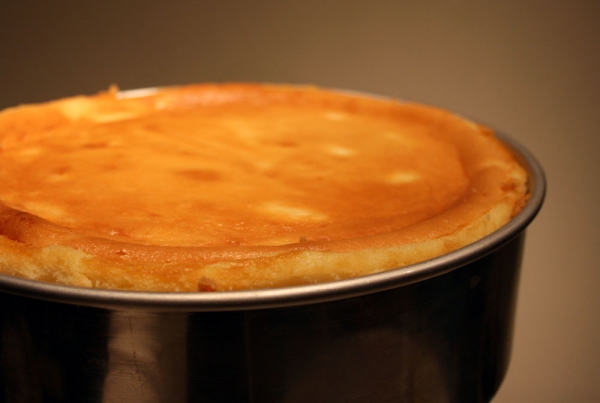
  Despite its decadent-sounding name, this cheesecake wasn't overly sweet. It had a complex, full-bodied flavor and rich brown coloring from the dulce de leche (caramellized sweetened condensed milk). It is the perfect cake to make for your sweetheart to complete your romantic v-day dinner. Even if you are like me and you don't have a sweetheart, don't let that stop you. This is just as delicious eaten alone :) I drizzled some extra sweetened condensed milk over the top before serving and crowned it with a whipped cream rosette.***TIP*** With all cheesecakes I get the best results when I bake them a day before serving so they have a chance to cool fully - first on the counter then in the fridge overnight where the flavors truly come together and the cake ripens to its best just in time for dessert.To prevent condensation from forming on your saran wrap when you cover your cheesecake, put a paper towel between the wrap and the cake to absorb the moisture. This way, it won't drip back down onto the cake making it look like it's weeping.
 Dulce de Leche Cheesecake
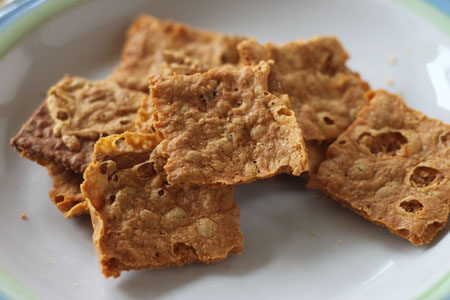


 Thank you everybody and please feel free to add in your link in the Widget below! For future months, email me your blog links and I'll include them in the monthly round-up.
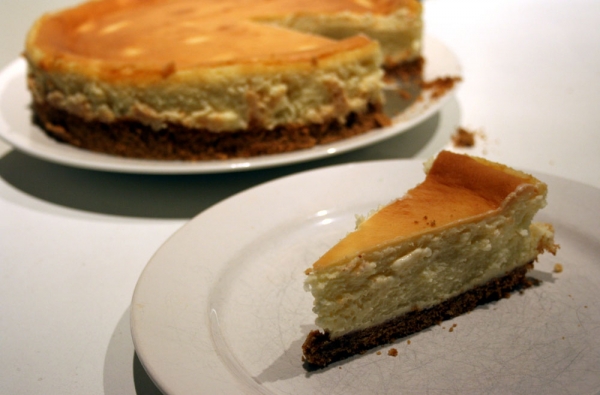 This is the ultimate pure cheesecake. I'm not exaggerating. Cheesecake lovers, you MUST try this. There's no chocolate marble or strawberry swirl to take the glory away from the ultra-dreamy filling. The top is slightly sweeter from the beautiful caramellization while the inside is smooth and creamy. The only change I made to the original recipe is that I used a graham cracker crust instead of a sponge cake crust.I will also be including this in my Copycat Club Feb/11 round-up. Please join me - see link above :)
Junior's Original New York Cheesecake10" Cake | Junior's Cheesecake Cookbook
Sponge Cake Layer
1/2 cup sifted cake flour
1 teaspoon baking powder
1 pinch salt
3 large eggs, seperated
1/3 cup sugar
2 tablespoons sugar
1 teaspoon pure vanilla extract
3 drops lemon extract
3 tablespoons unsalted butter, melted
1/4 teaspoon cream of tartar
Cheesecake Filling
4 (8 ounce) packages cream cheese
1 2/3 cups sugar
1/4 cup cornstarch
1 tablespoon pure vanilla extract
2 large eggs
3/4 cup heavy whipping cream
SPONGE CAKE BASE:Preheat the oven to 350 F and generously butter a 9-inch springform pan. Sift the cake flour, baking powder, and salt together ina medium sized bowl and set aside.
Beat the egg yolks together in a large bowl with an electric mixer on high for 3 minutes. Then, with the mixer still running, gradually add the 1/3 cup of sugar and continue beating until thick light-yellow ribbons form in the bowl, about 5 minutes more. Beat in the vanilla and lemon extracts.
Sift the flour mixture over the batter and stir it in by hand until mo more white flecks appear then blend in the butter. In a clean bowl, using clean dry beaters, beat the egg whites and cream of tartar together on high until frothy. Gradually add the remaining 2 tablespoons sugar and continue beating until stiff peaks form (the whites should stand up in stiff peaks, but not be dry). Stir about 1/3 cup of the whites into the batter, then gently fold in the remaining whites (don't worry if a few white specks remain). Gently spoon the batter into the pan. Bake the cake just until the center of the cake springs back when lightly touched, only about 10 minutes (watch carefully!) Let the cake cool in the pan on a wire rack while you continue making the cheesecake filling. Do not remove the cake from the pan.FILLING:Place one 8-ounce package of the cream cheese, 1/3 cup of the sugar, and the cornstarch in a large bowl. Beat with an electric mixer on low until creamy, about 3 minutes, then beat in the remaining 3 packages of the cream cheese. Increase the mixer speed to high and beat in the remaining 1 1/3 cups of the sugar, then beat in the vanilla. Blend in the eggs, one at a time, beating the batter well after each one. Blend in heavy cream. At this point mix the filling only until completely blended (just like they do at Junior's) Be careful not to overmix the batter.
Gently spoon the cheese filling on top of the baked sponge cake layer. Place the springform pan in a large shallow pan containing hot water that comes about 1 inch up the side of the pan. Bake the cheesecake until the center barely jiggles when you shake the pan, about 1 hour. Cool the cake on a wire rack for 1 hour. Then cover the cake with plastic wrap and refrigerate until it's completely cold, at least 4 hours or overnight. Remove the sides of the springform pan. Slide the cake off of the bottom of the pan onto a serving plate. Or, if you wish, simply leave the cake on the removable bottom of the pan and place it on a serving plate. Store any leftover cheesecake in the refrigerator.
This is the ultimate pure cheesecake. I'm not exaggerating. Cheesecake lovers, you MUST try this. There's no chocolate marble or strawberry swirl to take the glory away from the ultra-dreamy filling. The top is slightly sweeter from the beautiful caramellization while the inside is smooth and creamy. The only change I made to the original recipe is that I used a graham cracker crust instead of a sponge cake crust.I will also be including this in my Copycat Club Feb/11 round-up. Please join me - see link above :)
Junior's Original New York Cheesecake10" Cake | Junior's Cheesecake Cookbook
Sponge Cake Layer
1/2 cup sifted cake flour
1 teaspoon baking powder
1 pinch salt
3 large eggs, seperated
1/3 cup sugar
2 tablespoons sugar
1 teaspoon pure vanilla extract
3 drops lemon extract
3 tablespoons unsalted butter, melted
1/4 teaspoon cream of tartar
Cheesecake Filling
4 (8 ounce) packages cream cheese
1 2/3 cups sugar
1/4 cup cornstarch
1 tablespoon pure vanilla extract
2 large eggs
3/4 cup heavy whipping cream
SPONGE CAKE BASE:Preheat the oven to 350 F and generously butter a 9-inch springform pan. Sift the cake flour, baking powder, and salt together ina medium sized bowl and set aside.
Beat the egg yolks together in a large bowl with an electric mixer on high for 3 minutes. Then, with the mixer still running, gradually add the 1/3 cup of sugar and continue beating until thick light-yellow ribbons form in the bowl, about 5 minutes more. Beat in the vanilla and lemon extracts.
Sift the flour mixture over the batter and stir it in by hand until mo more white flecks appear then blend in the butter. In a clean bowl, using clean dry beaters, beat the egg whites and cream of tartar together on high until frothy. Gradually add the remaining 2 tablespoons sugar and continue beating until stiff peaks form (the whites should stand up in stiff peaks, but not be dry). Stir about 1/3 cup of the whites into the batter, then gently fold in the remaining whites (don't worry if a few white specks remain). Gently spoon the batter into the pan. Bake the cake just until the center of the cake springs back when lightly touched, only about 10 minutes (watch carefully!) Let the cake cool in the pan on a wire rack while you continue making the cheesecake filling. Do not remove the cake from the pan.FILLING:Place one 8-ounce package of the cream cheese, 1/3 cup of the sugar, and the cornstarch in a large bowl. Beat with an electric mixer on low until creamy, about 3 minutes, then beat in the remaining 3 packages of the cream cheese. Increase the mixer speed to high and beat in the remaining 1 1/3 cups of the sugar, then beat in the vanilla. Blend in the eggs, one at a time, beating the batter well after each one. Blend in heavy cream. At this point mix the filling only until completely blended (just like they do at Junior's) Be careful not to overmix the batter.
Gently spoon the cheese filling on top of the baked sponge cake layer. Place the springform pan in a large shallow pan containing hot water that comes about 1 inch up the side of the pan. Bake the cheesecake until the center barely jiggles when you shake the pan, about 1 hour. Cool the cake on a wire rack for 1 hour. Then cover the cake with plastic wrap and refrigerate until it's completely cold, at least 4 hours or overnight. Remove the sides of the springform pan. Slide the cake off of the bottom of the pan onto a serving plate. Or, if you wish, simply leave the cake on the removable bottom of the pan and place it on a serving plate. Store any leftover cheesecake in the refrigerator.
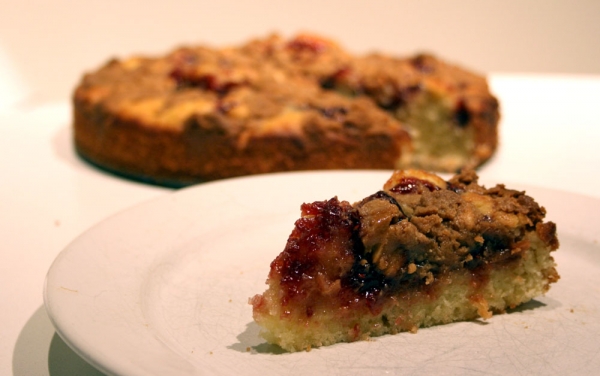 Did you know that food allergies affect 8% of children under 3, and 6-8% of school-age children. 85% of children outgrow milk and egg allergies by age 5, but only 20% outgrow peanut allergies by age 6. The prevalence of peanut allergies in children has doubled in the past five years. I guess those days of good old PB&J sandwiches are going the way of the dinosaurs. Now it would have to be something like "Lactose-Free-Nut-Free Soy PB & J"! Tee hee.
 It's too bad schools have to be so strict with enforcing peanut-free lunches due to allergies. This would make a great lunchbox treat - sturdy and not too sweet with a chewy centre. I guess your kids will just have to eat peanut butter and jelly crumb cake at home instead! This recipe starts out as a thin layer of a basic coffee cake batter topped with a generous serving of jelly and a unique peanut butter crumb topping. The crumbs are to die for. I had to exert all kinds of crazy will-power not to pick all the crumbs off the cake!
 Peanut Butter and Jelly Crumb Cake10" Round Cake |


