
 Here are some interesting cranberry facts.*There are 80 cranberry growers in British Columbia [I'm from B.C. and I didn't even know this until today!]. 74 growers belong to the Ocean Spray Growers Co-operative, and 4 are independent. Almost all the berries produced in British Columbia are sold and shipped into the United States for processing to the Ocean Spray Pool along with the crop from Wisconsin, Massachusetts, New York, Maine, Oregon and Washington.*Contrary to popular belief, cranberries do not grow in water. They are grown on peat or sandy marshes. Because cranberries float, marshes are flooded when the fruit is ready for harvesting.
*The cranberry gets its name from Dutch and German settlers, who called it "crane berry". When the vines bloom in late spring and the flowers' light pink petals twist black, they resemble the head and bill of a crane. Over time, the name was shortened to cranberry.*Cranberries contain no cholesterol and virtually no fat and are low in sodium. Cranberry products may contain substantial levels of dietary fiber and vitamins.So, make some cake and enjoy those cranberries :)
Cranberry Orange Cake
1 orange
2 cups (500 mL) all-purpose flour
1 cup (250 mL) granulated sugar
1-1/2 tsp (7 mL) baking powder
1/2 tsp (2 mL) baking soda
1/2 tsp (2 mL) salt
1 cup (250 mL) chopped fresh or frozen cranberries
1 egg, beaten
1/4 cup (50 mL) butter, melted
1. Grate rind from orange. Squeeze juice into liquid measure; add enough water to make 3/4 cup (175 mL). Set aside.
2. In large bowl, whisk flour, sugar, baking powder, baking soda, salt and orange rind; stir in cranberries. In small bowl, whisk together egg, butter and orange juice; stir into flour mixture just until blended. Spread in greased 9- x 5-inch (2 L) loaf pan.
3. Bake in centre of 350°F (180°C) oven for 50 to 60 minutes or until cake tester inserted in centre comes out clean. Let cool in pan for 10 minutes; turn out onto rack and let cool completely. Wrap and let stand for 12 hours before slicing. (Make-ahead: Store at room temperature for up to 2 days or overwrap with heavy-duty foil and freeze for up to 2 weeks.)
Here are some interesting cranberry facts.*There are 80 cranberry growers in British Columbia [I'm from B.C. and I didn't even know this until today!]. 74 growers belong to the Ocean Spray Growers Co-operative, and 4 are independent. Almost all the berries produced in British Columbia are sold and shipped into the United States for processing to the Ocean Spray Pool along with the crop from Wisconsin, Massachusetts, New York, Maine, Oregon and Washington.*Contrary to popular belief, cranberries do not grow in water. They are grown on peat or sandy marshes. Because cranberries float, marshes are flooded when the fruit is ready for harvesting.
*The cranberry gets its name from Dutch and German settlers, who called it "crane berry". When the vines bloom in late spring and the flowers' light pink petals twist black, they resemble the head and bill of a crane. Over time, the name was shortened to cranberry.*Cranberries contain no cholesterol and virtually no fat and are low in sodium. Cranberry products may contain substantial levels of dietary fiber and vitamins.So, make some cake and enjoy those cranberries :)
Cranberry Orange Cake
1 orange
2 cups (500 mL) all-purpose flour
1 cup (250 mL) granulated sugar
1-1/2 tsp (7 mL) baking powder
1/2 tsp (2 mL) baking soda
1/2 tsp (2 mL) salt
1 cup (250 mL) chopped fresh or frozen cranberries
1 egg, beaten
1/4 cup (50 mL) butter, melted
1. Grate rind from orange. Squeeze juice into liquid measure; add enough water to make 3/4 cup (175 mL). Set aside.
2. In large bowl, whisk flour, sugar, baking powder, baking soda, salt and orange rind; stir in cranberries. In small bowl, whisk together egg, butter and orange juice; stir into flour mixture just until blended. Spread in greased 9- x 5-inch (2 L) loaf pan.
3. Bake in centre of 350°F (180°C) oven for 50 to 60 minutes or until cake tester inserted in centre comes out clean. Let cool in pan for 10 minutes; turn out onto rack and let cool completely. Wrap and let stand for 12 hours before slicing. (Make-ahead: Store at room temperature for up to 2 days or overwrap with heavy-duty foil and freeze for up to 2 weeks.)
Showing posts with label Canadian Living. Show all posts
Showing posts with label Canadian Living. Show all posts
Friday, January 14, 2011
Cranberry Orange Cake
Here are some interesting cranberry facts.*There are 80 cranberry growers in British Columbia [I'm from B.C. and I didn't even know this until today!]. 74 growers belong to the Ocean Spray Growers Co-operative, and 4 are independent. Almost all the berries produced in British Columbia are sold and shipped into the United States for processing to the Ocean Spray Pool along with the crop from Wisconsin, Massachusetts, New York, Maine, Oregon and Washington.*Contrary to popular belief, cranberries do not grow in water. They are grown on peat or sandy marshes. Because cranberries float, marshes are flooded when the fruit is ready for harvesting.
*The cranberry gets its name from Dutch and German settlers, who called it "crane berry". When the vines bloom in late spring and the flowers' light pink petals twist black, they resemble the head and bill of a crane. Over time, the name was shortened to cranberry.*Cranberries contain no cholesterol and virtually no fat and are low in sodium. Cranberry products may contain substantial levels of dietary fiber and vitamins.So, make some cake and enjoy those cranberries :)
Cranberry Orange Cake
1 orange
2 cups (500 mL) all-purpose flour
1 cup (250 mL) granulated sugar
1-1/2 tsp (7 mL) baking powder
1/2 tsp (2 mL) baking soda
1/2 tsp (2 mL) salt
1 cup (250 mL) chopped fresh or frozen cranberries
1 egg, beaten
1/4 cup (50 mL) butter, melted
1. Grate rind from orange. Squeeze juice into liquid measure; add enough water to make 3/4 cup (175 mL). Set aside.
2. In large bowl, whisk flour, sugar, baking powder, baking soda, salt and orange rind; stir in cranberries. In small bowl, whisk together egg, butter and orange juice; stir into flour mixture just until blended. Spread in greased 9- x 5-inch (2 L) loaf pan.
3. Bake in centre of 350°F (180°C) oven for 50 to 60 minutes or until cake tester inserted in centre comes out clean. Let cool in pan for 10 minutes; turn out onto rack and let cool completely. Wrap and let stand for 12 hours before slicing. (Make-ahead: Store at room temperature for up to 2 days or overwrap with heavy-duty foil and freeze for up to 2 weeks.)
Thursday, December 2, 2010
Spritz Cookies 3 Ways: Espresso, Chocolate & Vanilla


I am IN LOVE with this recipe because of its ease to handle and amazing texture. It is tender and oh-so-buttery. It holds its shape wonderfully thus producing the most perfectly-shaped cookies. Most recipes call for an egg to hold it together, but I find that the egg makes the cookies a little too tough and not quite crumbly enough. This recipe is egg-free and the end result is a lot like shortbread. Feel free to add food coloring for a festive touch or play around with flavorings and extracts.
The three variations I have included here make both a nice display of dark, golden and pale cookies with flavors that also pair well together - coffee, chocolate and vanilla.
Spritz cookies are traditional Scandanavian Christmas cookies. They are delicate, simple butter cookies, shaped by putting the dough through a cookie press. They are small in comparison to the monster-sized cookies we see these days, measuring only about 1 1/2" in diameter. I think they are just adorable and so retro. Cookie presses these days are cheap. If you haven't inherited one from your mom, you can get one like this Wilton Comfort Grip on Amazon for $11.35! They're so affordable and cute that I will probably be giving a few of these along with a pretty bag of assorted Spritz cookies to some of my friends this Christmas.
However, even if you don't own a Cookie Press you can still make these cookies. Just use a large star piping tip to pipe the dough into little rosettes or squiggles or lines.
Spritz cookies are not as simple as they may appear. It took me a few batches of ugly cookies to get the hang of it.
Here are some tips to making perfect Cookie-Press Cookies:
- The dough must be room temperature. If it's too cold, it won't stick to the cookie sheet. It's best if your butter is very soft to begin with.
- Non-stick cookie sheets do not work, because the dough won't adhere to it. Shiny aluminum is best, and it too must be room temperature, ungreased and not lined with parchment paper. If the metal sheet is warm, the dough won't stick.
- Make sure the press is absolutely upright in relation the the sheet, with the base resting flat on the surface.
- It takes practice to press out just the right amount of dough. Too little and it sticks to the press. Too much, and the design of the cookie gets lost after baking.
- Spritz dough does not freeze well. If you want to freeze these cookies, do so AFTER they are baked, in airtight containers.
- If you are baking chocolate spritz it can be hard to tell when they are done. Therefore, put at least one vanilla (light colored) cookie on the tray so you can use it to gauge color for doneness.
Spritz Butter Cookies (3 ways)
Makes 3 dozen | adapted from Canadian Living, Dec. 2010
Basic Recipe:
1 cup butter, room temperature
2/3 cup powdered sugar
2 tsp vanilla extract
1/4 tsp salt
1 2/3 cup flour
1. Preheat oven to 350 degrees F. Do NOT grease pans but do use heavy-duty shiny pans to avoid overbrowning the bottoms.
2. Using a mixer with the paddle attachment combine butter and powdered sugar, mixing until light and creamy. Add in vanilla and salt. Mix to incorporate. With the mixer off, add flour. Mix until combined and sticks together to form one mass of dough. Do NOT chill or it will be too firm to press or pipe onto the cookie sheet. [At this point you can refrigerate the cookies on the sheets to be baked later].
3. Fill your cookie press or piping bag (use a large star tip). Pipe or press onto the ungreased cookie sheet. These do not spread, so you can put them quite close together.
4. Bake for 8-10 minutes (or less) until edges are just golden and tops are still pale. Cool fully and store airtight.
Espresso variation: Dissolve 2 tsp instant espresso powder (or 1 tbsp instant coffee powder) into the vanilla before adding vanilla to the mixture in step 3.
Chocolate variation: Substitute 1/3 cup unsweetened cocoa powder for 1/3 cup flour.
Wednesday, October 27, 2010
DB: Mini Cake Donuts
The October 2010 Daring Bakers challenge was hosted by Lori of Butter Me Up. Lori chose to challenge DBers to make doughnuts. She used several sources for her recipes including Alton Brown, Nancy Silverton, Kate Neumann and Epicurious.
I have been meaning to make donuts for a long time but kept putting off because it involved deep frying. But I have since overcome my fear of hot oil and have come to embrace its yummy goodness.
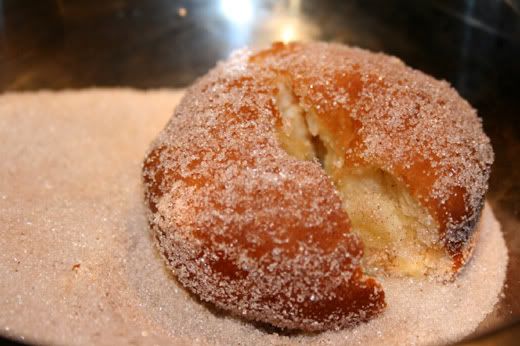
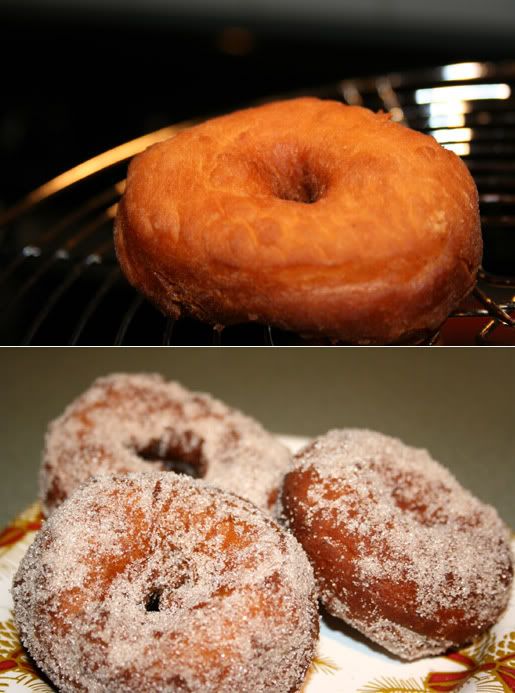
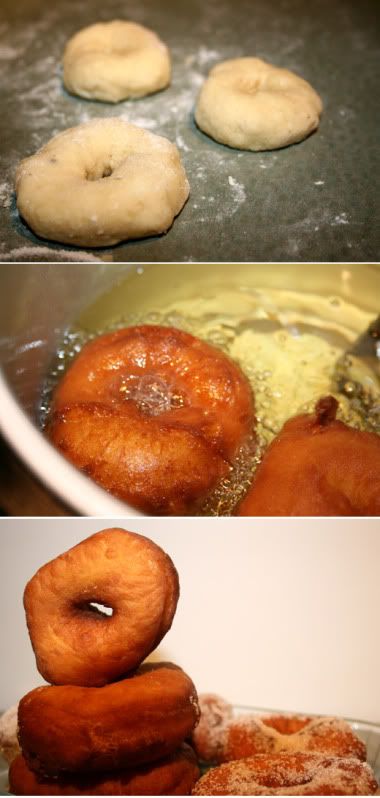
I used a cake donut recipe from Canadian Living magazine. I would have preferred to try a yeasted donut but didn't plan well enough ahead of time. These came together as easily as pancake batter, however, they required a 1 hour rest in the fridge. I am THRILLED with how they turned out. Super cute, 1 1/2" donuts or as the recipe directs, donut holes. I used my fingers to shape them.
My dad preferred them without the sugar, opting to have them dunked in his tea like a biscuit. Overall, a success! I will definitely be trying a yeasted version in the future and perhaps experimenting with a Krispy Kreme Copycat recipe.
Cake Donuts
from Canadian Living
3 cups flour
1 tbsp baking powder
3/4 tsp salt
1/2 tsp grated nutmeg
1/2 cup light cream (10% M.F.)
1/2 cup heavy cream
1 tsp vanilla
3 eggs
1 cup granulated sugar
Canola oil or safflower oil or vegetable oil, for deep-frying,
Cinnamon Sugar for coating
Preparation:
In bowl, whisk flour, baking powder, salt and nutmeg. In small bowl, whisk 10% and whipping creams and vanilla. Set aside.
In large bowl, beat eggs with sugar until pale; gradually beat in cream mixture. Stir in flour mixture to make soft sticky dough. Cover and refrigerate for 1 hour.
Spray a mini (1 tbsp) ice-cream scoop or 1 tbsp measure with nonstick spray. In deep fryer or deep saucepan, heat 2 inches oil until deep-fryer thermometer reads 350 degrees F. Drop batter by tablespoonfuls into oil, 6 at a time; deep-fry, turning once, until golden and puffed, 3 to 4 minutes. With slotted spoon, transfer to paper towels to drain. Transfer to rack; let cool slightly then toss in cinnamon sugar to coat.
Thursday, August 5, 2010
Blueberry Lemon Cream Cake


After anxiously waiting for the marks to be released, I found out that I PASSED my accounting exam! I can add those 3 little letters - CMA - after my name. It feels fantastic and this cake was a great way to celebrate!
It has 4 thin layers of lemon flavored sponge cake sandwich 3 layers of fresh, plump blueberries suspended in a slightly tart lemon cream filling. This was a delightfully light and summery dessert. Fancy enough for a special occasion yet not overly fussy.
The recipe comes from The Complete Canadian Living Baking Book: The Essentials of Home Baking.
Note: It's important to use an electric mixer for the cake to get the maximum rise by beating the eggs thoroughly.

Blueberry Lemon Cream Cake
1 - 10" Caks | adapted from Canadian Living
3 cups (750 mL) raspberries (or any fresh berries)
1 tbsp (15 mL) icing sugar
Sponge Cake:
6 eggs
1 cup (250 mL) granulated sugar
1 tsp (5 mL) vanilla
1 cup (250 mL) all-purpose flour
1/2 tsp (2 mL) baking powder
1/4 tsp salt
1/3 cup (75 mL) butter, melted
Lemon Cream:
1 pkg unflavoured gelatin
3 eggs
2 egg yolks
1-1/4 cup (300 mL) granulated sugar
1 tbsp (15 mL) grated lemon rind
2/3 cup (150 mL) lemon juice
1-1/3 cups (325 mL) whipping cream
1. Sponge Cake: Line bottom of 10" springform pan with parchment paper; grease side. Set aside. Set eggs in bowl of warm (100°F/40°C) water for 5 minutes.
2. In electric stand mixer on medium-high speed, beat eggs until foamy. Gradually beat in sugar until pale yellow and batter falls in ribbons when beaters are lifted, about 10 minutes. Fold in lemon rind and vanilla.
3. Sift together flour, baking powder and salt ; sift one-third over egg mixture and fold in. Repeat twice. Transfer one-quarter to bowl; fold in butter. Fold back into remaining batter. Pour into prepared pan.
4. Bake in centre of 325°F (160°C) oven until cake springs back when lightly touched in centre, 45 to 50 minutes. Let cool in pan on rack for 10 minutes. Remove side of pan; let cool on rack. (Make-ahead: Wrap in plastic wrap and store for up to 24 hours, or overwrap with heavy-duty foil and freeze for up to 2 weeks.)
5. Lemon Cream: In small bowl, sprinkle gelatin over 3 tbsp (50 mL) water; set aside. In heatproof bowl, whisk together eggs, egg yolks, sugar, lemon rind and lemon juice. Place over simmering water; cook, stirring frequently, until translucent and thick enough to softly mound on spoon, about 20 minutes.
6. Strain into large bowl. Stir in gelatin mixture until melted. Place plastic wrap directly on surface; refrigerate, stirring every 10 minutes, until cool and mixture can mound on spoon, about 1 hour. In bowl, beat cream; fold one-third into lemon mixture. Fold in remaining cream. Fold in 2-1/3 cups (575 mL) of the berries; set aside.
7. Assembly: Line bottom and side of same pan with waxed/parchment paper. Cut cake horizontally into thirds. Place top cake layer, cut side up, in pan. Spread with half of the lemon cream. Top with middle cake layer, remaining lemon cream and remaining cake layer, cut side down. Cover and refrigerate until set, about 4 hours. (Make-ahead: Refrigerate for up to 24 hours.)
8. To serve, remove side of pan. Sprinkle top with icing sugar. Arrange remaining berries around top edge.
Wednesday, June 23, 2010
Raspberry Nectarine Pie


Summer fruits are the best. Vibrant, juicy and refreshing. They tantalize all your senses and embody the essence of summer. The only problem is - just like summer, they are fleeting with only a short window of time to be enjoyed before they quickly get bruised and overripened. Luckily for us overripe peaches and nectarines are wonderful for baking. These fruits take on a new life in this pie, playing a melody of sweetness and tartness. Ruby-red raspberries contrasted against the bright yellow nectarines.
Did you know?
-genetic studies show that smooth nectarine skin is from a recessive gene, whereas fuzzy peach skin is from a dominant gene.
-nectarines bruise more easily from not having fuzz.
-peaches shouldn't be refrigerated.
-these fruits and they stop ripening after they are picked.
-peach skin should be removed before using in baking but nectarine skin can be left on.

I had to use a pie crust shield (like the one above) because my edges were browning way too quickly, however, as you can see the edges are still too brown. By the way, the pie crust shield is an invaluable tool. I use it every time I make pies and it saves so much time over fiddling with aluminum foil to cover the edges. Well worth the $5 investment.
Raspberry Nectarine Pie
9" Pie | Canadian Living Baking Book
Sweet Pastry for double-crust 9" pie (below)
5 cups (1 1/2 lbs) sliced peeled peaches/nectarines
1 cup raspberries, fresh or frozen
1/4 cup flour
1/2 tsp salt
3/4 cup sugar *could probably use less but I used it all and loved it
1 tbsp lemon juice
Milk and sugar for brushing/sprinkling
1. Line 9-inch pie plate with bottom crust pastry dough. Preheat oven to 425 degrees F. In large bowl, combine nectarines/peaches, raspberries, sugar, flour, lemon juice. Fill pastry shell with peach mixture.
2. Moisten edges of bottom crust. Cover with top crust (or latticed top crust). Trim and flute edges. Cut steam vents. Brush top with milk or cream; sprinkle lightly with granulated sugar.
3. Bake at 425 degree F in bottom third of oven for 15 minutes then reduce heat to 350 degrees F and bake for 35 to 45 minutes longer or until peaches are tender, filling thickened and crust golden. Cover edges with foil/pie shield if browning too quickly. Store at room temperature.
Double Crust Sweet Pastry
pastry for one 9" double crust | Chocolate & Zucchini
2 1/4 cups flour
2/3 cup sugar
1/2 tsp salt
14 tbsp cold butter, cubed
4 tbsp milk
1. Combine flour, sugar, salt in food processor.
2. Pulse in butter, don't overprocess.
3. Add in milk as needed just so it comes togethers when you press some between your fingers. Divide dough in half and refrigerate or freeze, well wrapped.
Subscribe to:
Posts (Atom)


