Friday, November 27, 2009

DB: Cannoli Sandwich Cookies


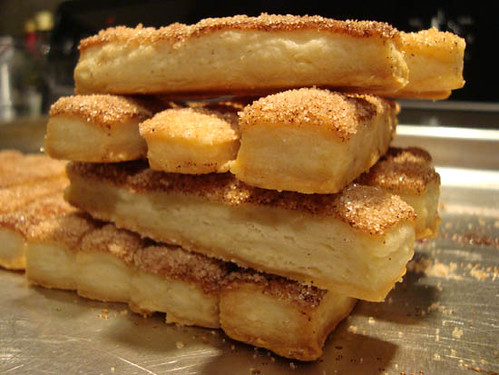
So, this month's Daring Bakers challenge was not supposed to involve baking, but my twist still involved my oven. I took the inspiration from common cannoli flavorings - nuts, cheese, orange, chocolate - on the challenge was a baked cannoli cookie with chocolate-mascarpone filling.

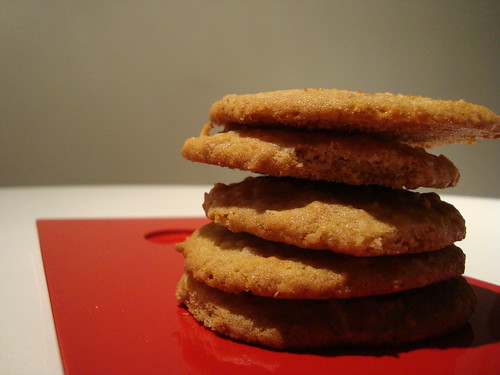
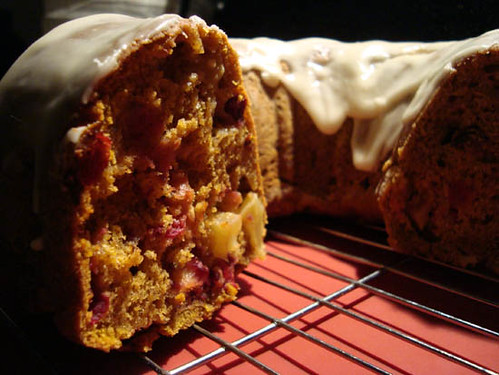
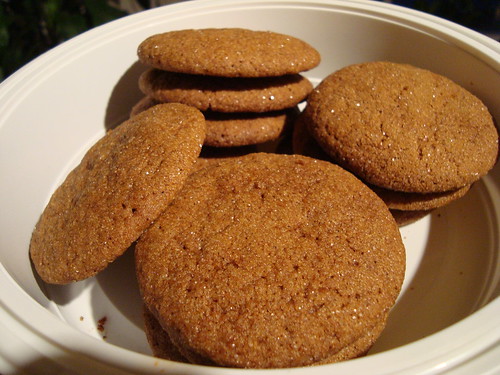
The cookie itself is delicate and crumbly, a little like shortbread. This slice-and-bake cookie fits itself nicely into your schedule. No need to even thaw the dough before baking - just slice directly out of the freezer and pop them into the oven. The flavors complemented each other really nicely. I think I will be adding these to my Christmas baking list (with a few changes to make them more festive). Pistachios and dried cranberries with cream cheese frosting. I'm looking forward to it!

The November 2009 Daring Bakers Challenge was chosen and hosted by Lisa Michele of Parsley, Sage, Desserts and Line Drives. She chose the Italian Pastry, Cannolo (Cannoli is plural), using the cookbooks Lidia’s Italian-American Kitchen by Lidia Matticchio Bastianich and The Sopranos Family Cookbook by Allen Rucker; recipes by Michelle Scicolone, as ingredient/direction guides. She added her own modifications/changes, so the recipe is not 100% verbatim from either book.

Cannoli Cookies
adapted from Good Life Eats

1 cup butter, softened
3/4 cup sugar
1/4 cup brown sugar
1 large egg
1 tsp vanilla extract
2 1/4 cups flour
1 1/2 tsp baking powder
1/2 tsp orange zest
1/4 tsp cinnamon
1/2 cup finely chopped almonds

Filling
3/4 cup whole milk ricotta
6 oz mascarpone cheese
2 oz bittersweet chocolate, melted and cooled
1/3 cup powdered sugar
3/4 tsp vanilla

4 oz. semi-sweet chocolate, for drizzling

1. Beat butter at medium speed until creamy. Gradually add sugar and brown sugar, beating well. Add egg and vanilla, beat till combined.
2. Combine flour, baking powder, zest, and cinnamon. Add to butter mixture. Beat at medium speed. Stir in pistachios.
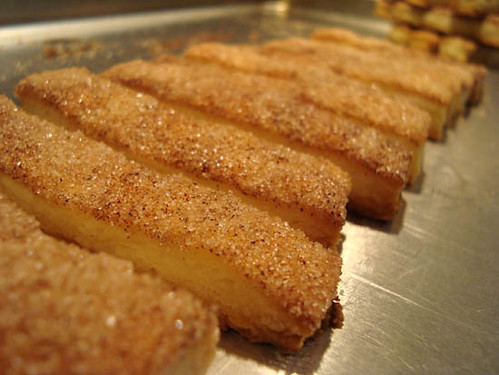
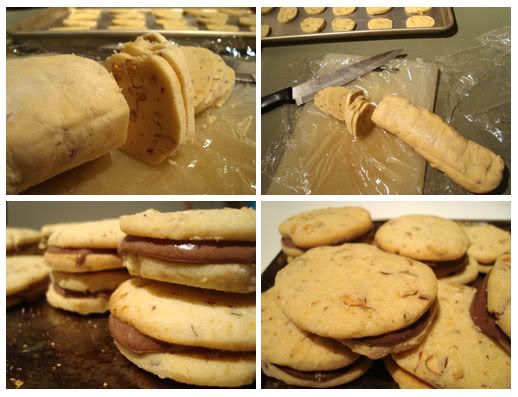
3. Shape dough into two 6" logs. Wrap with wax paper and freeze until firm. Slice frozen dough into 1/8 inch thick rounds. Place rounds on a parchment paper lined cookie sheet.
4. Bake at 350 degrees F for 10-12 minutes, or until lightly browned at edges. Cool 1 minute on pan then transfer to wire rack.
5. Fill completely cooled cookies with cannoli filling. Assemble sandwiches and drizzle with melted chocolate. Cool in refrigerator until chocolate has hardened.
6. Filling: Mix filling ingredients together. Chill until ready to use. To fill sandwiches, pipe filling on the underside of one cookie and sandwich with another.
Drizzle with melted chocolate.

Wednesday, November 25, 2009

Caramel Glazed Apple Pie Cake


The pressure is on! One of my mom's colleagues wants to pay me to do her Christmas baking as she's having a lot of visitors over this year and hates baking. She has no idea what cookies/cakes or how much she'll need. I'm totally hanging here - HELP!!! I need your input. Should I stick to the classics like shortbread and gingerbread? Do you have any recipe suggestions? How should I determine what to charge? Right now I'm thinking of putting together a list of favorites and letting her pick from there or use it as a jump-off point for her to give me some direction.

Now, on to the cake: This is a lightning fast cake to put together. It is a very moist cake (it uses 4 apples!) that tastes just like pie but I like to think it's a little healthier :)
The cake is great on its own but the caramel topping pushes it right over the top - tartness from the apples playing off the decadence of the caramel.

The sugar in the cake caramelizes during baking and gives the cake topping a little crunch. I used 4 different apples: granny smith, gala, mcintosh and spartan, for an added dimsnaion of taste.

Variation: serve hot with vanilla ice cream and drizzle the caramel sauce on top of the ice cream.

Caramel Glazed Apple Pie Cake
Makes 9" x 13" pan

1 cup vegetabile oil
2 cups sugar
2 eggs
2 1/2 cups flour
2 tsp baking powder
1 tsp baking soda
1/2 tsp salt
1 tsp cinnamon
1 tsp nutmeg
4 medium apples, diced small

1 cup caramel sauce or sundae topping (Don't used melted down caramels here or it will be too hard when cooled)
1 tbsp cornstarch or flour

1. Preheat oven to 350F. Grease a 9x13" cake pan.
2. With a mixer beat to combine oil, sugar and eggs.Mix together dry ingredients in a separate bowl then add to wet ingredients. Mix just to combine - it will be thick.
3. Stir in apples and pour into prepared baking pan. Bake for 45-60 minutes or until deep golden brown on top and starts to pull away from sides of the pan.
4. Cool on wire rack in pan. Combine caramel sauce with flour/cornstarch and pour over cake, spreading evenly. It will melt into the cake, filling it with sweet, caramelly goodness.

Tuesday, November 24, 2009

TWD: Chocolate Peanut Caramel Cupcakes


I couldn't find that chestnut paste Dorie calls for in this recipe, so I substituted peanut butter and loved the results. I cut the tops of the cupcakes at a 45 defree angle and filled them with the filling and some ganache then put the tops back on and froated them. They were quite dense (I put a lot of filling in each) and kinda reminded me of chocolate bars. Pretty rich and compact, so I'm glad I made them small. I imagine this recipe would be well suited to hazelnuts as well.


Thank you to Katya of Second Dinner for choosing this recipe!

Friday, November 20, 2009

Bacon Cheddar Breakfast Buns


Oh My God. These are to die for. It's really simple and deliciously rewarding. What's not to love: bacon, cheese, green onions and bread.
You basically make a recipe for 1 loaf of white bread, knead in some herbs and garlic powder, roll it out and spread with ranch and sprinkle with goodies (bacon, grated cheddar, green onions), roll it up like a cinnamon bun, sprinkle some parmesan on top, cut and place in a plan to rise. Bake. Eat. :)


Bacon Cheddar Breakfast Buns
Makes 12 | Adapted from King Arthur Flour

1 cup warm milk
1 tablespoon sugar
2 1/4 tsp active dry yeast
2 tablespoons bacon pan grease or melted butter
3 cups All-Purpose Flour
1 1/2 teaspoons salt
1 tbsp garlic powder
2 tbsp dried oregano

1/4 cup ranch dressing
12 pc. bacon, cooked and chopped, grease reserved
1 cup grated sharp cheddar cheese
3/4 chopped scallions or chives

Pour the warm milk into a mixing bowl and dissolve sugar in milk. Cool to 110 degrees F then the yeast. When the yeast is foamy, add the bacon grease/butter and 2 1/2 cups of flour and the salt and spices. Mix together and then add remaining 1/2 cup of flour if needed to form a soft, slightly sticky dough.

Knead the dough for 3 to 4 minutes, until it begins to behave as if it belonged together. Let it rest while you clean and grease the bowl. Continue kneading a further 3 to 4 minutes, until the dough feels smooth and springy. Let the dough rise until doubled (1 to 2 hours). Deflate it and knead out any stray bubbles, roll it out into a large rectangle and spread with ranch dressing and sprinkle with bacon, cheddar and scallions. Roll up tightly, pinch seam to seal and cut into 12 equal pieces. Arrange in a greased 9x13 inch baking dish. Cover and let rise until almost doubled (45 minutes to 1 hour at room temp or overnight in fridge). *If you are doing the overnight rise, take them out in the morning to bring to room temperature 15 minutes before you preheat the oven.

Just before baking, sprinke the buns with parmesan cheese. Bake at 350 degrees F for 35 to 40 minutes, or until nicely browned.

Tuesday, November 17, 2009

TWD: Cran Apple Tart


The recipe for "Cran Apple Crisps" (baked out of order as all my Nov. TWD recipes are) was chosen by The Repressed Pastry Chef. Check out her blog for the original recipe. I happened to put my own twist on the crisp, making it into a tart instead of a spoon dessert. I'll take any excuse to use my 9" fluted tart pan. I love that thing. A simple all-purpose pie crust filled with Dorie's apple cranberry filling and topped with her crisp topping. Because the tart pan is so shallow I used only about 2/3 of the recipe (2.5 apples instead of 4, the rest scaled accordingly). I froze the (delicious) extra streusel in a ZipLock container for easy to throw together fruit crisps or muffin toppings in a flash.


When I first put this into the oven the filling was piled so high it looked like an anthill, but thankfully the apples cooked down and in the end it was just the perfect height. Note: this bubbles a lot! I should've known better and put foil under my pan to save myself a lot of sticky puddles in my oven. Served at room temperature the next day it was even better than hot out of the oven. It was a beautiful medley of sweet and tart with contrasting textures from fresh and dried cranberries and bits of coconut in the topping. Nobody could guess there was coconut but when I told them their reaction was: "ahhh.... so THAT'S what it is". They knew something in there tasted different (in a good way!) but couldn't put their finger on it.

Monday, November 16, 2009

Best-Ever Shortbread


The shortbread cookie is a favorite in my house. What can I say, they love butter! My son could eat it off a spoon if I let him (which I don't). Because it's so well loved I have at least 25 recipes for shortbread, each one claiming to be "the best". It comes from Nancy Silverton's cookbook called Pastries from La Brea Bakery. I was going to skip it until I read her little blurb before the recipe which said basically that: don't skip this recipe just because you think you have enough shortbread recipes. She claims hers is better than all the rest. AND SHE'S RIGHT!!!

The dough is so easy to manage. I did the whole thing in my mixer, refrigerated it overnight and it baked up beautifully, filling my house with the sweet smell of butter. I think the icing sugar is the key to this recipe. I especially like that it doesn't call for corn starch like many other shortbread recipes do.

Some recipes are too crumbly to roll and cut while others are rollable but too moist, losing their flakiness. This one has the best of both worlds. You could easily roll it and cut out shapes or just do as I did - be lazy and make bars. Just let the dough sit on the counter for 10-15 minutes after you take it out of the fridge so it's easier to roll out.

There are some real gems in Nancy's book, such as this recipe and the one for her cinnamon buns - made using a croissant dough. OMG they are to die for.I have a few others bookmarked too for future baking. However, the book lacks pictures and is a little pricier considering how thin it is. Hmmm... quality over quantity? I only wish I had known about her bakery on La Brea Street, L.A. I went to California back in May. I even remember walking on that street! Now looking back I'm kicking myself for missing the chance to try one of her pastries.

Best-Ever Shortbread
20 fingers | Nancy Silverton of La Brea

1 cup unsalted butter
1/4 cup icing sugar
1/4 cup granulated sugar
2 cups flour
1/4 tsp salt

In a mixer (with the paddle attachment) cream together butter and sugars.
Combine flour and salt in a separate bowl. Gradually add into butter mixture on low. It should eventually come together into one ball. Turn out onto counter and roll into a ball. Saran wrap it and chill overnight.
The next day, remove from fridge and let sit for 15 minutes before rolling and cutting. (Preheat oven to 350 degrees F.
Roll out to 3/8" thick and cut into shapes or bars. Bake for 15 minutes then reduce heat to 300 degrees F and bake for another 15-20 minutes or until light golden brown around the edges.
Store airtight.


I got this tip from Cooks Illustrated and it works wonderfully!
When making shortbread (or other cookies) in a round pan, use a small 1" cookie cutter to cut out a circle in the centre of the pan.

This helps avoid the tips of the cookie wedges from crumbling in the centre of the pan when they are cut.

Saturday, November 14, 2009

Chewy Coconut Cookies


I have a bit of a love-hate relationship with coconut. In grade 6 we did a social studies unit on France and we were asked to bake/cook something French to bring to class for the last day of our study. Our group chose macaroons, but the girl in charge of bringing the shredded DRIED coconut was kinda not so smart and brought a whole coconut instead. Imagine that: four 11-year olds trying to make macaroons, totally new at cooking to begin with and then faced with a whole coconut! It was a disaster, but our teacher was kind enough to make us feel good about our attempt. It's the effort that counts, right? tee hee.

I think my main complaint about coconut is the texture. I don't mind the taste. It's weird how totally different fresh and dried coconut are. They taste nothing alike at all, in my opinion. I used to love Malibu until an unfortunate night of drinking too much of it... and now I can't even smell the stuff without feeling nauseous. Anyhow, here are some chewy coconut cookies I made. They are a bendy kind of cookie, sorta on the thin side, a little crisp around the edges but predominently chewy. The softness comes from the coconut as it holds moisture well. In sI've noticed that some chocolate chip cookie recipes use ground dried coconut with the flour to help the cookies achieve a chewy texture. The recipe is from Allrecipes.com but a very similar one is also in the Gourmet Today Cookbook.

Chewy Coconut Cookies
Makes 1 dozen | Allrecipes

1 1/4 cups all-purpose flour
1/2 teaspoon baking soda
1/4 teaspoon salt
1/2 cup butter
1/2 cup packed brown sugar
1/2 cup white sugar
1 egg
1/2 teaspoon vanilla extract
1 1/3 cups flaked coconut

Preheat oven to 350 degrees F. Combine the flour, baking soda, and salt; set aside.
In a medium bowl, cream the butter, brown sugar, and white sugar until smooth. Beat in the egg and vanilla until light and fluffy. Gradually blend in the flour mixture, then mix in the coconut. Drop dough by teaspoonfuls onto an ungreased cookie sheet. Cookies should be about 3 inches apart.
Bake for 8 to 10 minutes in the preheated oven, or until lightly toasted. Cool on wire racks.

Wednesday, November 11, 2009

Cinnamon-Sugar Pastry Sticks


Whenever I make pies I look forward to the bits of extra pastry left over from trimming the edge of the pie crust or the dough scraps from when you cut out tartlette rounds. I can't stand to throw food out, so I coat them with cinnamon-sugar and bake them on a cookie sheet until golden brown. They come out buttery and crisp and are perfect to nibble on while waiting for your pie to be done baking.

Today I was in the mood for a sweet baked treat but didn't feel motivated enough to measure out a bunch of ingredients (and do the accompanying dishes afterwards). I was happy to find a plastic-wrapped ball of pie dough in my fridge I had made a few days ago. Whwnever I make pie crust, I always make extra and either freeze or refrigerate it because you never know when you might need a quick crust (like today!)

In the time it took to preheat the oven (to 425F), I had rolled the dough (1/4" thick), cut it into little (1/2" x 3") sticks and sprinkled them with cinnamon sugar (1/3 cup sugar and 1 tsp cinnamon). After baking for 10-15 mins they were ready. Super-easy and almost no dishes!

You could do this with any pie dough but here's the one I used: my favorite all-butter dough from Gourmet. No icky shortening here! An all-butter pastry dough is a little less flaky than a dough made with a blend of butter and shortening, but you’ll love the end result — the taste of butter really comes through - mmm-marvelous!


All-Butter Crust
1 - 9" Single Crust | Gourmet, Sept/09

1 1/4 cups all-purpose flour
1/2 cup cold unsalted butter
1/4 teaspoon salt
3 to 5 tablespoons ice water

1. Blend together flour, butter, and salt in a bowl with your fingertips or a pastry blender just until most of mixture resembles coarse meal with some roughly pea-size butter lumps.
2. Drizzle 3 Tbsp ice water evenly over mixture and gently stir with a fork until incorporated. Squeeze a small handful: If it doesn'tt hold together, add more ice water, 1/2 Tbsp at a time, stirring until incorporated, then test again. (Do not overwork mixture or pastry will be tough.)
3. Turn out dough onto a lightly floured surface and divide into 4 portions. With heel of your hand, smear each portion once or twice in a forward motion to help distribute fat. Gather dough together, with a pastry scraper if you have one, and press into a ball, then flatten into a 5-inch disk. Chill, wrapped in plastic wrap, until firm, at least 1 hour or up to 3 days.

Tuesday, November 10, 2009

TWD: All-in-One Holiday Cake


This recipe was chosen by Brittin of The Nitty Britty. Once again, this month I'm baking all the TWD recipes out of order. This week was crazy-hectic-busy so I needed something that would come together in the midst of making dinner, doing accounting homework, talking on Skype with my school group partners and making sure my son doesn't get into too much trouble while I'm not watching him. I prepped a lot of the recipe ahead of time - chopped the cranberries, walnuts and apples, measured out the dry ingredients and set the butter and eggs out to come to room temperature. This is one of the reasons I like quickbreads so much. Once everything is measured out it's just a matter of whirring the wet ingredients in the mixer, throwing in the dry ones for a few seconds and popping it in the oven.

This cake is the embodiment of autumn. All those wholesome, earthy, spicy flavors melded into one beautiful Bundt. It screams "harvest" and "holidays". A chock full of goodies in every bite. While it may not be the most elegant or dainty cake, it's certainly very pretty. Little red cranberries peeking out amidst chunks of apple and nuts. Mmmm...

I always make sure to grease my Bundt pan reeeaallly well with shortening and flour. I use my hands to make sure it gets in all the little cracks and crevices. My heart always skips a beat in that moment when you flip the pan over to unmold it. Will it stick? Won't it? And then a sigh of relief when the cake slides out intact in all its Bundt-shaped glory. I think for Christmas this year I'm going to ask for a NordicWare Bundt pan. I have a Wilton one right now and it works well enough, but I guess I'm being a brat wanting the "real thing", just like Le Creuset is THE BRAND known for cookware.... or maybe it's just an excuse for me to get another item for my already too full kitchen. :)


All-in-One Holiday Cake
1 - 10" Bundt Cake

2 cups all-purpose flour
2 teaspoons baking powder
1/2 teaspoon baking soda
2 teaspoons cinnamon
1/4 teaspoon freshly grated nutmeg
Pinch of salt
1 1/2 teaspoons grated fresh ginger root (or 1 teaspoon ground ginger)
1 1/4 sticks (10 tablespoons) unsalted butter, at room temperature
1 cup sugar
1/2 cup (packed) light brown sugar
2 large eggs, at room temperature
1 teaspoon pure vanilla extract
1 1/4 cups canned unsweetened pumpkin puree
1 large apple, peeled, cored and finely chopped
1 cup fresh cranberries, halved or coarsely chopped
1 cup pecans, coarsely chopped

2 tbsp maple syrup
6 tbsp icing sugar

Getting ready: Center a rack in the oven and preheat the oven to 350°F. Butter a 9- to 10-inch (about 12-cup) bundt pan. Do not place the pan on a baking sheet—you want the oven's heat to come up through the bundt's open core. Put the flour, baking powder, cinnamon, nutmeg and salt (and ground ginger, if you're using it) in a bowl and whisk to combine.

Working with a mixer (and using a paddle attachment, if you have one), beat the butter and both sugars together at medium speed until light and fluffy. Add the eggs, one at a time, and beat for 1 minute after each addition; beat in the vanilla. Reduce the mixer speed to low and add the pumpkin, chopped apples and grated ginger—don't be concerned if the mixture looks curdled. Still on low speed, add the dry ingredients, mixing only until they are incorporated. Working with a rubber spatula, stir in the cranberries and pecans.

Scrape the batter into the pan and smooth the top with the spatula. Slide the pan into the oven and bake 60 to 70 minutes, or until a knife inserted into the center of the cake comes out clean. Transfer the cake to a rack and cool for 10 minutes before unmolding. Cool to room temperature on the rack.

Maple Sugar Icing: Sift 6 tablespoons of confectioner's sugar into a bowl and stir in 2 tablespoons of maple syrup. Add more maple syrup little by little, until you have an icing that runs nicely off the tip of a spoon. You might need another 1/2 tablespoon of syrup to get the consistency. Put the cooled cake on a sheet of waxed paper and drizzle the icing from the tip of a spoon over the cake. Let the icing set for a few minutes before serving.

Serving: Just before bringing the cake to the table, dust it with confectioner's sugar. Because of the apples, cranberries and nuts, this cake doesn't lend itself to being cut into dainty slices—and it's just as well: You really want to get a mouthful of this bundt, the better to appreciate its many flavors. The cake needs no embellishments if you're serving it as an afternoon treat, but it is really nice with softly whipped cream or a scoop of ice cream. For brunch, toast the cake lightly and spread it with a little salted butter and/or a slick of pure maple syrup.

Storing: Wrapped well, the cake will keep at room temperature for up to 5 days, at which point it will be perfect for toasting, or for up to 2 months in the freezer.

Monday, November 9, 2009

Oatmeal Wheat Bread


As most food-people are, I too am saddened by Gourmet Magazine's scheduled closure. However, the publication of this big green cookbook called Gourmet Today makes me feel a little better, knowing that Gourmet's recipes will be living on through this book. This bread is the first recipe I have made from the book and it lived up to exceeded my expectations. I would go so far as to say I will look no further than this for a sandwich bread recipe.

Gourmet's publicity manager said, “This book is really being viewed as Gourmet magazine’s legacy, even as a collector’s item. Perhaps there’s a sentimental factor in the new book’s popularity. People are holding onto and archiving past issues of Gourmet, downloading recipes from the Gourmet website, and the book is another extension of that—a way for the legendary brand to live on.” (from Publisher's Weekly). It's a great book, but I wonder how it compares to Gourmet's 2006 publication: The Gourmet Cookbook - the yellow one. I'm such a cookbook whore that it almost causes me anxiety when new editions of books are released because then I'm faced with the dilemma: do I buy it or just stick to the older edition I have? I know rationally that I don't need so many cookbooks but I keep on buying them anyway. Well, I guess I could be addicted to worse things, right?

I was extremely impressed with how this loaf turned out and the amazing smell that filled my kitchen while it was baking. The loaves were light and airy with great texture. I was amazed at how much flour and the recipe called for (5 cups plus 1 cup oats!) especially since the end result wasn't heavy at all. I love how the honey and oats added texture and subtle flavor. The dough was soft and moist and slightly sticky. Not the easiest to work with but not difficult either and SO worth it. Oh my, I could go on and on about this bread's ethereal texture...

Oatmeal Wheat Bread
Makes 2 loaves | Gourmet Today Cookbook

2 cups whole milk
1 cup old-fashioned rolled oats plus additional for topping
1/2 cup warm water (105-115°F)
2 tablespoons active dry yeast
1/2 cup mild honey
1/4 cup unsalted butter, melted and cooled
3 cups whole-wheat flour
2 cups unbleached all-purpose flour
1 tablespoon salt
1 large egg, lightly beaten with 1 tablespoon water

1. Heat milk in a 1 1/2- to 2-quart saucepan over low heat until hot but not boiling, then remove pan from heat and stir in oats. Let stand, uncovered, stirring occasionally, until cooled to warm.

2. Stir together water, yeast, and 1 teaspoon honey in a small bowl; let stand until foamy, 5 minutes. (If mixture doesn’t foam, discard and start over with new yeast.) Stir yeast mixture, melted butter, and remaining honey into cooled oatmeal.

3. Stir together whole-wheat flour, 1 1/2 cups unbleached flour, and salt in a large bowl. Add oat mixture, stirring with a wooden spoon until a soft dough forms. Turn out onto a well-floured surface and knead with floured hands, adding just enough of remaining unbleached flour to keep from sticking, until dough is smooth, soft, and elastic, about 10 minutes (dough will be slightly sticky). Form dough into a ball and transfer to an oiled large bowl, turning to coat. Cover bowl loosely with plastic wrap and a kitchen towel; let rise at warm room temperature until doubled in bulk, 1 to 1 1/2 hours.

4. Lightly butter loaf pans. Turn out dough onto a lightly floured surface and knead several times to remove air. Divide dough in half and shape each half into a loaf, then place 1 loaf in each buttered pan, seam side down, tucking ends gently to fit. Cover loaf pans loosely with a kitchen towel and let dough rise in a draft-free place at warm room temperature until doubled in bulk, about 1 hour.

5. Put oven rack in middle position and preheat oven to 375°F. Lightly brush tops of loaves with some of egg wash and sprinkle with oats, then bake until bread is golden and loaves sound hollow when tapped on bottom, 35 to 40 minutes. Remove bread from pans and transfer to a rack to cool completely, about 1 1/2 hours.

Sunday, November 8, 2009

Pizza Buns


There's just something about the smell of cheese and tomato sauce baked together that is simply mouth-watering. Even if I'm not hungry, the smell of pizza gets my stomach growling. These muffin-sized pizza buns definitely induced that reaction while they were baking. The dough is a little airier and lighter than pizza dough. Definitely a great snack that lets you fulfill your pizza craving without ordering a whole pie. You could easily throw in some cooked bacon and onions or chopped up pepperoni for even more pizza goodness.

Pizza Buns
Makes 12 | Adapted from King Arthur Flour

1 1/3 cup warm milk
2 1/4 tsp active dry yeast
2 tbsp olive oil
1 tbsp sugar
1 1/2 tsp salt
3-4 cups flour

3/4 cup pizza sauce
1 cup grated cheddar cheese

1. Combine milk with yeast in stand mixer bowl and let stand until foamy, approximately 5 minutes.
2. Add olive oil and stir to combine. With mixer on low using dough hook, add 1 cup flour, sugar and salt. Add the remaining flour as needed to reach the desired consistency. The dough should be soft but not sticky. Lightly oil the top with additional olive oil or butter. Cover and let rise until almost doubled, about 1 hour.
3. Gently punch down dough and roll out into a large, thin rectangle.
4. Spread pizza sauce over dough and sprinkle with cheddar cheese. Roll up starting from long end, pinch to seal the seams and cut into 12 rolls. Place each into a greased muffin tin. Cover and let rise for 30-45 minutes, until almost doubled. Sprinkle with additional cheese if desired.
5. Bake at 350 degrees F for 30 mins until golden brown.

Thursday, November 5, 2009

Junior's Cappuccino Cheesecake

Another success from the Junior's Cheesecake Cookbook. I have been impressed time and time again by the recipes in this book. I look forward to the day I can go to New York and try the "real" thing from the Junior's store, complete with sponge cake crust. Even though the real thing calls for a sponge cake crust I have been sticking to my regular digestive cookie crust when I make these Junior's cheesecakes. I used to be a graham cracker crust person until I discovered digestives. I'm never looking back!!!

The espresso flavor was definitely there but not overpoweringly so. I loved this recipe - a definite keeper - especially since so many espresso cheesecake recipes also include chocolate. I'm a purist when it come to my coffee.

I had a caramel sauce left over from my Whole Wheat Oatmeal Caramel Bars so I drizzled it over the cheesecake before serving. It tasted just like a caramel macchiato! Does that mean that chocolate syrup would make this mocha-like? Mmmm.... so many possibilities.

Junior's Cappuccino Cheesecake
9" Cake | Adapted from Junior's Cheesecake Cookbook

1 - 9" graham cracker crust
1 tbsp instant coffee powder
1 tbsp hot water
4 pkg. (8 oz. each) cream cheese
1 2/3 cup sugar
1/3 cup cornstarch
1 tbsp vanilla extract
2 eggs
3/4 cup heavy cream

1. Preheat oven to 350 degrees F.
2. Dissolve instant coffee in 1 tbsp hot water. Let stand.
3. On low speed beat together 1 package cream cheese, 1/3 cup sugar and cornstarch until creamy, about 3 minutes. Scrape the bowl down occasionally. Blend in remaining cream cheese, one package at a time, scraping bowl after each addition. Increase speed to medium and beat in remaining 1 1/3 cups sugar and vanilla. Blend in the eggs, one at a time, beating well after each one. Stir the coffee into the heavy cream then add the coffee-cream mixture to the cheese mixture. Beat until blended but do not overmix.
4. Pour cheese mixture over prepared crust. Bake in a water bath in preheated oven. The edges should be light golden brown and the top a light tan color, about 1 hour 15 minutes. Remove from water bath and cool on wire rack for at least 2 hours (do not touch it at all during this time). After 2 hours, cover loosely with plastic wrap and refrigerate fully - at least 4 hours, but overnight is best.
5. Dust with cocoa and decorate with chocolate curls and coffee beans before serving.

Tuesday, November 3, 2009

TWD: Sugar-Topped Molasses Spice Cookies


Today's Tuesdays with Dorie recipe was chosen by Pamela of Cookies with Boys. She decided on Sugar-Topped Molasses Spice Cookies on pages 76 and 77 of Baking: From My Home to Yours. I'm baking the recipes out of order this month, based on what my schedule allows for, so I included the recipe here instead of just the link. This recipe was super simple with super spectacular results.

Molasses spice cookies have a soft spot with me (and with many others). There's just something about the spiciness of the cookies that brings back fond memories. They have all the yummy-ness of gingerbread cookies but with an amazingly chewy texture. These are the best kind of cookies - slightly crispy edges that give way to a bendy, chewy middle. Unfortuantely, mine didn't have the pretty cracks in them that are usually seen on molasses cookies, but they more than made up for that in the way they tasted.

Sugar-Topped Molasses Spice Cookies
Makes 30 | Dorie Greenspan

2 1/3 cups all-purpose flour
2 teaspoons baking soda
1/2 teaspoon salt
2 teaspoons ground ginger
1/2 teaspoon ground cinnamon
1/4 teaspoon ground allspice
pinch cracked or coarsely ground black pepper
3/4 cup unsalted butter, room temperature
1 cup light brown sugar
1/2 cup molasses (not blackstrap)
1 large egg
1/2 cup sugar, for rolling

Whisk together the flour, baking soda, salt, ginger, cinnamon, allspice and pepper.

Working with a stand mixer, preferably fitted with a paddle attachment, or with a hand mixer in a large bowl, beat the butter on medium speed until smooth and creamy. Add the brown sugar and molasses and beat for 2 minutes or so to blend, scraping down the sides of the bowl as needed. Add the egg and beat for 1 minute more. Reduce the mixer speed to low and add the dry ingredients, mixing until the flour and spices disappear. If some flour remains in the bottom of the bowl, to avoid overbeating the dough, mix in the last of the dry ingredients by hand with a rubber spatula. You'll have a smooth, very soft dough.

Divide the dough in half and wrap each piece in plastic wrap. Freeze for 30 minutes, or refrigerate for at least 1 hour. (The dough can be kept refrigerated for up to 4 days.)

Center a rack in the oven and preheat the oven to 350 degrees F. Line two baking sheets with parchment or silicone mats.

Put the sugar in a small bowl. Working with one packet of dough at a time, divide it into 12 pieces, and roll each piece into a smooth ball between your palms. One by one, roll the balls around in the bowl of sugar , then place them on one of the baking sheets. Dip the bottom of a glass into the sugar and use it to press down on the cookies until they are between 1/4 and 1/2 inch thick.

Bake the cookies one sheet at a time for 12 to 14 minutes, or until the tops feel set to the touch. Remove the baking sheet from the oven and, if the cookies have spread and are touching, use the edge of a metal spatula to separate them while they are still hot. Transfer the cookies to a rack to cool to room temperature. Repeat with the second batch of dough.

Storage:
The cookies will keep for at least 1 week in the cookie jar. Wrapped airtight, they can be frozen for up to 2 months.

Sunday, November 1, 2009

Caramel Sticky Buns


Happy November 1! We're in November already. How could time have passed so quickly? It seems like summer was just here and now it's already heading into the Christmas season. For this cold autumn day I made these caramel sticky buns: ooey, gooey cinnamon goodness covered with a creamy caramel topping and studded with pecans. My two favorite sweet flavors rolled into one: cinnamon and caramel. Some people are chocaholics, well, I am a caramel-holic who loves it in all its forms, from super-soft to almost toffee-like. I think the secret here is in the vanilla pudding mix that gets added to the dough.

These buns are a true indulgence. Rich and tender on the inside offset by crunchy pecans and sticky, gooey caramel. While they are best fresh from the oven, they take nicely to storage in an airtight container and reheating for 20 seconds in the microwave.

The dough part of the recipe is from Allrecipes.com, the topping is my own addition. Dough recipe was written for a breadmaker, although I made mine using a stand mixer and the standard straight dough procedure. Make sure not to add too much flour when kneading so as to keep the dough soft, not dry.

Caramel Sticky Buns
Makes 24 small rolls | inspired by Allrecipes.com

Dough:
1 (.25 ounce) pkg active dry yeast
1 tablespoon white sugar
1/4 cup warm water
1 cup warm milk
1/4 cup butter, melted
1/2 (3.4 ounce) pkg. instant vanilla pudding mix*
1 egg, room temperature
1/2 teaspoon salt
4 cups bread flour

Topping:
3/4 cup heavy cream
1 1/2 cups brown sugar
3/4 cup chopped pecans

Filling:
1/4 cup butter, very soft
1/2 cup brown sugar
1/2 cup white sugar
4 teaspoons ground cinnamon

1. In the pan of your bread machine, combine water, melted butter, vanilla pudding, warm milk, egg, 1 tablespoon sugar, salt, bread flour and yeast. Set machine to Dough cycle; press Start.
2. Make filling: Combine cinnamon, brown sugar and white sugar.
3. Make topping: Stir together heavy cream and brown sugar. *Do not substitute any lower fat cream or your caramel will not turn out properly*. Pour topping into a greased 11x15 inch baking pan (lasagne dish). Sprinkle coarsely chopped pecans over the brown sugar mixture.
4. When Dough cycle has finished, turn dough out onto a lightly floured surface. Divide dough in half and roll each half into a large rectangle, as thin as you can get it, approximatly 1/8 inch thick. Spread with 1/2 the softened butter. Sprinkle 1/2 brown sugar mixture over dough. Roll up dough tightly, beginning with long side. Pinch ro seal the seam. Slice into 12 equal slices and place in the prepared pan. Repeat with other half of dough for a total of 24 rolls (3 across, 8 down). Cover and let rise in a warm place until doubled, about 45 minutes. Or, refrigerate overnight and let them finish rising the next morning.
5. Preheat oven to 350 degrees F (175 degrees C). Bake in preheated oven for 20-25 minutes until golden brown on top. Carefully but quickly invert onto a cookie sheet(before the topping hardens).

*I have successfully used 1/2 cup nonfat dry milk powder instead of the pudding mix.