Tuesday, July 28, 2009

TWD: Vanilla (Strawberry) Ice-Cream

Yes, I deviated from the recipe and added 2 cups of pureed sweetened strawberries. Unlike the last time I made ice cream, this time my machine froze properly and I actually got 'ice cream' instead of 'milkshake'. I think the trick was leaving the freezer bowl in the freezer for 1/2 week instead of just 24 hrs. This ice cream was super creamy, refreshing but surprisingly not too rich. Dorie does it again and impresses me with the simple perfectionism of her recipes. They just have that 'wow' factor. This was the perfect treat for our superhot weather.

Monday, July 27, 2009

Junior's White Chocolate Strawberry Cheesecake

This is the cake I made for my birthday on July 21. The first day it was yummy but the next day and then day after it was even better as the cake settled and 'ripened'. If you don't have the book already and you like cheesecake, go get the "Junior's Cheesecake Cookbook". I'm submitting this post to Brenda's Canadian Kitchen for Cookbook Sundays where the only requirement is to make something from a cookbook you own. I highly recommend joining as it gives you a little more push to get cooking from the cookbooks on your shelf.

Everything I've made from this Junior's cookbook has been fabulous. They're famous for a reason! With the heat and humidity it was a real challenge making white chocolate curls and decorating before the whipped cream melted. All in all I'm loving the heat though since in general I'm so cold. The air conditioning at work is so strong I keep a wooly scarf at my desk and a fleece blanket! They make fun of me for it but I would freeze to death without them, lol.

My birthday gifts were all baking-related (of course). I got more stuff to feed my obsession. I don't know how/when I will be able to bake my way through the mountains of new recipes I have collected but I still can't stop collecting. I got:

  • Canadian Living Baking Book
  • King Arthur Flour's Baking Companion
  • Wilton Cake Decorating Revolving Turntable
  • America's Test Kitchen Family Cookbook
  • Pizza stone and pizza peel

    Junior's White Chocolate Strawberry Cheesecake
    Adapted from Junior's Cheesecake Cookbook

    one 9" Graham cracker crust

    three 8-ounce packages cream cheese (full fat)
    1 1/3 cups sugar
    2 tablespoons cornstarch
    1 tablespoon vanilla extract
    2 extra-large eggs
    6 oz. white chocolate, melted & cooled
    1/2 cup whipping cream

    2 cups fresh strawberries plus more for garnish
    1 tbsp cornstarch
    1/4 cup sugar

    1. Prepare the strawberry swirl by pureeing the strawberries in a food processor or blender and then mixing in the sugar and cornstarch. Let stand to thicken.

    2. Preheat the oven to 350°F. Put one package of the cream cheese, 1/3 cup of the sugar, and the cornstarch in a large bowl. Beat with an electric mixer on low until creamy, about 3 minutes, scraping down the bowl several times. Blend in the remaining cream cheese, one package at a time, scraping down the bowl after each one. Increase the mixer speed to medium and beat in the remaining 1 cup sugar, then the vanilla. Blend in the eggs, one at a time, beating well after adding each one. Beat in the whipping cream just until completely blended. Fold in melted and cooled white chocolate. Don't overmix!
    3. Pour the cheese mixture over the prepared graham cracker crust. Using a teaspoon, drop the strawberry mixture on top of the cheese batter, pushing it down slightly as you go. Using a thin, pointed knife, cut through the batter a few times in a swirling “figure 8” design, just until strawberry swirls appear.
    4. Place the cake (with the base wrapped in foil) in a large shallow pan containing hot water that comes about 1 inch up the sides of the springform. Bake until the edges are light golden brown and the top of the cake is golden with deep red swirls, about 1 hour and 15 minutes. Remove the cake from the water bath, transfer to a wire rack, and let cool for 2 hours (just walk away—don’t move it). Leave the cake in the pan, cover loosely with plastic wrap, and refrigerate until completely cold, at least 4 hours or preferably overnight.
    5. To serve, release and remove the sides of the springform, leaving the cake on the bottom of the pan. Place on a cake plate and garnish with whipped cream, strawberries and white chocolate curls. Refrigerate until ready to serve. Slice with a sharp straight-edge knife, not a serrated one. Cover leftover cake and refrigerate for up to a week or freeze up to 1 month.

  • DB: Mallows

    The July Daring Bakers' challenge was hosted by Nicole at Sweet Tooth. She chose Chocolate Covered Marshmallow Cookies and Milan Cookies from pastry chef Gale Gand of the Food Network.

    This is my first Daring Bakers challenge and I was super excited about making these. Lately I have had so little time to bake that I was glad to see that these fit in nicely with my schedule as they can be done in steps spread out over a period of time. I didn't make my own marshmallows either. Hmm... I guess that doesn't make me a very good "daring baker", eh? However, I did make my own caramels and I put a little dollop between the marshmallow and the cookie, although you can't tell from the pix. I topped each with an almond sliver to pretty them up.

    I wonder if anyone else experienced this, but I think the recipe calls for too much oil in the glaze. Mine never set up properly and they had to be served cold, directly from the fridge or else the chocolate dripped off. Nobody complained, but next time I would only use 1 tsp or so of oil in the glaze, so I changed the recipe included here to reflect that. The cookie base worked really well with the Mallows but on their own, they aren't very tasty.

    Mallows (Chocolate Covered Marshmallow Cookies)
    Adapted from Gale Gand, Food Network | Makes 3 dozen

    • 3 cups (375grams/13.23oz) all purpose flour
    • 1/2 cup (112.5grams/3.97oz) white sugar
    • 1/2 teaspoon salt
    • 3/4 teaspoon baking powder
    • 3/8 teaspoon baking soda
    • 1/2 teaspoon ground cinnamon
    • 12 tablespoons (170grams/ 6 oz) unsalted butter
    • 3 eggs, whisked together
    • Homemade marshmallows***, recipe follows
    • Chocolate glaze, recipe follows

    1. In a mixer with the paddle attachment, blend the dry ingredients. On low speed, add the butter and mix until sandy. Add the eggs and mix until combine. Form the dough into a disk, wrap with clingfilm or parchment and refrigerate at least 1 hour and up to 3 days.
    2. When ready to bake, grease a cookie sheet or line it with parchment paper or a silicon mat. Preheat the oven to 375 degrees F. Roll out the dough to 1/8-inch thickness, on a lightly floured surface. Use a 1 1/2 inches cookie cutter to cut out small rounds of dough. Transfer to the prepared pan and bake for 10 minutes or until light golden brown. Let cool to room temperature.
    3. Pipe a “kiss” of marshmallow onto each cookie. Let set at room temperature for 2 hours.
    4. Line a cookie sheet with parchment or silicone mat. One at a time, gently drop the marshmallow-topped cookies into the hot chocolate glaze. Lift out with a fork and let excess chocolate drip back into the bowl. Place on the prepared pan and let set at room temperature until the coating is firm, about 1 to 2 hours.

    ***Note: if you don’t want to make your own marshmallows, you can cut a large marshmallow in half and place on the cookie base. Heat in a preheated 350-degree oven to slump the marshmallow slightly, it will expand and brown a little. Let cool, then proceed with the chocolate dipping.

    Homemade marshmallows:

    • 1/4 cup water
    • 1/4 cup light corn syrup
    • 3/4 cup (168.76 grams/5.95oz) sugar
    • 1 tablespoon powdered gelatin
    • 2 tablespoons cold water
    • 2 egg whites , room temperature
    • 1/4 teaspoon pure vanilla extract

    1. In a saucepan, combine the water, corn syrup, and sugar, bring to a boil until “soft-ball” stage, or 235 degrees on a candy thermometer.
    2. Sprinkle the gelatin over the cold water and let dissolve.
    3. Remove the syrup from the heat, add the gelatin, and mix.
    4. Whip the whites until soft peaks form and pour the syrup into the whites.
    5. Add the vanilla and continue whipping until stiff.
    6. Transfer to a pastry bag.

    Chocolate glaze:

    • 12 ounces semisweet chocolate
    • 1 tsp vegetable oil

    Melt the 2 ingredients together in the top of a double boiler or a bowl set over barely simmering water.

    Sunday, July 26, 2009

    Classic Mini Fruit Tarts


    So simple, so cute, so summery. These might just be making an appearance several times this summer at my place. Good thing they are so easy too!

    Mini Fruit Tarts

    Ingredients:
    Pastry for Single Crust Pie:
    1 1/2 cups all-purpose flour
    2 tablespoons sugar
    3/4 teaspoon salt
    1/2 cup plus 2 tbap very cold or frozen butter, cut into chunks
    2 1/2 tbsp very cold or frozen shortening, cut into chunks
    1/4 - 1/2 cup ice water

    1 recipe pastry cream
    Blueberries, Strawberries or other fresh fruit

    Directions:
    1. Put the flour, sugar and salt into a food processor fitted with a metal blade; pulse just to combine the ingredients. Drop in the butter and shortening and pulse only until the butter and shortening are cut into the flour. Don't overdo the mixing - what you're aiming for is to have some pieces the size of peas and others the size of barley. Pulsing, gradually add 3 tablespoons water and pulse once, add some more water, pulse again and keep going. Then a few long pulses to get the water into the flour. If, after a dozen or so pulses, the dough doesn't look moistened or form soft curds, pulse in as much of the remaining water as necessary, or even a few drops more, to get a dough that will stick together when pinched.
    2. Scrape the dough onto a work surface and shape into a disk. Wrap in plastic wrap and refrigerate for at least 1 hour or for up to 2 days before using.
    3. Preheat oven to 350 degrees F. Roll out dough to 1/4" thickness. Cut into rounds and place each round in a muffin tin to form mini tart shells. Bake for 10-15 minutes or until fully baked and golden brown. Cool fully before using. TIP: You can make these in advance and freeze in a large Ziploc bag to be filled later.
    4. To serve: Scoop pastry cream into each tartlet shell and top with fruit of choice.

    Saturday, July 25, 2009

    Asian Strawberry Mousse Sponge Cake

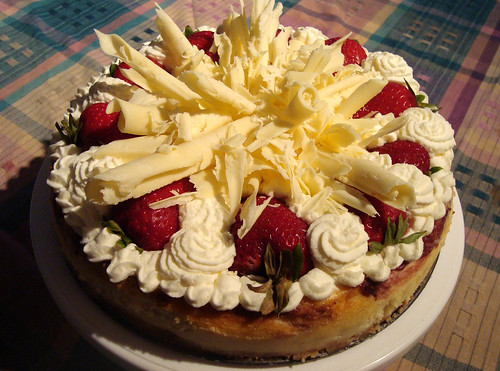
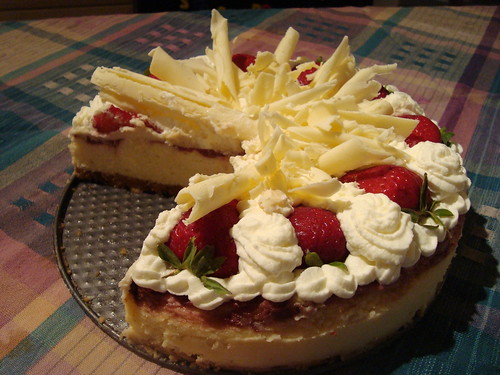
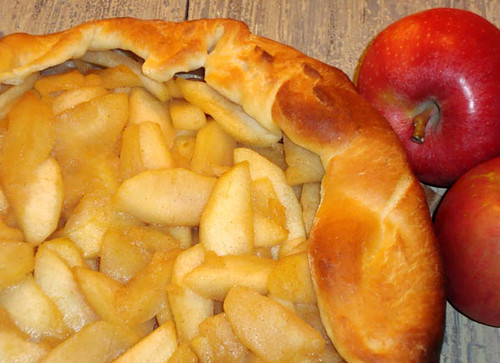
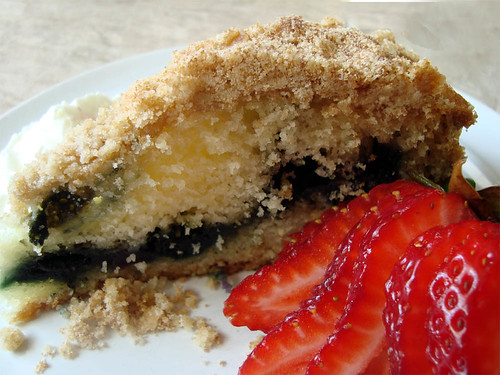
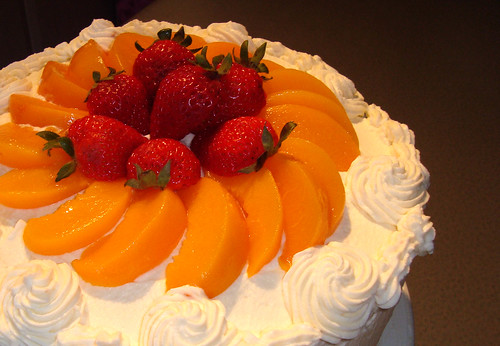
    I made this cake as a birthday cake last weekend. It is an Asian inspired cake - like those fresh fruit cakes from Asian bakeries with the really light sponge cake and not too sweet whipped cream frosting. I am very unfamiliar with Asian baking but also very interested in honing my skills. I'm pretty happy with how this turned out. My only regret is not having any pictures of the sliced cake. It was a magnificent 4 layer cake filled with pale pink strawbweey mousse. It must have been yummy because it disappeared too quickly for me to take any photos!

    The recipient of this cake is someone I dated for a couple of years back in 2003-2005 and now he's become one of my best friends. Him and my son get along amazingly well and Zach is lucky to have someone as amazing as this guy in his life. I'm glad I could do something special for his birthday.

    The recipe is adapted from Viet World Kitchen. I made 2 batches of the sponge cake and cut each cake into 2 layers for a total of 4 layers.

    Asian Sponge Cake
    Makes 1 one 9" round cake

    Egg yolk base:
    3 large egg yolks, placed in a metal bowl, about 3-quart capacity
    1/2 cup sugar
    1 1/2 teaspoons pure vanilla extract

    Egg whites:
    3 large egg whites, place in a metal bowl, 2-3-quart capacity
    pinch of salt
    1/4 teaspoon cream of tartar
    1 1/2 tablespoons sugar

    Finishing the batter:
    1/3 cup plus 1/4 cup cake flour, sifted
    3 tablespoons unsalted butter (melted and cooled)

    1. Grease, flour and line the bottom of a 4-cup pan such as a round 9" pan. Put oven rack in the lower third of the oven and preheat to 350 degrees F.
    2. Beat the egg yolks in a bowl with electric mixer. Gradually sprinkle in the sugar by the tablespoon to incorporate well. (Do this too fast and the batter will be grainy with sugar.) Continue beating for several minutes, until the mixture is thick, pale yellow, and when you pause and lift the whisk (or beaters), the batter drips down and forms a ribbon that slowly dissolves on the surface. Beat in the vanilla. Set aside. Wash and dry the beaters well.
    2. Start beating the egg whites in a separate bowl. When they are foamy throughout, sprinkle in the salt and cream of tartar. Continue beating until soft peaks form (when the whisk (or beaters) is lifted out of the egg whites, a soft, slightly bent over peak of egg white forms in the bowl). As you beat, the whites will go from clear to light grey to solid white. Instead of sliding from the walls of the bowl, they will stick to the bowl.
    3. After soft peaks form, sprinkle in the 1 1/2 tablespoons sugar and continue beating for a couple more minutes to generate stiff egg whites (the peak stands straight when the whisk is lifted from the bowl). The whites will have a sheen.
    4. Immediately take a large rubber spatula and add 1/4 of the egg whites into the egg yolk base. Stir gently to lighten the base. Then add 1/3 of the remaining whites onto the base. Sift 1/4 of the flour on top. Delicately and quickly use the spatula to fold the ingredients together, until they are nearly all incorporated. Repeat another 2 times, alternating flout and whites as before. When all ingredients have been added and folding in is almost complete, pour in the melted butter and fold it in quickly (do not overblend or the batter will deflate). The finished batter will be pale yellow, very thick, and light.
    5. Pour the batter into the prepared cake pan. It should fill to about 1/4 inch of the rim. Scoop out extra batter to avoid overflow during baking. Use the spatula to spread the batter out evenly. Push the batter toward the edges to prevents a domed-center during baking.
    6. Gently slide the cake into the oven. Bake for 20 to 25 minutes. The cake will rise slowly and then brown. The cake is done when its puff sinks slightly and the sides show a faint line of shrinkage from the edges of the pan. Remove the cake from the oven and cool on a rack for 15 minutes. (It will deflate and pull away from the pan walls.) Run a knife all around the edge, between the cake and the pan. Invert the cake onto your hand (or back on the rack), give the cake bottom a tap, and then remove the cake pan. Peel off the parchment paper and discard. Invert the cake, top side up, onto the rack. Allow to cool completely (about 1 hour) before eating, filling, or icing.

    Mousse & Assembly

    2 tablespoons Grand Marnier, Cointreau, or Triple Sec
    1 1/4 teaspoons unflavored gelatin
    1 pint strawberries
    1/4 cup sugar
    1/2 cup heavy cream, chilled

    Whipped cream frosting:
    1 1/2 cups heavy cream, chilled
    2 tablespoons sugar
    1/2 teaspoon vanilla extract

    1. Cut each cake in half horizontally, forming your layers.
    2. To make the strawberry mouse, put the liquor in a small bowl and sprinkle the gelatin over it. Set aside.
    3. Wash and pat the strawberries dry with a dish towel. Hull and cut enough berries into small pieces about the size of your thumbnail to make a brimming cup. Set aside the remaining strawberries for garnish.
    4. Put the strawberries in a small skillet and add the sugar, stirring to combine. Heat over medium heat, stirring just until the sugar has melted. Remove from the heat and add the liquor, stirring, until the gelatin has dissolved. Pour into a mixing bowl and set aside to cool to room temperature, about 1 hour, stirring occasionally. When the berries have sufficiently cooled, you will be able to mound them with the liquid into a jam-like mixture.
    5. While the strawberry mixture cools, whip the 1/2 cup cream using a stand mixer or hand-held mixer until soft peaks form. (Aim for a soft, thick marshmallowlike texture.) Refrigerate until ready to use.
    6. For the frosting, combine the cream, sugar and vanilla in a bowl. Then whip using a stand mixer or hand-held mixer until just shy of stiff. Lift up the beaters and nice peaks should form, clinging onto the beaters nicely.Do not overwhip or it will be grainy. Refrigerate until ready to use.
    7. To fill and frost the cake, put the cake on a cake stand or platter, with strips of wax paper or parchment paper underneath to form a collar that will keep the stand or platter dirty clean. Finish the strawberry mousse by combining the strawberry mixture with the 1/2 cup of whipped cream; a rubber spatula is a great tool to use. Spread the strawberry mousse on top of the cake layer. Place the second layer atop. Then frost the cake with the whipped cream. When finished decorating, refrigerate the cake for 10 to 15 minutes, then gently pull out the pieces of wax or parchment paper. The cake can be decorated up to 3 hours in advance. Serve with the remaining strawberries on the side.

    Thursday, July 23, 2009

    Milestones' Hot Spinach and Artichoke Dip

    I am in love with the hot spinach and artichoke dip from Milestones Restaurant.

    Join my Copycat Club - See link above, under my banner


    I could just order that as my entrée and be satisfied. However, the accountant in me knows that the profit margin on chips and dip is huge. That fact keeps me from ordering it in favor of something more difficult to make or "worth the price". Luckily for me, I found this recipe (below) that comes really close to Milestones' dip. The recipe makes quite a bit of dip so I made the whole batch and divided it into two portions. I baked one and froze the other one in an oven-safe bowl for another day. When I wanted to serve the second one, I just took it out of the freezer and baked it. It turned out just as great as the unfrozen one.

    Milestone's Hot Spinach & Artichoke Dip
    adapted from allrecipes.com


    1 (14 ounce) can artichoke hearts, drained
    1/3 cup grated Romano cheese
    1/4 cup grated Parmesan cheese
    1/2 teaspoon minced garlic
    1 (10 ounce) package frozen chopped spinach, thawed and drained
    1/3 cup heavy cream
    1/2 cup sour cream
    1 cup shredded mozzarella cheese

    Directions
    1. Preheat oven to 350 degrees F (175 degrees C). Set out either a 9x13" glass baking pan or two smaller baking dishes.

    2. In a food processor, place artichoke hearts, Romano cheese, Parmesan cheese and garlic. Pulse until chopped, but not ground. Set aside.

    3. In a medium bowl, mix together spinach, heavy cream, sour cream and mozzarella cheese. Stir in artichoke mixture. Spoon into baking dish.

    4. Bake for 20 to 25 minutes, or until cheese is melted and bubbly. (Make ahead option: Cover and refrigerate for use with the next day or freeze for longer storage. Bake from frozen, adding 10-15 minutes to baking time. You might have to cover the dip with foil if the top is browning too quickly.)

    Tuesday, July 21, 2009

    Pizza & My 25th B-day

    Happy birthday to me! I am 25 years old. I have been alive for a quarter of a century! When I was a little girl I thought age 25 was so old, but I am 25 now and I still feel like a little girl. In terms of education and career I am happy with where I am, but in terms of relationships and the whole "family" side of things, I'm not where I expected to be. I'm glad I at least have one child already so even if I stay single for a little while I won't feel totally left behind. With my 3 close friends getting married (1 this year, 2 next year), I am the last single one. Ironically, I was the first to get engaged (at 21) and now I'm going to be the last to get married! For my birthday cake this year I made a white chocolate strawberry cheesecake. Pictures and entry to follow maybe tomorrow.

    So, for today's entry: Pizza!

    I really wish my family liked pizza more because I am in love with working with pizza dough. My favorite crust recipe is from Canadian Living. It is a thicker, chewier crust but it is still crisp and airy (I rolled it really really thin). It rolls out like a dream and I like the use of olive oil in the dough. It would make great bread sticks too. I topped it with freshly roasted red peppers, feta cheese, bacon and onions.

    I adore working with yeast dough, especially sweet yeast doughs. Baking bread is my obsession. I read somewhere that in the realm of baking there are two types of people: bread-makers and pastry-makers. I'm definitely a bread person. Pastry is too artsy and less earthy. I like the feel of the dough under my hands and the way it grounds me and pulls me down back to earth when my mind is too hectic.

    Tuesday, July 14, 2009

    TWD: Brioche Apple Tart

    I used apples instead of plums for today's recipe. I don't like plums much and besides, I had these gorgeous organic granny smith apples that needed to be used. For the filling and make-up technique I followed Anna Olson's Apple Caramel Galette recipe.

    Wow, this brioche [apple] tart was a time consuming but well worth it recipe! All that time needed to let the dough rest before, during, overnight and after refrigeration. Actual hands-on time was really minimal but this required some planning ahead so I'm glad I read and re-read the recipe before starting.

    Let me tell you, I am *in love* with the brioche dough. Before the overnight refrigeration it seemed too sticky and I could barely touch it let alone knead it without it sticking to everything. However, overnight it is like a transformation happened and the next morning the dough was tender, smooth and rolled out beautifully. Simply a dream to work with. I wouldn't hesitate to use this dough again perhaps for apple dumplings or cinnamon buns or filled with a danish type cream cheese filling and some jam.

    Monday, July 13, 2009

    Best Ever Blueberry Coffee Cake

    I'm not kidding about the "best ever" part. Every time I make this I get rave reviews. I have had this recipe since Grade 8 from a summer cooking class I took. I have never made this and not gotten top notch compliments on it.

    Looking back, it's neat to see how baking has always piqued my interest. I still have my very first baking book from the "LOOK, I can __________" series. My mom can't cook/bake to save her life, so my first baking adventure was a solo endeavor at age 8 or 9. I made fruit tarts including the pastry from scratch. They were perfectly flaky (according to my mom) but I also made a huge mess of the kitchen. I think every surface was covered in flour and butter. We used to have book fairs in elementary school so in Grade 4 instead of buying Archie comics or novels I bought 3 cookbooks. Pizza, BBQ-ing and Hershey's Desserts. Since then my passion has deepened and my knowledge greatly expanded. I wanted to be a foods teacher at one point... or a nutritionist.

    I hope you get a chance to try making this cake. It's so good and not too sweet. When blueberry season comes around I even have people bring me berries and ask me to make this cake. I recently started using my food processor to cut in the butter and make the streusel and it works great.

    Blueberry Coffee Cake
    Makes 1 - 9" square pan

    Streusel:
    1/2 cup brown sugar
    1/4 cup sifted all-purpose flour
    1/4 cup butter

    Cake:
    2 cups all-purpose flour
    1 tbsp baking powder
    1/2 teaspoon salt
    1 egg, beaten
    3/4 cup sugar
    1/3 cup butter
    1/2 cup milk
    1 teaspoon vanilla extract
    1 cup blueberries fresh or frozen

    Directions:

    1. Topping: In small mixing bowl, combine dry topping ingredients. Cut in butter. Set aside.
    2. Cake: Combine all dry ingredients. Cut in butter until mixture resembles coarse meal with some larger butter pieces. In a separate bowl, beat together egg, milk and vanilla. Make a well in the flour mixture and stir in egg mixture with a fork until just mixed. Do not over mix!
    3. Pour 1/2 the batter into a greased and floured 9" square pan. Sprinkle with blueberries and top with remaining batter. Smooth top carefully without disrupting berries too much.
    4. Sprinkle topping mixture evenly over batter. Bake at 375° for 30-40 minutes, or until cake tests done. Partially cool in pan on wire rack.

    Sunday, July 12, 2009

    Chinese Egg Tarts (Tan Tarts)

    My first attempt at making Chinese baked goods. I've started leaning towards branching out in that area and I would love to know how to make those coconut-filled cocktail buns with the pillowy soft bun and the sweet, creamy coconut filling. I also want to try making those Asian birthday cakes, you know, the ones with fresh fruit and whipped cream, airy and not too sweet. If anyone has any recipes to recommend for either of these items or any other Chinese pastry, send them my way please!

    So, back to the egg tarts (tan tarts)... My first attempt at these was yesterday using a mish-mash of online recipes. The egg-custard filling was pretty good and close to the 'real thing' once it had cooled to room temperature, but the pastry was all wrong. When I was making it (creaming the butter and sugar to make the pastry) my instincts told me "I shouldn't be creaming this" but I followed the recipe anyway. I tried again today with the leftover filling, but this time I used my own flaky pie crust recipe and the results were much better. I think that by letting the uncooked egg filling sit overnight it probably enhanced the flavor and texture too. I think in Asia they bake using all weight measurements so this is why the recipe is in grams. The photo is from my firat attempt, so please ignore the ugly pastry.

    Chinese Egg Tarts
    Makes 14 (standard muffin tin)

    1 recipe double-crust basic pastry

    3 eggs
    110 gm icing sugar
    225 gm hot water
    85 gm evaporated milk
    1/2 tsp vanilla extract

    1. Filling: Add sugar into hot water, mix until completely dissolved and let cool. Whisk egg with evaporated milk. Pour into cooled sugar water. Mix well. Strain egg mixture to remove foam or simply skim foam off the top.
    2. Refrigerate egg mixture overnight. Don't skip this step!
    3. When ready to bake, preheat oven to 375 degrees F.
    4. Using prepared pie crust dough - the same as you would use for apple pie (recipe not given here), shape dough into 1 1/2 inch balls, and press the balls into tart molds/muffin tins so that it covers the bottom, and goes up the sides as high as you can get it without the pastry becoming too thin.
    5. Carefully pour egg mixture into each unbaked tart shell.
    6. Bake for 15 to 20 minutes in the preheated oven, until golden brown and the filling is puffed up a little bit. IYou might need to watch and adjust the oven temperature as I did. When a toothpick is inserted and it doesn't fall over, they are ready. Cool for 5 minutes before unmolding then cool to room temperature before eating.

    Thursday, July 9, 2009

    Tomato Quiche

    My CF memory card for my Canon XTI still doesn't work, but thankfully I have a backup camera - my little pink Sony point and click.


    Anything baked in a tart pan looks great and this tomato quiche is no exception especially with the bright vegetables and molded pastry edge. I only wish it tasted half as good as it looked. The recipe was a blue ribbon winner from Taste of Home (which is usually awesome) but this tomato quiche was kinda blah. Next time I'll either use a sharper cheese or add some ham or bacon to it. Or I'll just stick to my regular standby quiche filling of sautéed red peppers, mushrooms, bacon, broccoli and mozzarella.

    Any environmentalists out there? If you haven't already seen this cookbook - The Big Green Cookbook - I recommend leafing through it because it's got some great ideas on "green" cooking and household tips. I think I'm going to get a copy for my tree-hugging friend for his birthday on the 14th. I hope Amazon ships that fast because as usual, I didn't think far enough ahead.

    My Favorite Quiche Filling

    Makes enough for 1 - 9" tart

    1/2 onion, diced
    4 strips bacon
    1/2 red pepper, diced
    4-6 mushrooms, sliced
    1 cup mozzarella cheese

    2 eggs
    3/4 cup milk
    Salt & Pepper to taste

    1. In a non-stick pan, sautée the onion and bacon until bacon is almost cooked through. Add mushrooms and red pepper. You may want to add the red pepper a bit later than the mushrooms so it doesn't overcook. Continue frying until bacon is fully cooked.
    2. In a separate bowl beat together the milk and eggs and season to taste.
    3. In a partially baked tart crust, sprinkle 1/2 the cheese. Put the bacon-veggie filling over the cheese then pour the egg mixture over everything. Sprinkle the top with remaining cheese.
    4. Bake at 425ºF for 15 minutes. Lower the oven to 375ºF and bake for another 20-25 minutes or until egg is almost set. Cool for 15 minutes before unmolding from pan and serving.

    Wednesday, July 1, 2009

    Junior's Cheesecake - Raspberry Swirl "Little Fellas"

    Happy Canada Day! These treats fit Canada's colors perfectly. It was really weird having a day off in the middle of the week. I kept thinking it was Saturday or Sunday. I can't believe 1/2 the year has gone by already. 2009 is halfway gone!

    As promised, here is the recipe for the very easy and soooo yummy Junior's Cheesecake little fellas. There are also other variations in the Junior's Cheesecake Cookbook. Basically the cheesecake part is the same, only the swirl part is different. You could do strawberry, mocha, chocolate or whatever other creative swirl you can think up. These baked up perfectly, probably because of the water bath under the muffin tins (genius!) However, I was disappointed that they didn't have any kind of crust. I love graham cracker crusts and next time I think I might sprinkle some graham crumbs or put a Nilla wafer at the bottom of each little fella, for tradition's sake.

    Raspberry Swirl "Little Fellas"

    Raspberry Filling

    1 1/2 cups raspberries
    2 tbsp lemon juice
    1/3 cup sugar

    Combine all filling ingredients in a saucepan and bring to a boil, stirring constantly. Simmer until thickened, about 5-10 minutes. You may have some leftover filling which you can use to drizzle on top later on.
    Alternatively, you could just use raspberry jam although it will be a lot sweeter and thicker.

    Cheesecake:

    2 (8 oz.) pkg. cream cheese, room temperature
    2/3 cup sugar
    3 tablespoons cornstarch
    1 tablespoon pure vanilla extract
    2 extra large eggs
    1/2 cup whipping cream

    1. Preheat oven to 350 degrees F. Line 12 standard muffin cups with liners. You might need a 13th cup depending on the size of your muffin tins (use a custard cup if needed).

    2. Put one package of cream cheese, 1/3 cup of sugar, and the cornstarch in a large bowl. Beat with an electric mixer on low until creamy, about 3 minutes, scraping down the bowl a few times. Blend in the remaining cream cheese and 1/3 cup sugar, then the vanilla. Blend in the eggs, one at a time, beating well after adding each one. Beat in the cream just until it's completely blended. Be careful not to be overmix.

    3. Divide the batter among the muffin cups(fill each one almost up to the top). Drop a heaping teaspoon of the raspberry puree in the center of each, pushing each down slightly. Using a small knife or skewer, cut through the batter until raspberry swirls appear. Do not mix in the puree completely or the cakes will turn pink and the swirls will disappear.

    4. Place the muffin tin in a large shallow pan and add hot water until it comes about 1 inch up the sides of the tin. Bake the cakes until set and slightly puffy, about 30-45 minutes. Remove the cakes from the water bath, transfer the tin to a wire rack, and let cool for 2 hours. Transfer the cakes to a container and chill for at least 4 hours. (I chilled min quickly in the freezer still in the muffin tins and they were fully chilled in 2 hours)

    5. Top with fresh raspberries and drizzle with white chocolate just before serving if you wish. If there are any leftovers, cover with plastic wrap and store in the refrigerator or wrap and freeze for up to 1 month.