Showing posts with label Books. Show all posts

Tuesday, February 28, 2012

Baked Bars


The last weekend was so relaxing. We spent it at my future parents in law's place discussing wedding themes, colors and centerpieces. It was a lot of fun looking at wedding blogs and on pinterest. I also feel a lot better now having made some decisions about what direction we want to go with decorations.


Ok, now let's talk about these yummy bars! Sweetened condensed milk is an amazing and vesatile ingredient. I love it in all forms: straight out of the can or caramellized into dulce de leche or baked into a gooey topping like in these bars from the "Baked" cookbook by the guys from the famous NYC Bakery: "Baked". They are so good that they are even named after the bakery itself!

Cut these bars into small squares as they are extremely rich and so so good. When I brought these to work the entire tray disappeared almost as soon as it was wet out.


"Baked" Bars
9x13 inch pan | "Baked"

Crust
2 cups sweetened shredded coconut, toasted
2 1/2 cups ground graham cracker crumbs (about 20 crackers)
1 cup unsalted butter, melted

Filling
1 1/3 cup walnut halves, toasted and chopped
1 1/2 cup (9 oz) semi-sweet chocolate chips
3/4 cup white chocolate, coarsely chopped
3/4 cup butterscotch chips
2 cans (8 oz each) sweetened condensed milk

1. Preheat oven to 300 degrees F. Butter the bottom and sides of a 9x13" baking pan. Line with Parchment.

2. In a large bowl, combine graham cracker crumbs and toasted coconut. Add the melted butter. Combine the mixture, then turn it out into the prepared pan. Using your hands, press the crust into an even layer on the bottom and up the sides of the pan. Use the bottom of a measuring cup to create a perfectly even crust.

3. Refrigerate the crust for 15 minutes, then bake for 10 minutes, or until golden brown. Transfer to a wire rack and let the crust cool completely.

4. To make the filling, increase the oven temperature to 325 degrees F. Evenly spread the walnuts onto the bottom of the crust. Spread the chocolate chips over the walnuts, followed by the white chocolate, followed by the butterscotch chips.

6.In a steady stream, pour the sweetened condensed milk evenly over the filling. Shake the pan very gently to make sure the sweetened condensed milk is evenly distributed.

7.Bake for 30 to 40 minutes, rotating the pan every 10 minutes, until golden brown and bubbly. Transfer to a wire rack and let cool completely. Cut into squares and serve.

Thursday, February 23, 2012

Hazelnut Cream Cheese Brownies - Fat Witch Bakery


Fat Witch Bakery is in the lovely Chelsea Market in New York City. I have previously mentioned how wonderful that trip was with my then boyfriend, now fiance. It was on that vacation that we knew we were meant to be. Through the overwhelming humidity and frustration of navigating the subway system, we grew closer and learned to laugh at ourselves and enjoy the time together even when we got lost for 3 hours trying to get back to our accommodation.

When we finally found our way to Chelsea Market, my face lit up. I'd heard so much about it before. To be there in person was unreal! So many delicious treats, I didn't know where to turn my attention. These brownies feature Chocolate, Hazelnuts and Cream Cheese. They are not overly rich nor sweet. I like the simplicity of this amazing combination. If you like Nutella and cheesecake you will definitely enjoy these brownies.


Fat Witch Bakery Hazelnut Cream Cheese Brownies
Makes 9" square | Fat Witch Bakery Cookbook

Filling:
3 ounces cream cheese, softened
1/4 cup granulated sugar
1 large egg
2 teaspoons lemon juice
1/2 teaspoon vanilla extract
1/4 cup finely chopped hazelnuts

Brownies:
1/2 cup bittersweet chocolate chips
5 tablespoons unsalted butter
1 cup all-purpose flour
1/4 teaspoon salt
3/4 cup granulated sugar
2 large eggs
1 teaspoon vanilla extract
3/4 cup coarsely chopped hazelnuts

1. Filling: In a medium bowl, beat cream cheese and sugar until smooth. Add egg, lemon juice, and vanilla extract, beating until well-blended. Stir in hazelnuts. Cover bowl and refrigerate.

2. Grease and flour a 9-inch square baking pan. Melt chocolate and butter in a small saucepan over low heat, stirring frequently. Remove from heat to cool.

3. Beat sugar, eggs, and vanilla until smooth. Add cooled chocolate mixture. Beat until well-combined. Gradually add flour and salt, mixing just until combined. Stir in hazelnuts. Spread half of the brownie batter into prepared pan, just covering the bottom. Spread chilled filling over brownie batter. Refrigerate for 10 minutes.

4. Preheat oven to 350 degrees F. Spread remaining brownie batter on top of the filling. (This is far easier said than done.) Swirl the layers with a butter knife.

5. Bake 30-33 minutes, or until a wooden pick inserted in the center comes out clean or with dry crumbs. Cool in pan on wire rack for 1 hour. Brownies should be covered and stored in the refrigerator.

Tuesday, January 3, 2012

Brown Butter Cookies


This recipe is case in point for why I love old cookbooks and compilations from years gone by. I especially enjoyed this one, published after Conde Nast stopped publishing the magazine (so sad!) The Gourmet Cookie Book (The Single Best Recipe from Each Year 1941-2009).

Other good compilations are:
The Essential NY Times Cookbook- Classic Recipes for a New Century
Baking Illustrated by Cooks Illustrated
Baking in America - Traditional and Contemporary Favorites from the Past 200 Years.

People sometimes tell me it's odd that I "read" cookbooks, but to me, they are like storybooks that I can incorporate into my own life and family memories.


Brown Butter Cookies
Makes 24 | adapted from Gourmet, June 1961

1 cup butter
2/3 cup sugar
2 1/3 cups flour
1 teaspoon baking powder
Walnut halves, to decorate

1. In a small, heavy-bottomed saucepan, melt butter on low heat, stirring occasionally, until browned. Stir in sugar and vanilla sugar and remove from heat. Let cool.

2. Combine flour and baking powder and beat in cooled butter mixture to form a smooth dough.

3. Preheat oven to 325 degrees F. Roll small balls of dough into balls about 1 inch in diameter. Place dough balls about an inch apart on a baking sheet lined with parchment paper. Press each ball of dough down using the tines of a fork. Top with half of a blanched almond or an almond slice.

4. Bake at 325 degrees F for 20 minutes, or until edges just start to turn golden. Remove from baking sheet after 1 minutes and let cool on wire racks.

Monday, December 5, 2011

Junior's Strawberry Shortcake Cheesecake


This tall cake cannot be described any other way besides "statuesque". It stands a stunning 5" high - crowned with rosettes of piped whipped cream. It consists of a strawberry cheesecake layer sandwiched between two fluffy sponge cakes. It is not too sweet and very impressive in both appearance and taste.


I made this cake for Thanksgiving, since we are not big fans of pumpkin pie. It was so refreshing and light that it didn't weigh us down even after a huge meal! My sister's boyfriend doesn't usually like cheesecake but he went back for seconds of this one. I can't say enough to recommend this recipe.

Don't be deterred by the seemingly long and labor intensive recipe. While it does have a lot of steps, they are all easy. Essentially you are making 2 sponge cakes, 1 cheesecake and whipping some cream and slicing strawberries then assembling. It can be broken up over a few days. I made the cheesecake first (this can be made ahead and frozen) then the sponge cake. I whipped the cream just before assembling it on the same day it was served. Below is a picture of the first layer of cake, cream and strawberries, before the cheesecake layer gets put on.


The recipe comes from Junior's Cheesecake Cookbook. It is one of their "Too Tall" recipes - aptly named as these are indeed skyscraping cakes!


Strawberry Shortcake Cheesecake
tall 9" cake | Junior’s Cheesecake Cookbook

Cheesecake layer:
10 oz (1 cup) frozen whole strawberries, thawed and drained well
1/3 cup plus 1 tsp cornstarch
3 (8 oz) packages of cream cheese at room temperature
1 1/3 cups sugar
1 tbsp pure vanilla extract
2 extra large eggs
2/3 cup heavy or whipping cream

For the sponge cake (2 layers):
2/3 cup sifted cake flour
1 1/2 tsp baking powder
1/2 tsp salt
5 extra large eggs, separated and at room temperature
2/3 cup sugar
1 ½ tsp pure vanilla extract
¼ tsp pure lemon extract
¼ cup (1/2 stick) unsalted butter, melted
½ tsp cream of tartar

to assemble and frost:
2 quarts fresh strawberries
1 tbsp unflavored granulated gelatin
3 tbsp cold water
1 quart heavy or whipping cream
1/3 cup sugar
1 tbsp pure vanilla extract

1. Preheat the oven to 350 degrees F. Generously butter the bottom and sides of one 9-inch springform pan and two 9 inch round layer cake pans. Wrap the outside of the springform (but not the cake pans) with aluminum foil, covering the bottom and extending all the way up the sides. Very important: line the bottom of all three pans with parchment or waxed paper (do not let the paper come up the sides).

2. Pulse the thawed strawberries in your food processor until smooth (you need 3/4 cup of puree). Stir in the 1 tsp of cornstarch and set aside. It will thicken slightly as it stands.

3. Put one package of the cream cheese, 1/3 cup of the sugar, and the cornstarch in a large bowl. Beat with an electric mixer on low until creamy, about 3 minutes, scraping down the bowl a few times. Beat in the remaining cream cheese, one package at a time, scraping down the bowl after each. Increase the mixer speed to medium and beat in the remaining 1 cup sugar, then the vanilla. Blend in the eggs, one at a time, beating well after adding each. Beat in the cream just until it’s completely blended. Be careful not to overmix! Fold in the strawberry puree.

4. Gently spoon the batter into the springform, then place it in a large shallow pan containing hot water that comes 1 inch up the sides of the springform. Bake the cake until the edges are light golden brown and the top is set, about 1 ¼ hours. Remove the cake from the water bath, transfer the tin to a wire rack, and let cool in the pan for 2 hours, then cover with plastic wrap and refrigerate until completely cold, about 4 hours. Then freeze overnight until ready to assemble the cake.

5. While the cheesecake is cooling, make the sponge cake layers. Check that the oven is preheated to 350 degrees and that the water bath has been removed. In a small bowl, sift the flour, baking powder, and salt together. Beat the egg yolks in a large bowl with an electric mixer on high for 3 minutes. While the mixer is still running, slowly add 1/3 cup of the sugar and continue beating until thick, light yellow ribbons form in the bowl, about 5 minutes more. Beat in the extracts. Sift the flour mixture over the batter and stir it in by hand, just until no white flecks are visible. Blend in the melted butter.

6. Put the egg whites and cream of tartar in a clean medium size bowl and, using clean, dry beaters, beat the mixer on high until frothy. Gradually add the remaining 1/3 cup sugar and continue beating until stiff peaks form. (the whites will stand up and look glossy, not dry). Fold about 1/3 of the whites into the batter, then add the remaining whites. Don’t worry if you still see a few white specks-they’ll disappear during baking. Divide the batter evenly between the two layer cake pans and bake until golden (not wet or sticky) and the center springs back when lightly pressed, about 12 minutes. Let the cakes cool in the pan on a wire rack for 15 minutes, then turn them out onto the rack and gently peel off the paper liners. Let cool completely, then cover with plastic wrap and refrigerate overnight or until ready to assemble the cake.

7. on the day you plan to assemble the cake, hull 1 quart of the strawberries, then cut them into 1/2 inch pieces (you need 2 cups). Reserve the remaining berries for decorating the cake.

8. Make the frosting. Place the gelatin in a heatproof measuring cup, stir in the cold water, and let stand until it swells and thickens. Cook in the microwave on high for about 30 seconds or over a pan of simmering water for about 1 minute, until clear and completely melted. In a medium size bowl, whip the cream with an electric mixer on high until it thickens and soft peaks just begin to form. With the mixer still running, add the sugar and beat just until the cream stands up in peaks (don’t overmix or the cream will curdle). Beat in the vanilla. Add the melted gelatin all at once and beat until thoroughly incorporated. Refrigerate the cream for at least 30 minutes (preferably no longer than 1 hour) in two bowls: 2 cups in a small bowl for piping decorations on the top of the cake and the remainder in a second larger bowl for frosting the cake. Meanwhile, remove the frozen strawberry cheesecake from the freezer and let stand at room temperature for 10 minutes.

9. Place one layer of the sponge cake, top side down, on a cake plate. Spread evenly with a thin layer of whipped cream frosting from the large bowl and half of the strawberry pieces. Release and remove the ring of the springform, then remove the frozen cheesecake from the bottom of the pan. Peel away the paper liner and place top side down on top of the frosted bottom layer. Press the cheesecake down gently, just enough so the two layers stick together but not enough for the filling to come out the sides. Top the cheesecake layer with some more whipped cream from the large bowl, and sprinkle evenly with the remaining strawberry pieces. Top with the second cake layer of sponge cake, top side up. Frost the top and sides of the cake with the rest of the whipped cream in the large bowl.

10. To decorate, hull the remaining quart of berries and halve them, from top to tip. Place a ring of berries around the bottom edge of the cake, tip ends up. Using 5 or 6 berry halves, make a star in the center of the cake, pointing the tips of the berries away from the center. Fit a pastry bag with a medium closed star tip or medium open star tip and fill the cream from the small bowl. Pipe shells or rosettes around the top edge of the cake and make a large rosette on top of the strawberry pieces.

11. Refrigerate the cake until serving time (it takes at least 2 hours to allow the cheesecake to thaw enough to slice easily. Use a sharp straight edge knife, not a serrated one. Cover and leftover cake and refrigerate.

Wednesday, October 26, 2011

Maple Pecan Pound Cake


Despite its name "pound cake", this loaf is not heavy in the least. It cuts cleanly into beautiful, mouth-watering slices.

This is the perfect embodiment of fall flavors. The batter is infused with pure maple syrup and the flavors are heightened with maple extract both in the batter and in the glaze. Do not skip the glaze – it takes the cake from being great to AMAZING. It is the kind of glaze with an ever so faint crust on top that yields easily and melts on your tongue like the maple cream filling you find in some filled chocolates. Toasting the nuts is also an invaluable step to maximize flavor.

I bring baking to work at least once a week and I had several co-workers comment that this was one of their favorites. Another hit from "Cake Keeper Cakes" by Lauren Chattman. This is one gem of a book and this is one hell of a cake.


Maple Pecan Pound Cake
1 loaf | Cake Keeper Cakes

CAKE
1 3/4 cups all-purpose flour
3/4 tsp baking powder
1/4 tsp salt
4 large eggs
1/2 tsp maple extact
1/2 tsp vanilla extract
14 tbsps (1 3/4 sticks) butter, softened
1 cup packed brown sugar
5 tbsps pure maple syrup
1 cup pecans, toasted and chopped

GLAZE
1/2 cup powdered sugar
2 tbsps heavy cream
1 tbsp maple syrup
1 1/2 tsps fresh lemon juice
1/4 tsp maple extract

1. Cake: preheat oven to 350 degrees F. Grease a 9" x 5" loaf pan and dust with flour.

2. Whisk together the flour, baking powder, and salt. Combine the eggs, maple extract and vanilla in a glass measuring cup and lightly beat.

3. Combine the butter and brown sugar in a large bowl; cream with an electric mixer on med-high speed until fluffy, about 3 minutes; stir in the maple syrup until smooth. Decrease mixer speed to med-low; pour the egg mixture into the bowl in a slow stream; mix until incorporated.

4. Decrease mixer speed to low; add the flour mixture, 1/2 at a time; after the last addition, mix for 30 seconds. Stir in pecans. Scrape the batter into the prepared pan and smooth the top.

5. Bake the cake until it is golden brown and a toothpick comes out clean, about 1 hour and 15 minutes. Let the cake cool in the pan for about 5 minutes, invert it onto a wire rack, and then turn it right side up on a rack to cool completely.

6. Glaze: combine the glaze ingredients in a bowl; whisk until smooth. Move the whisk back and forth across the cake, drizzling it over the top and letting it drip down the sides. Let stand until the glaze sets, about 1 hour. Store at room temperature.

Thursday, September 29, 2011

Peanut Butter Cake Mix Cookies


This is an easy and fast recipe for peanut butter cookies. They start with a yellow cake mix (but if you are feeling adventurous, you might want to try devil's food cake mix!). They are chewy, especially if you take care to underbake them. My favorite parts were the caramellized, slightly crisp edges that surrounded the chewy centres of the cookies.

These come from a really cute little book called "101 things to do with a cake mix". Amazon users rate this as 4 1/2 stars! With recipes for brownies, cookies, bundt cakes, etc. you will never use the recipe on the back of the box again.


Peanut Butter Cake Mix Cookies
adapted from 101 Things to do with a Cake Mix

1 package (18.5 oz) yellow cake mix
1 cup peanut butter (either creamy or chunky)
1/3 cup vegetable oil
2 eggs
2 tablespoons water

1. Preheat oven to 350 degrees F. Pour the cake mix into a large bowl. Make a well in the center, and add peanut butter, oil, eggs, and water. Mix until well blended.

2. Drop by teaspoonfuls onto ungreased cookie sheets. Flatten slightly using a fork dipped in water if desired.

3. Bake for 10 to 12 minutes in the preheated oven. Let cookies set on cookie sheet for 2 to 3 minutes before carefully removing from the cookie sheet to cool on wire racks.

Wednesday, September 14, 2011

Perfect Pound Cake


This golden, statuesque pound cake is tender and moist. The crisp, caramellized crust hides a fine grained cake with a slightly firm texture that results from the use of cake flour. Delicious plain or served with lemon curd. It also freezes extremely well and takes well to flavoring with different extracts and lemon or orange zest. The recipe is from the classic book by Rose Levy Berenbaum - The Cake Bible. It is not as heavy on the eggs and butter as many other pound cake recipes yet just as delicious. The recipe below is for a loaf cake but I doubled the recipe and baked it in a tube pan.


Perfect Pound Cake
8 x 5" loaf | The Cake Bible by Rose Levy Beranbaum

13 tbsp butter
3 tablespoons milk
3 large eggs
1 1/2 teaspoons vanilla
1 1/2 cups sifted cake flour
3/4 cup sugar
3/4 teaspoon baking powder
1/4 teaspoon salt
13 tablespoons, softened

1. Preheat oven to 350 degrees F. In a medium bowl lightly combine the butter, milk, eggs and vanilla.

2. In a large mixing bowl combine the dry ingredients and mix on low speed for 30 seconds to blend. Add the butter and half the egg mixture. Mix on low speed until the dry ingredients are moistened. Increase to medium speed and beat for 1 minute to aerate and develop the cake’s structure.

3. Scrape down the sides. Gradually add the remaining egg mixture in 2 batches, beating for 20 seconds after each addition to incorporate the ingredients and strengthen the structure. Scrape down the sides.

4. Scrape the batter into the prepared pan and smooth the surface with a spatula. The batter will be almost a 1/2" from the top of a 4-cup loaf pan. (If pan is smaller, use excess batter for cupcakes.)

5. Bake 55 to 65 minutes or until a wooden toothpick inserted in the center comes out clean. Cover loosely with buttered foil after 30 minutes to prevent overbrowning. The cake should start to shrink from the sides of the pan only after removal from the oven. Let the cake cool in the pan on a rack for 10 minutes and invert it onto a greased wire rack. If baked in a loaf pan, to keep the bottom from splitting, reinvert so that the top is up and cool completely before wrapping airtight.

Monday, September 5, 2011

Fat Witch's Cherry Oatmeal Bars


Where did the summer go? Has Labor day really come and gone already? Seems like July and August went by in the blink of an eye. Every weekend has been so fun and activity-filled that I have not noticed the time passing. Time to pack away the ice-cream maker and start looking towards autumn-inspired baked goods.

This is my son's last year in preschool before he goes to Kindergarten. He wants so much to go to school like the big kids. Letting him help me in the kitchen and help pack his own lunch makes him feel more grown-up. We had fun making these one-bowl bar cookies together. They are like overstuffed oatmeal cookies. Not quite as oat-y as granola bars but contain many of the same ingredients: oats, dried cherries, coconut. These will be a welcome treat for back-to-school or breakfast on the run.

Fat Witch's Cherry Oatmeal Bars
Makes 9" Pan | adapted from Fat Witch Brownies Cookbook

3/4 cup + 1 tbsp butter
1 1/2 tsp vanilla
1 1/2 cups quick oats
1 cup flour
1 cup brown sugar
1/4 tsp salt
1/2 tsp cinnamon
1 cup dried cherries
1/4 cup dried coconut
1/3 cup chopped nuts

1. Preheat oven to 350 degrees F. Grease 9" pan.

2.Melt butter and stir in vanilla. Combine all other ingredients in a bowl then add melted butter. Stir to combine fully.

3. Press into greased pan and bake for 30 minutes or until top is golden brown and edges start to pull away from the pan.

Thursday, August 4, 2011

Banana Chocolate Chunk Cookies


This recipe from Martha Stewart's Cookies will make your kitchen smell like the most amazing place on earth. Toasted walnuts and generous chunks of chocolate held together with a soft, banana flavored batter. This is like chocolate chip banana bread in cookie form. So far I have yet to be let down by a recipe from Martha Stewart's Cookies. The banana in these cookies keeps them soft for longer than the average cookie. Since they have fruit, nuts, rolled oats and whole wheat flour, they are probably slightly healthier than your average cookie too!


Banana Chocolate Chunk Cookies
3 dozen | Martha Stewart's Cookies

1 cup all-purpose flour
1/2 cup whole wheat flour
1 tsp. coarse salt
1/2 tsp baking soda
3/4 cup unsalted butter at room temperature
1/2 cup white sugar
1/2 cup brown sugar
1 large egg
1 1/2 tsp pure vanilla extract
1/2 cup mashed ripe banana (about 1 large)
1 cup old-fashioned rolled oats
8 ounces semi-sweet chocolate, coarsely chopped
1/2 cup coarsely chopped walnuts, toasted

1. Preheat oven to 375 degrees F. Whisk together both flours, salt and baking soda in a medium bowl.

2. Mix butter and sugars with an electric mixer till light and fluffy, then add egg and vanilla and combine. Mix in banana. Add flour mixture, mixing until just combined. Stir in oats, chocolate and walnuts.

3. Using a cookie scoop, drop dough onto baking sheets lined with parchment paper, spacing about 2 inches apart. Bake until golden brown and just set, 12 to 13 minutes. Cool on sheets for 5 minutes, then cool completely on wire racks.

Tuesday, July 26, 2011

Blueberry Muffins from Amy's Bread


These muffins were just the way muffins should be: moist, bursting with berry flavor and crowned with high, domed tops. The batter is just the right consistency to hold the blueberries suspended evenly throughout the muffin and just the right sweetness to complement the berries. The recipe is from The Sweeter Side of Amy's Bread.

Amy's Bread is a bakery in Manhattan and one of the many I plan on visiting when I visit New York at the end of September! Yup, this girl is going to the big apple for a week! I'm so excited to try all these restaurants and bakeries that I have only read about or watched as they were featured on the Food Network. If anyone knows of any "must visit" places, I'd love to hear about them!


Blueberry Muffins
Makes 12 | The Sweeter Side of Amy's Bread

3 1/4 cups flour
1 1/3 cup sugar
1 tbsp baking powder
1 3/4 tsp salt
1 cup butter
3 large eggs
1 1/4 cups milk
1 1/2 tsp lemon zest
1 2/3 cups blueberries

1. Preheat oven to 375 degrees F. Line 12 muffin cups.

2. Combine flour, sugar, powder and salt in a bowl.

3. Whisk together melted butter, eggs, milk and zest in a separate bowl. Add liquid mixture to flour mixture and gently fold in berries. Fill muffin tins.

4. Bake for 20-25 minutes or until toothpick tests clean.

Tuesday, July 19, 2011

Apple Walnut Cake from Amy's Bread


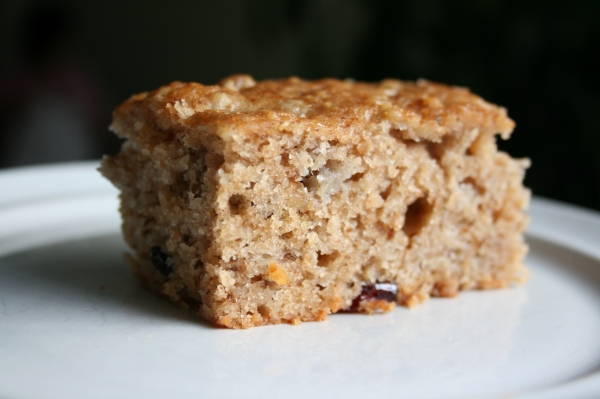
This recipe comes from a cookbook called The Sweeter Side of Amy's Bread. Apples and walnuts are perfect partners and this recipe shows them off wonderfully. It is one of those homely, unpretentious, down to earth yummy cakes that reminds you of home. It is just the kind of comforting cake I need right now as I am 3 weeks into my home renovations and utterly sick of being surrounded by construction dust, debris and tools. If all goes well, I will have only 2 weeks left of this and I can hardly wait! Once this is all done I will be back to baking more frequently. I've really missed it.


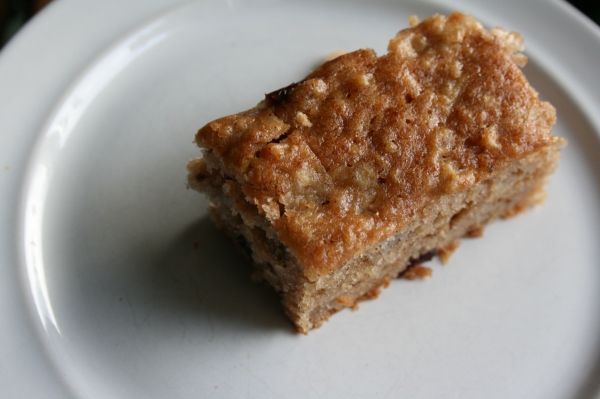
Recipe tips: The corn oil gives this cake a slightly more buttery flavor but canola oil will work just fine. If you don't have a food processor, use a grater to grate the apples. Just be warned that grated apples will release more moisture than those pulsed in the food processor.
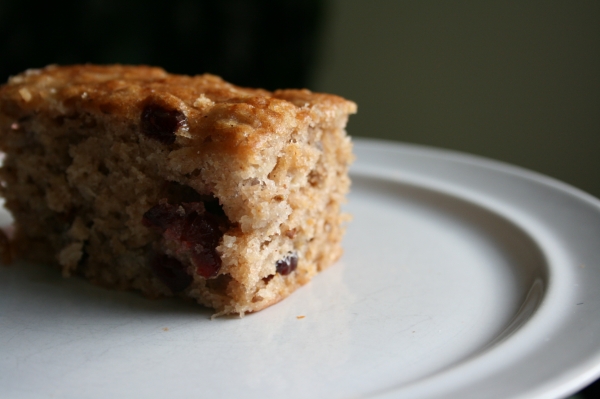


Apple Walnut Cake
9x13" pan | adapted from The Sweeter Side of Amy's Bread

2 1/2 large apples
1/2 cup dried cherries or cranberries
3/4 cup chopped walnuts
1 1/2 cups sugar
1 cup corn oil or canola oil
2 large eggs
3/4 tsp vanilla
2 1/4 cups flour
1/2 tbsp salt
3/4 tsp baking soda
1 tsp cinnamon

1. Preheat oven ot 350 degrees F. Spray/line a 9x13" pan.

2. Cut apples into chunks and process in food processor for a few seconds until chopped but not mushy. Toss with dried cranberries/cherries and walnuts.

3. Whisk together sugar, oil, eggs, vanilla until well combined. In a separate, larger bowl, mix dry ingredients together. Add oil mixture to flour mixture and stir gently with wooden spoon until almost combined - there will still be flour visible. Fold in apple mixture until evenly distributed. Batter will become softer and easier to handle. Pour into prepared pan and spread evenly.

4. Bake 30-35 minutes or until toothpick comes out clean. Rotate the pan halfway through. Cool completely on wire rack. Serve at room temperature. Store in refrigerator.

Sunday, April 17, 2011

Caramelized Apple Banana Bread


Banana bread is to quickbreads as chocolate chip cookies is to cookies. There can never be too many banana bread recipes or variations on the old classic. So, here is yet another one to try when you have a bunch of overripe bananas in your fruit bowl.


This recipe comes from the Sweet Melissa Baking Book. What makes it unique is the caramelized apples that are folded into the batter just before baking. It does require a few more steps than regular banana bread does, but it is worth it.

The bread is filled with undertones of cinnamon, nutmeg and cloves. I love the textural contrast between bread and fruit. The tender pieces of apple are like gems strewn throughout the loaf. The high fruit content also keeps this loaf moist. It stores well for several days.


Caramelized Apple Banana Bread
Makes 1 loaf | Sweet Melissa Baking Book

For the apples
2 tablespoons unsalted butter
3 tablespoons firmly packed dark brown sugar
2 granny smith apples, peeled, cored, and cut into 1/2-inch pieces
1/2 teaspoon ground cinnamon
1/2 teaspoon pure vanilla extract

For the banana bread
2 cups all-purpose flour
1 teaspoon baking soda
1/2 teaspoon ground cinnamon
1/4 teaspoon ground cloves
1/4 teaspoon freshly ground nutmeg
1/2 teaspoon kosher salt
8 tablespoons unsalted butter (1 stick)
1 cup granulated sugar
2 large eggs
1/4 cup fresh orange juice
1 teaspoon pure vanilla extract
1 1/4 cups very ripe mashed bananas (2 to 3)

1. Before you start: Position a rack in the center of your oven and preheat the oven to 350°F Lightly butter and flour a 1 1/2-quart loaf pan. 2. To make the apples: Preheat a medium skillet over medium-high heat. Add the butter and brown sugar and heat until bubbling. Add the apples and cinnamon and sauté until golden and tender, about 5 minutes. Stir in the vanilla. Remove from the heat and set aside to cool.

3. To make the banana bread: In a medium bowl, whisk together the flour, baking soda, cinnamon, cloves, nutmeg, and salt.

4. In the bowl of an electric mixer fitted with the paddle attachment, cream the butter and sugar until light and fluffy, 1 to 2 minutes. Add the eggs, one at a time, mixing well after each addition. Scrape down the sides of the bowl.

5. In a small bowl, combine the orange juice and vanilla. Add the flour mixture to the butter mixture in three batches, alternating with the orange juice mixture, mixing well after each addition. Scrape down the sides of the bowl after each flour addition. Stir in the mashed bananas until combined. Then stir in the reserved apples.

6. Pour the batter into the prepared loaf pan. Bake for 55 to 60 minutes, or until a wooden skewer inserted into the center comes out clean. Remove to a wire rack to cool for 20 minutes before unmolding onto the rack to cool further. Serve slightly warm or at room temperature.

Monday, April 4, 2011

Strawberry Cake Muffins


These muffins remind me a lot of the "Summer-Berry Muffins" that I used to buy all the time from a local cafe. The recipe I used comes from Screen Doors and Sweet Tea: Recipes and Tales from a Southern Cook by Martha Hall Foose. She calls them cupcakes but I think they are more like muffins since I opted not to frost them. I didn't want to cover up the naturally sweet flavor of the berries - it calls for a whole cup of pureed berries in the batter and the frosting (if you decide to make it) uses an additional 1/2 cup.

The results are gorgeous — tender little cakes with a beautiful rosy hue. Cake flour makes them especially delicate and bakery-shop perfect in texture. I had to take a picture of the pink batter before baking it just because it was so cute.


Strawberry Cake Muffins
Makes 12 | adapted from Screen Doors and Sweet Tea

2 1/2 cups cake flour
1 teaspoon baking soda
1/4 teaspoon salt
1/3 cup buttermilk
1/4 cup canola oil
1 teaspoon vanilla extract
1/2 cup (1 stick) unsalted butter
1 1/2 cups granulated sugar
2 large eggs
1 cup mashed strawberries
1 teaspoon grated orange zest

1. Preheat the oven to 350 degrees F. Spray a muffin tin with nonstick cooking spray or line with foil baking cups.

2. In a medium bowl, sift together the flour, baking soda, and salt. In another medium bowl, combine the buttermilk, oil, and vanilla extracts; set aside.

3.. In an electric mixer, beat the butter and granulated sugar until light and fluffy. Add the eggs one at a time, beating well after each addition. Gradually add the buttermilk mixture. Beat for 1 minute at medium speed.

4. Reduce the speed to low and add the flour mixture. Mix until just combined. Stir in the strawberries and the orange zest. Spoon into the prepared muffin tins, filling them two-thirds full. Bake for 18 to 20 minutes, or when cupcakes spring back when touched lightly in the center. Cool in the pan for 10 minutes, then unmold the cupcakes and cool on racks.

Friday, March 25, 2011

Maple Pecan Tartlets


Baking Illustrated is one of my favorite Cooks Illustrated cookbooks. My second favorite being The New Best Recipe and my third being The Best 30 Minute Recipe. In general there seems to be a love/hate relationship going on with Cooks Illustrated/America's Test Kitchen. I personally trust their recipes enough to make them for a dinner party without prior testing. They do know what they're talking about and the food tastes great, however, I've noticed that they publish a lot of the same recipes in different books with a slightly different spin on them. That is why of all their publications, these 3 are my favorites. They each provide a sufficiently different approach to cooking so the recipes aren't redundant. While you are prepping your filling, bake your crust. Try to time it so that the filling is ready to be poured immediately into the hot crust. Maple Pecan Pie 24 minis | Baking Illustrated 1 recipe for basic 9" Pie Crust 1/4 cup butter 1/2 cup sugar 1/2 tsp salt 3 eggs 1 tsp vanilla 1 cup pure maple syrup 1 1/2 cups pecans, chopped (I left mine whole) 1. Prehat oven to 350 degrees F. Roll out your pie crust and line your mini muffin or mini tart tins.

2. Filling: Melt butter in a double boiler. Add sugar and salt and stir to dissolve. Cool slightly then add eggs, vanilla and maple syrup. Continue stirring, still using the double boiler, until it reaches 130 degrees on an instant-read thermometer. It will be glossy and smooth. Stir in pecans. 3. Pour filling into hot crust. Bake 50-60 minutes or until the center is not jiggly. (It will continue to cook as it cools too, from the residual heat). Cool fully, at least 4 hours, and serve at room temperature.

Wednesday, March 23, 2011

Sugared Brioche Twists


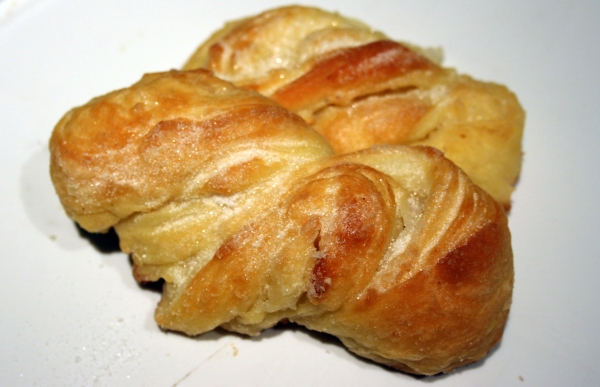
I just bought this wonderful little book called
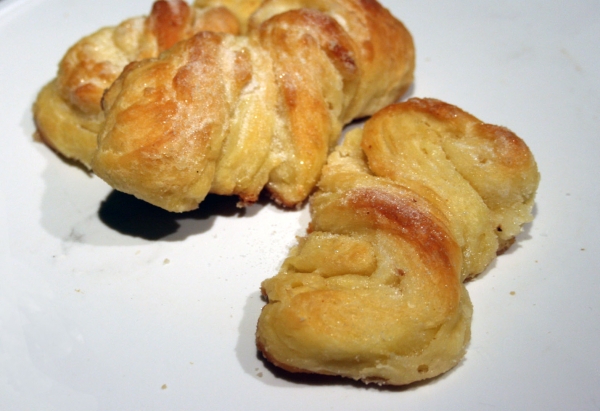
 Fast Breads: 50 Recipes for Easy, Delicious Bread by Elinor Klivans. The book was published September 2010 but somehow I hadn't seen it on the shelves until last week. It was the last copy and I didn't think twice about buying it. The recipes involve yeast which I love baking with. There is also a focus on sweet breads and comfort breads like sticky buns, cinnamon rolls, brioche, parker house rolls and butter twists.

Some reviewers mentioned that the breads a not really "fast" as they require overnight rising. However, the hands-on time is minimal and therefore, they really can be considered "fast" in my opinion. These breads also allow you a lot of flexibility because they can rest in the fridge for a few days, giving you plenty of time to build them into your schedule, no matter how busy you are.

I used Elinor's brioche recipe but instead of shaping it into a loaf I rolled it out thin and sprinkled sugar on it they rolled it up - cinnamon bun style - then cut it into pieces and twisted each piece to form a pastry of its own. They were beautiful. The delicate flavor of butter took centre stage, accompanied by a slight crunch from the caramelized sugar. The pastry is golden and light in texture.

They were so flaky and light. A lot like croissants but without all the work of making a laminate dough.


Sugared Brioche Twists
Makes 12 | Adapted from Fast Breads

1/4 cup milk
2 1/4 tsp active dry yeast
1 tbsp sugar
4 large eggs, room temperature
2 1/2 cups all purpose flour
1 tsp salt
1 1/4 cups butter, room temperature, 1" cubes
1/4 - 1/2 cup butter, for filling, room temperature
3/4 cup sugar, for filling

1. Heat milk to 110 degrees F on an instant read thermometer (or to just slightly warmer than body temperature). Transfer to a stand mixer bowl with paddle attachment. Stir in yeast and sugar and let sit until yeast is foamy, 5 mins.

2. On low speed, beat in eggs. Add the flour and salt and continue mixing until flour is incorporated and looks like thick cake batter, approximately 8-10 minutes. As you mix, scrape down the bowl and beaters as needed.

3. Scrape dough into a buttered bowl. Cover witih plastic wrap and refrigerate overnight or up to 2 days. It will almost double in size.

4. After refrigeration, remove from fridge and roll out into a large rectagle, approximately 11" x 17" inches. Spread evenly with butter and sprinkle with sugar. Roll up into a log and pinch to seal the seam. Cut into 12 even pieces. Pick up each piece and twist it, pulling slightly, to form twisted pastries. Place on baking tray and cover loosely with oiled plastic wrap. Allow to rise for approximately 30 minutes. Sprinkle with additonal sugar if desired.

5. Bake at 350 degrees F for 25-30 minutes or until golden brown and dough is cooked through. Serve warm or at room temperature.

Wednesday, February 9, 2011

Dulce de Leche Cheesecake


Despite its decadent-sounding name, this cheesecake wasn't overly sweet. It had a complex, full-bodied flavor and rich brown coloring from the dulce de leche (caramellized sweetened condensed milk). It is the perfect cake to make for your sweetheart to complete your romantic v-day dinner. Even if you are like me and you don't have a sweetheart, don't let that stop you. This is just as delicious eaten alone :) I drizzled some extra sweetened condensed milk over the top before serving and crowned it with a whipped cream rosette.

***TIP*** With all cheesecakes I get the best results when I bake them a day before serving so they have a chance to cool fully - first on the counter then in the fridge overnight where the flavors truly come together and the cake ripens to its best just in time for dessert.

To prevent condensation from forming on your saran wrap when you cover your cheesecake, put a paper towel between the wrap and the cake to absorb the moisture. This way, it won't drip back down onto the cake making it look like it's weeping.


Dulce de Leche Cheesecake
9" cake | 125 Best Cheesecake Recipes

1 1/4 cups graham cracker crumbs
1/4 cup melted butter

4 (8oz ea.) pkg cream cheese, room temperature
1 cup brown sugar
4 eggs
1 tsp vanilla extract
1 can (14 oz) dulce de leche

1. Preheat oven to 350 degrees F. Wrap foil around the outside of a 9" spring form pan (to keep water from water bath out of the cake). Make graham cracker crust and press into pan. Freeze. [I didn't freeze mine and it turned out fine].

2. Beat cream cheese until very smooth. Add brown sugar then eggs one at a time. Mix in vanilla and dulce de leche. Pour over prepared crust.

3. Place in a water bath and bake 45-55 minutes, until only a slight jiggle in the middle. Cool in pan for 2 hours or until room temperature then refrigerate overnight before serving.

Sunday, January 30, 2011

Honey-Nut Sticky Buns


The sticky, nutty topping on these buns is to die for! With brown sugar, heavy cream and a touch of honey, they are rich and complex in flavor. The dough get its touch of sweetness from honey instead of sugar.

You can easily have freshly baked cinnamon buns in the morning by making these right before bed and popping them in the fridge to rise. Then all you do is bake them straight outta the fridge the next morning and voila!

According to the Rachel Ray Magazine's February 2011 issue, 29% of people shy away from recipes involving yeast. I used to be one of these people, but not anymore! Now yeast is one of my favorite things to work with. It's not difficult at all - in fact yeast breads can fit completely around YOUR schedule with the use of your fridge or freezer to slow the rising process until you're ready to shape and bake. You will be rewarded with freshly made sticky buns and the most amazing aroma throughout your house.

On the topic of houses, I'm super-excited to have the opportunity to do a review of one of CSN Stores' products. There is so much to choose from in their stores and you can also read customer reviews of their products right on their website. I know from personal experience that their shipping is quick and their products are high quality. Lots of their products also have free shipping if you spend > $69. I'm in the midst of house-hunting (condo-hunting actually) and I've fallen in love with several of their furniture pieces. One piece I am eying is this Round Chair which comes in 5 colors and would fit into any style home, from retro to modern.


Honey-Nut Sticky Buns
Makes 12 | Adapted from "A Treasury of Southern Baking"

Dough
1/4 cup honey
1 pkg (2 1/4 tsp) active dry yeast
1/4 cup warm water
1 cup warm milk
4 tbsp (1/2 stick) butter, melted and cooled
1 egg
3 1/2 - 4 1/2 cups all purpose flour
1/4 tsp salt
1/2 cup raisins or other dried fruit, chopped (optional)

Filling
4 tablespoons (1/2 stick) butter, melted and cooled
2/3 cup sugar
1 tbsp ground cinnamon

Glaze
1/2 cup (1 stick) butter
3/4 cup packed light brown sugar
1/4 cup honey
1/4 cup heavy cream
1 1/2 cups chopped pecans or walnuts
1/4 teaspoons salt

DOUGH: In the bowl of a stand mixer combine the water, yeast, and 1 teaspoon of the honey. Stir to dissolve and let stand until foamy (about 5 minutes.) Add the remaining honey, salt, butter, egg, milk, and 3 cups of the flour. Mix on low speed until combined.

Switch to dough hook and continue mixing on low speed, slowly adding the remaining flour 1/4 cup at a time. Increase the speed to medium and mix until the dough looks silky smooth and a bit tacky, but not too sticky. If the dough is too wet, add another tablespoon or two of flour. Add raisins or other chopped dried fruit if using. Continue mixing for 3 to 4 minutes. Turn the mixer off, and shape the dough into a ball.

Put the dough in a greased bowl, turning it to coat. Cover and let the dough rise in a warm spot until it doubles in volume (about 1 1/2 hrs) After the dough has risen, gently deflate it and turn it out onto a lightly floured surface. Roll the dough into a rectangle measuring 18 x 9 inches.

FILLING: brush the dough with the melted butter and sprinkle evenly with the sugar and cinnamon. Roll up the dough from one long end and pinch to seal. Slice into 12 equal pieces.

TOPPING: Combine all the glaze ingredients in a small saucepan and heat, stirring, just until melted. Pour the glaze into a 9 x 13 inch pan. Arrange the buns in the pan (there should be a little bit of room for them to rise.)

To bake today: Cover with a tea-towel and let them rise at room temperature until almost doubled and puffy, 45-60 mins, then bake for 35-45 mins in a 350 degree F oven.

To Bake the next morning: Cover with plastic wrap, and refrigerate overnight. In the morning, preheat the oven to 350 degrees F. Remove the plastic wrap from the pan and bake the sticky buns for 25 to 30 minutes, or until they are golden brown. You might need longer for a glass pan.

5. Invert immediately onto a large baking sheet. Leave the pan upside down for 5-10 minutes to let all the topping seep out and into the buns. Remove the pan and scrape out any sticky topping and nuts onto the buns. Serve warm or at room temperature. Store fully cooled buns at room temperature in an air airtight container or wrap them well and freeze.

Note: Take care to invert the buns soon after you remove the pan from the oven or you risk letting the topping cool too much and get stuck to the pan. If you use a metal pan, the baking time is shorter than if you use a glass pan. If they are browning too quickly, tent with foil. Enjoy!

Saturday, January 29, 2011

Campbell's Tomato Soup Spice Cake


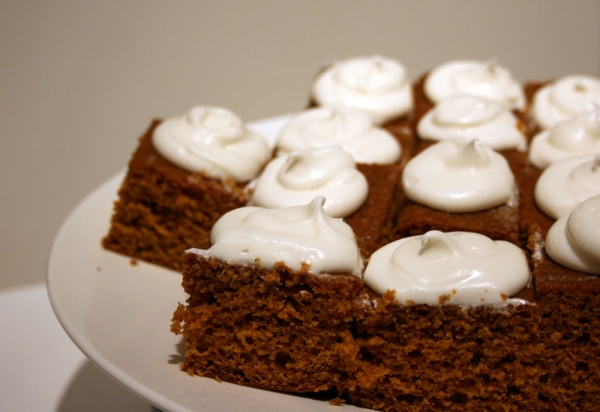
This recipe comes from a cookbook with a really long name:
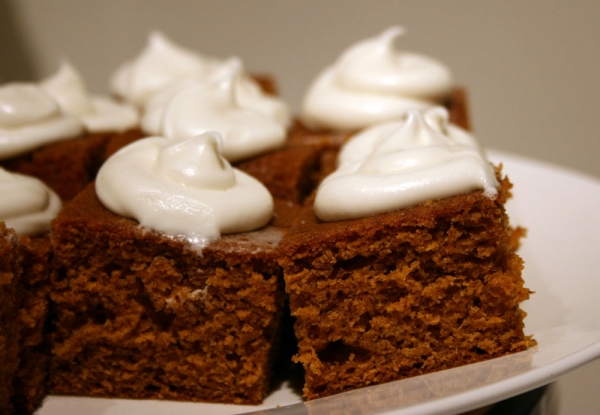
 Best Recipes: From The Backs Of Boxes, Bottles, Cans And Jars. This book includes a great selection of easy, quick, family favorites. Nobody would guess that canned condensed soup is the secret ingredient that gives this cake its moist, soft texture and appealing color. The book description reads: "A half century of good cooks have baked this Campbell's Tomato Soup cake. It's as moist, delicate and delicious today as it was fifty years ago."


Campbell's Tomato Soup Spice Cake
9x13" cake

2 cups flour
1 1/3 cup sugar
4 tsp baking powder
1 tsp baking soda
1 1/2 tsp allspice
1 tsp cinnamon
1/2 tsp ground cloves
1 (10.75oz) can Campbell's Condensed Tomato Soup
1/2 cup shortening
2 eggs
1/4 cup water

1. Preheat oven to 350 degrees F. Grease and flour a 9 x 13" pan.

2. Measure dry ingredients into a large bowl. Stir to combine. Add soup and shortening. Beat on low to medium for 2 minutes. Add eggs and water. Beat 2 minutes more, screaping down the sides of the bowl. Pour into pans.

3. Bake for 35-40 minutes or until toothpick comes out clean.

4. Cool fully then frost with "Vanilla Philly Frosting" (see below).

Vanilla "Philly" Frosting
Fills and frosts 8-9" cake

1 (8 oz.) pkg. cream cheese
1 tbsp milk
1 tsp vanilla
dash salt
5 1/2 cups confectioners' sugar

Blend together cream cheese, milk, vanilla and salt. Add sugar, 1 cup at a time, mixing well after each addition. Store in fridge.

Wednesday, January 26, 2011

Honeyed Apple Torte


This recipe was adapted from Baking in America by James Patent. When I decided to try this recipe I was not expecting such a beautiful cake! It was a nice surprise when it turned out a gorgeous golden brown with the honey-infused apple slices nestled into the cake. Even more than its appearance, I love love loved the texture. Crispy-chewy edges and a dense yet tender crumb made for a nice balance of textures against the apples. It is not a tall cake - after all James Patent does call it a torte - but to me it seems to lean more towards cake.


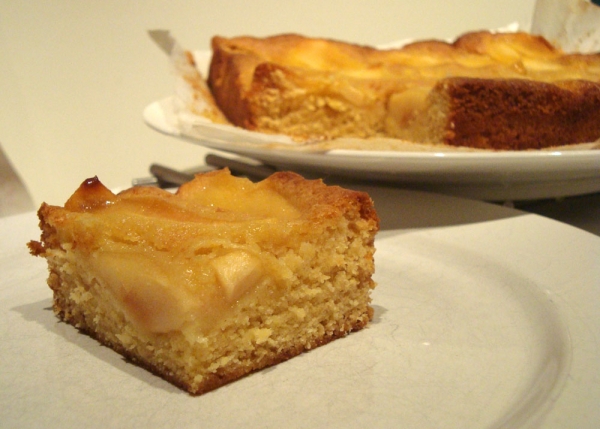
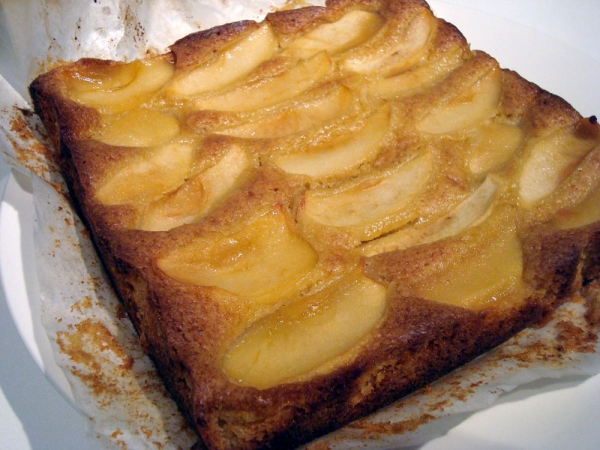
This is a nice and prettier alternative to the usual apple cakes that you mix chopped apples into. It really shows off the fruit and looks like more effort than it really is.
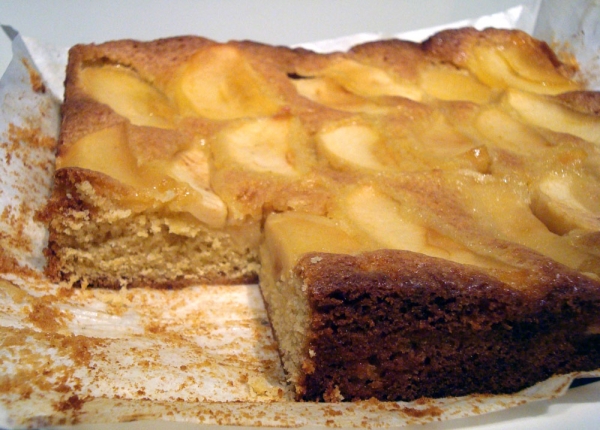


Honeyed Apple Torte
9" square or round pan | adapted from Baking in America

1/3 cup honey
2 tbsp lemon juice
3 medium-firm apples, sliced

1 1/4 cups flour
1 tsp baking powder
1/4 tsp salt
6 tbsp butter, room temperature
3/4 cup sugar
1 tsp vanilla
1/4 cup brown sugar
2 eggs

1 tbsp sugar
1/2 tsp cinnamon

1. Simmer the honey, lemon juice and apples together in a skillet over medium, stirring gently and frequently until apples are tender. Drain and cool, reserving honey liquid for the cake.

2. Preheat oven to 350 degrees F. Grease a 9" square or round pan. Combine dry ingredients in a bowl. Set aside.

3. Cream together butter, sugar, vanilla and brown sugar. Add honey liquid from step 1 then add eggs and beat. Add dry ingredients and mix just to combine. Do not over mix. Scrape into prepared pan and arrange the cooled apple slices on top, pressing them down into the batter slightly. Sprinkle sugar and cinnamon evenly on top.

4. Bake for 1 hour or until gently puffed and golden brown and toothpick comes out clean.

Wednesday, December 15, 2010

Guaranteed Fudge Brownies


You are most likely thinking - Oh no, not another brownie recipe - but before you click away, please note that these brownies are Incredible. So incredible that King Arthur Flour has designated them as "guaranteed" in the King Arthur Flour Cookie Companion. They have a crinkly, shiny, slightly crisp top layer that yields to a decadently fudgy (but not gooey) brownie layer. The generous chocolate chunks dispersed throughout the batter melt on your tongue giving you an extra burst of chocolate. There are no nuts to detract from the utterly rich and fudgy texture of these gems.

**Tip** In order to get the coveted shiny, crinkly top, make sure to heat your melted chocolate and butter together a SECOND time so the sugar dissolves fully and the chocolate-butter mixture is glossy.

King Arthur Flour's Guaranteed Fudge Brownies
9 x 13 pan | KAF Cookie Companion

3/4 cup butter
2 cups sugar
1 cup Dutch-process cocoa
1 teaspoon salt
1/2 teaspoon baking powder
1 tablespoon vanilla extract
3 large eggs
1 cup all-purpose flour
1 cup (6 ounces) chocolate chips

1. In a medium-sized microwave-safe bowl, or in a saucepan set over low heat, melt the butter, then add the sugar and stir to combine. Return the mixture to the heat (or microwave) briefly, just until it's hot (about 110 degrees to 120 degrees), but not bubbling; it'll become shiny looking as you stir it. Heating this mixture a second time will dissolve more of the sugar, which will yield a shiny top crust on your brownies.

2. Stir in the cocoa, salt, baking powder and vanilla. Whisk in the eggs, stirring until smooth; then add the flour and optional nuts and chips, again stirring until smooth. Spoon the batter into a lightly greased 9 x 13-inch pan.

3. Bake the brownies in a preheated 325 degree F oven for 29 to 32 minutes, until a cake tester inserted into the center comes out clean, or with just a tiny amount of crumb clinging to it. The edges of the brownies should be set, but the middle still soft. Remove the brownies from the oven, and cool them completely before cutting and serving.