
 These squares are tangy and sweet, smooth and crisp all at the same time. 3 layers of lemony bliss. The top layer is a silky sour cream topping. Beneath that is a classically tart citrusy filling atop a tender, flaky shortbread crust. These beauties are well worth the effort - and trust me, it's not that much effort.They are one of the prettier squares out there. Perfect for pot-lucks. I don't know many people who don't like a good lemon square. Taste of Home may not be as "gourmet" as Bon Appétit or as fun as the Food Network Magazine, but I still enjoy it, especially since it is only $13 for a year's subscription! I'm a self-proclaimed magazine junkie... I think I almost need a whole room to house my food magazines. If anybody has any good tips for magazine storage and organization, please let me know, I will be forever grateful.
Sour Cream Lemon Squares9"x13" pan | Taste of Home Dec/Jan 2000
BASE:
1 1/2 cups all-purpose flour
1/2 cup confectioners' sugar
1 teaspoon lemon zest
1 teaspoon orange zest
3/4 cup cold butter, cubed
FILLING:
4 eggs
2 cups sugar
1/3 cup lemon juice
1/4 cup all-purpose flour
2 teaspoons lemon zest
2 teaspoons orange zest
1 teaspoon baking powder
TOPPING:
2 cups sour cream
1/3 cup sugar
1/2 teaspoon vanilla extract
1. In a food processor, combine the flour, confectioners' sugar, and lemon and orange peel. Add butter; cover and process until mixture forms a ball.
Pat into a greased 13" x 9" baking pan. Bake at 350 degrees F for 12-14 minutes or until set and the edges are lightly browned.
2. In a large bowl,combine all the filling ingredients. Pour over hot crust. Bake for 14-16 minutes or until set and lightly browned.
3. In a small bowl, combine topping ingredients. Spread over hot filling. Bake 7-9 minutes longer or until set. Cool on a wire rack. Refrigerate overnight and cut into bars just before serving. Store in the refrigerator.
These squares are tangy and sweet, smooth and crisp all at the same time. 3 layers of lemony bliss. The top layer is a silky sour cream topping. Beneath that is a classically tart citrusy filling atop a tender, flaky shortbread crust. These beauties are well worth the effort - and trust me, it's not that much effort.They are one of the prettier squares out there. Perfect for pot-lucks. I don't know many people who don't like a good lemon square. Taste of Home may not be as "gourmet" as Bon Appétit or as fun as the Food Network Magazine, but I still enjoy it, especially since it is only $13 for a year's subscription! I'm a self-proclaimed magazine junkie... I think I almost need a whole room to house my food magazines. If anybody has any good tips for magazine storage and organization, please let me know, I will be forever grateful.
Sour Cream Lemon Squares9"x13" pan | Taste of Home Dec/Jan 2000
BASE:
1 1/2 cups all-purpose flour
1/2 cup confectioners' sugar
1 teaspoon lemon zest
1 teaspoon orange zest
3/4 cup cold butter, cubed
FILLING:
4 eggs
2 cups sugar
1/3 cup lemon juice
1/4 cup all-purpose flour
2 teaspoons lemon zest
2 teaspoons orange zest
1 teaspoon baking powder
TOPPING:
2 cups sour cream
1/3 cup sugar
1/2 teaspoon vanilla extract
1. In a food processor, combine the flour, confectioners' sugar, and lemon and orange peel. Add butter; cover and process until mixture forms a ball.
Pat into a greased 13" x 9" baking pan. Bake at 350 degrees F for 12-14 minutes or until set and the edges are lightly browned.
2. In a large bowl,combine all the filling ingredients. Pour over hot crust. Bake for 14-16 minutes or until set and lightly browned.
3. In a small bowl, combine topping ingredients. Spread over hot filling. Bake 7-9 minutes longer or until set. Cool on a wire rack. Refrigerate overnight and cut into bars just before serving. Store in the refrigerator.
Wednesday, April 27, 2011
Sour Cream Lemon Squares
These squares are tangy and sweet, smooth and crisp all at the same time. 3 layers of lemony bliss. The top layer is a silky sour cream topping. Beneath that is a classically tart citrusy filling atop a tender, flaky shortbread crust. These beauties are well worth the effort - and trust me, it's not that much effort.They are one of the prettier squares out there. Perfect for pot-lucks. I don't know many people who don't like a good lemon square. Taste of Home may not be as "gourmet" as Bon Appétit or as fun as the Food Network Magazine, but I still enjoy it, especially since it is only $13 for a year's subscription! I'm a self-proclaimed magazine junkie... I think I almost need a whole room to house my food magazines. If anybody has any good tips for magazine storage and organization, please let me know, I will be forever grateful.
Sour Cream Lemon Squares9"x13" pan | Taste of Home Dec/Jan 2000
BASE:
1 1/2 cups all-purpose flour
1/2 cup confectioners' sugar
1 teaspoon lemon zest
1 teaspoon orange zest
3/4 cup cold butter, cubed
FILLING:
4 eggs
2 cups sugar
1/3 cup lemon juice
1/4 cup all-purpose flour
2 teaspoons lemon zest
2 teaspoons orange zest
1 teaspoon baking powder
TOPPING:
2 cups sour cream
1/3 cup sugar
1/2 teaspoon vanilla extract
1. In a food processor, combine the flour, confectioners' sugar, and lemon and orange peel. Add butter; cover and process until mixture forms a ball.
Pat into a greased 13" x 9" baking pan. Bake at 350 degrees F for 12-14 minutes or until set and the edges are lightly browned.
2. In a large bowl,combine all the filling ingredients. Pour over hot crust. Bake for 14-16 minutes or until set and lightly browned.
3. In a small bowl, combine topping ingredients. Spread over hot filling. Bake 7-9 minutes longer or until set. Cool on a wire rack. Refrigerate overnight and cut into bars just before serving. Store in the refrigerator.
Monday, April 25, 2011
TWD: Cornmeal Shortbread
 This recipe was chosen by Valerie of Une Gamine dans la Cuisine. Valerie is a sweet blogger and her TWD choice was a hit at our house. Super crunchy and super tasty. Thanks for this great pick - a slight twist on a classic cookie.
Sunday, April 24, 2011
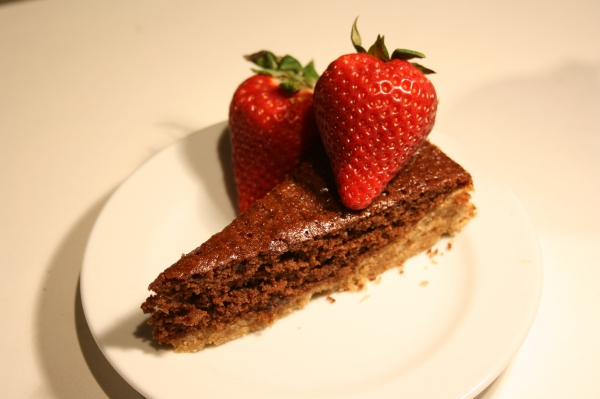
Oatmeal Chocolate Chip Cake
 This recipe is another winner from Cake Keeper Cakes. Today is a lazy day - starting with me waking up at 2:00 PM. I feel a little guilty admitting to sleeping away more than half the day, but it truly felt AMAZING! I didn't even realize how exhausted and sleep deprived my body has been.When I woke up, I felt like making something simple and comforting. This twist on a lunchbox staple - the oatmeal chocolate chip cookie - was just the thing. For ultimate moistness, wholesome rolled oats are soaked in boiling water before being added to the batter. Note: Remember to build in extra time to let the oat and hot water mixture cool fully.In my opinion, the best thing about this cake is the golden brown crispy top that gives way to the moist, fluffy cake and decadent chunks of melty, gooey chocolate chips. It's the best of both worlds - cake and cookie.
 Oatmeal Chocolate Chip Cake8" square pan | Cake Keeper Cakes
1 cup rolled oats (not instant)
3/4 cup boiling water
1 1/2 cups flour
1 1/2 tsp baking powder
1/2 tsp cinnamon
1/4 tsp salt
1/2 cup butter, room temperature
1 cup brown sugar
1/2 cup sugar
2 large eggs
1 tsp vanilla
1 cup chocolate chips
1 cup chopped walnuts/pecans
1. Place oats and boiling water in a bowl. Stir and let stand until cool. Combine flour, cinnamon, baking powder and salt.
2. Preheat oven to 350 degrees F. Grease and flour an 8" square pan. Cream together butter and sugars until light and fluffy. Add vanilla and eggs and mix to combine. Add cooled oats and mix, then add flour mixture. Do not over mix.
3. Fold in chocolate chips. Dump batter into the baking pan and bake for 50-55 minutes or until toothpick comes out clean. Cool on wire rack for 10 mintes before inverting and removing from pan.
Oatmeal Chocolate Chip Cake8" square pan | Cake Keeper Cakes
1 cup rolled oats (not instant)
3/4 cup boiling water
1 1/2 cups flour
1 1/2 tsp baking powder
1/2 tsp cinnamon
1/4 tsp salt
1/2 cup butter, room temperature
1 cup brown sugar
1/2 cup sugar
2 large eggs
1 tsp vanilla
1 cup chocolate chips
1 cup chopped walnuts/pecans
1. Place oats and boiling water in a bowl. Stir and let stand until cool. Combine flour, cinnamon, baking powder and salt.
2. Preheat oven to 350 degrees F. Grease and flour an 8" square pan. Cream together butter and sugars until light and fluffy. Add vanilla and eggs and mix to combine. Add cooled oats and mix, then add flour mixture. Do not over mix.
3. Fold in chocolate chips. Dump batter into the baking pan and bake for 50-55 minutes or until toothpick comes out clean. Cool on wire rack for 10 mintes before inverting and removing from pan.
Monday, April 18, 2011
TWD: Tourtely Apple Tart
 Jeanette of The Whimsical Cupcake chose A Tourtely Apple Tart on pages 306 and 307.
 I made mine without the top crust and it was lovely. I like the rustic feel of this tart, even though I made it in a fluted tart pan. I used a mixture of gala and fuji apples.I'm all about texture and the nuts definitely added great textural dimension to the juicy apples. Thanks for a yummy pick this week Jeanette!
Sunday, April 17, 2011
Caramelized Apple Banana Bread
 Banana bread is to quickbreads as chocolate chip cookies is to cookies. There can never be too many banana bread recipes or variations on the old classic. So, here is yet another one to try when you have a bunch of overripe bananas in your fruit bowl.
 This recipe comes from the Sweet Melissa Baking Book. What makes it unique is the caramelized apples that are folded into the batter just before baking. It does require a few more steps than regular banana bread does, but it is worth it.The bread is filled with undertones of cinnamon, nutmeg and cloves. I love the textural contrast between bread and fruit. The tender pieces of apple are like gems strewn throughout the loaf. The high fruit content also keeps this loaf moist. It stores well for several days.
 Caramelized Apple Banana BreadMakes 1 loaf | Sweet Melissa Baking Book
For the apples
2 tablespoons unsalted butter
3 tablespoons firmly packed dark brown sugar
2 granny smith apples, peeled, cored, and cut into 1/2-inch pieces
1/2 teaspoon ground cinnamon
1/2 teaspoon pure vanilla extract
For the banana bread
2 cups all-purpose flour
1 teaspoon baking soda
1/2 teaspoon ground cinnamon
1/4 teaspoon ground cloves
1/4 teaspoon freshly ground nutmeg
1/2 teaspoon kosher salt
8 tablespoons unsalted butter (1 stick)
1 cup granulated sugar
2 large eggs
1/4 cup fresh orange juice
1 teaspoon pure vanilla extract
1 1/4 cups very ripe mashed bananas (2 to 3)
1. Before you start: Position a rack in the center of your oven and preheat the oven to 350°F Lightly butter and flour a 1 1/2-quart loaf pan.
2. To make the apples: Preheat a medium skillet over medium-high heat. Add the butter and brown sugar and heat until bubbling. Add the apples and cinnamon and sauté until golden and tender, about 5 minutes. Stir in the vanilla. Remove from the heat and set aside to cool.
3. To make the banana bread: In a medium bowl, whisk together the flour, baking soda, cinnamon, cloves, nutmeg, and salt.
4. In the bowl of an electric mixer fitted with the paddle attachment, cream the butter and sugar until light and fluffy, 1 to 2 minutes. Add the eggs, one at a time, mixing well after each addition. Scrape down the sides of the bowl.
5. In a small bowl, combine the orange juice and vanilla. Add the flour mixture to the butter mixture in three batches, alternating with the orange juice mixture, mixing well after each addition. Scrape down the sides of the bowl after each flour addition. Stir in the mashed bananas until combined. Then stir in the reserved apples.
6. Pour the batter into the prepared loaf pan. Bake for 55 to 60 minutes, or until a wooden skewer inserted into the center comes out clean. Remove to a wire rack to cool for 20 minutes before unmolding onto the rack to cool further. Serve slightly warm or at room temperature.
Caramelized Apple Banana BreadMakes 1 loaf | Sweet Melissa Baking Book
For the apples
2 tablespoons unsalted butter
3 tablespoons firmly packed dark brown sugar
2 granny smith apples, peeled, cored, and cut into 1/2-inch pieces
1/2 teaspoon ground cinnamon
1/2 teaspoon pure vanilla extract
For the banana bread
2 cups all-purpose flour
1 teaspoon baking soda
1/2 teaspoon ground cinnamon
1/4 teaspoon ground cloves
1/4 teaspoon freshly ground nutmeg
1/2 teaspoon kosher salt
8 tablespoons unsalted butter (1 stick)
1 cup granulated sugar
2 large eggs
1/4 cup fresh orange juice
1 teaspoon pure vanilla extract
1 1/4 cups very ripe mashed bananas (2 to 3)
1. Before you start: Position a rack in the center of your oven and preheat the oven to 350°F Lightly butter and flour a 1 1/2-quart loaf pan.
2. To make the apples: Preheat a medium skillet over medium-high heat. Add the butter and brown sugar and heat until bubbling. Add the apples and cinnamon and sauté until golden and tender, about 5 minutes. Stir in the vanilla. Remove from the heat and set aside to cool.
3. To make the banana bread: In a medium bowl, whisk together the flour, baking soda, cinnamon, cloves, nutmeg, and salt.
4. In the bowl of an electric mixer fitted with the paddle attachment, cream the butter and sugar until light and fluffy, 1 to 2 minutes. Add the eggs, one at a time, mixing well after each addition. Scrape down the sides of the bowl.
5. In a small bowl, combine the orange juice and vanilla. Add the flour mixture to the butter mixture in three batches, alternating with the orange juice mixture, mixing well after each addition. Scrape down the sides of the bowl after each flour addition. Stir in the mashed bananas until combined. Then stir in the reserved apples.
6. Pour the batter into the prepared loaf pan. Bake for 55 to 60 minutes, or until a wooden skewer inserted into the center comes out clean. Remove to a wire rack to cool for 20 minutes before unmolding onto the rack to cool further. Serve slightly warm or at room temperature.
Thursday, April 14, 2011
Cake Mix Sugar Cookies
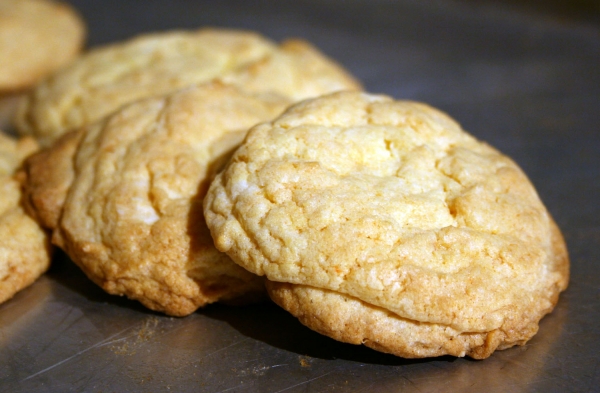 When I mixed up this dough, it looked really sticky and I was concerned that it would not firm up enough to roll out. Well, fight the urge to add more flour!!! A couple of hours in the fridge and it was perfect for rolling out and cutting into shapes. For quicker cookies you could easily refrigerate in logs then do a slice 'n bake cookie.
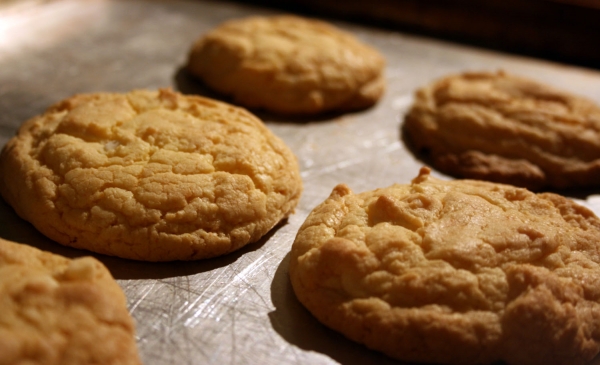 Cake Mix Sugar CookiesMakes 24 | Adapted from Allrecipes.com
1 (18.25 oz) cake mix (yellow or butter is my fave)
2 eggs
1/2 cup vegetable oil
Preheat oven to 350 degrees F. Dump all ingredients into a bowl. Mix with a wooden spoon until fully combined. Drop by tablespoonful onto a cookie sheet. Bake for 8-10 minutes or until lightly golden around edges.
Cake Mix Sugar CookiesMakes 24 | Adapted from Allrecipes.com
1 (18.25 oz) cake mix (yellow or butter is my fave)
2 eggs
1/2 cup vegetable oil
Preheat oven to 350 degrees F. Dump all ingredients into a bowl. Mix with a wooden spoon until fully combined. Drop by tablespoonful onto a cookie sheet. Bake for 8-10 minutes or until lightly golden around edges.
Saturday, April 9, 2011
Sunshine Cinnamon Rolls
 These cinnamon buns are livened up with bright, perky orange flavor. They are not too heavy nor too rich. The light lemony glaze provides a little sugar jolt adds a hint of sweetness which makes them just right for a breakfast treat.
 The texture is light, fluffy and tender from the milk and eggs. You can also freeze the baked rolls for a few weeks and thaw on the day you want to eat it. A quick heat in the microwave makes them almost as good as the day they were baked. I like to wrap them individually so I can quickly pull out one at a time for easy lunchbag treats. By lunchtime they are thawed and ready to be eaten!
 Sunshine Cinnamon Rollsmakes 12 | adapted from Southern LivingROLLS
1 (1/4 ounce) package yeast
1/4 cup warm water
1 cup warm milk
1/4 cup shortening [or softened butter]
1/4 cup sugar
1 teaspoon salt
1 egg, lightly beaten
3 1/2 to 3 3/4 cups flour
FILLING
1 cup sugar
1/2 cup butter, softened
2 tablespoons orange zest
2 tsp cinnamon
GLAZE
1 cup powdered sugar
4 teaspoons butter, softened
4-5 teaspoons milk
1/2 teaspoon lemon extract
1. In small bowl, dissolve yeast in water. In a large bowl, mix milk, shortening, sugar, salt, and egg. Add yeast mix; blend well. Stir in enough flour to make a soft dough. Knead on floured board for about 7 minutes.
2. Put in greased bowl and turn to grease top. Cover and let rise until doubled, about 1 hour. While the dough is rising, mix filling ingredients until smooth.
3. After the hour, punch dough down. Roll out into a large rectangle. Spread the filling on the rectangle. Roll up tightly starting with the long end. Cut into 12 rolls. Place rolls side by side a 9x13" baking pan or two round 9" pans. Cover and let rise until doubled, about 45 minutes.
4. Bake at 375 degrees F for 25-30 minutes, until golden brown and bread is fully cooked through. While the rolls are baking mix glaze ingredients. Spread over warm rolls.
Sunshine Cinnamon Rollsmakes 12 | adapted from Southern LivingROLLS
1 (1/4 ounce) package yeast
1/4 cup warm water
1 cup warm milk
1/4 cup shortening [or softened butter]
1/4 cup sugar
1 teaspoon salt
1 egg, lightly beaten
3 1/2 to 3 3/4 cups flour
FILLING
1 cup sugar
1/2 cup butter, softened
2 tablespoons orange zest
2 tsp cinnamon
GLAZE
1 cup powdered sugar
4 teaspoons butter, softened
4-5 teaspoons milk
1/2 teaspoon lemon extract
1. In small bowl, dissolve yeast in water. In a large bowl, mix milk, shortening, sugar, salt, and egg. Add yeast mix; blend well. Stir in enough flour to make a soft dough. Knead on floured board for about 7 minutes.
2. Put in greased bowl and turn to grease top. Cover and let rise until doubled, about 1 hour. While the dough is rising, mix filling ingredients until smooth.
3. After the hour, punch dough down. Roll out into a large rectangle. Spread the filling on the rectangle. Roll up tightly starting with the long end. Cut into 12 rolls. Place rolls side by side a 9x13" baking pan or two round 9" pans. Cover and let rise until doubled, about 45 minutes.
4. Bake at 375 degrees F for 25-30 minutes, until golden brown and bread is fully cooked through. While the rolls are baking mix glaze ingredients. Spread over warm rolls.
Thursday, April 7, 2011
Honey Florentines
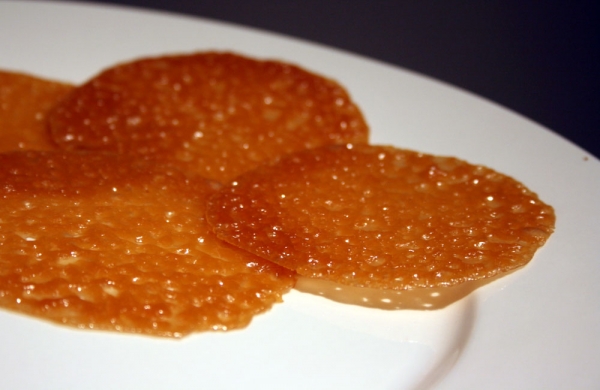 This recipe from Martha Stewart's Cookies was so easy to make. Unlike a lot of other florentine recipes, this one doesn't have any nuts or candied fruit in it. It is lacy, simple and delicate. I like the use of honey that gives these a gentler sweetness than pure sugar would. I liked them slightly underbaked so they are a little on the chewy side rather than being crisp through and through.Honey FlorentinesMakes 24 | Martha Stewart2 tbsp butter
2 tbsp brown sugar
1 1/2 tbsp honey
2 tbsp flour
1/2 tsp salt
Preheat oven to 375 degrees F. Line a pan with parchment or a silicone liner. Combine first 3 ingredients in a small saucepan and melt over low heat. Stir in flour and salt. Drop by teaspoonful onto prepared pan, leaving lots of room for spreading. Bake for 6-8 minutes or until golden brown. Cool fully then gently peel off the parchment/silicone. Store airtight.
This recipe from Martha Stewart's Cookies was so easy to make. Unlike a lot of other florentine recipes, this one doesn't have any nuts or candied fruit in it. It is lacy, simple and delicate. I like the use of honey that gives these a gentler sweetness than pure sugar would. I liked them slightly underbaked so they are a little on the chewy side rather than being crisp through and through.Honey FlorentinesMakes 24 | Martha Stewart2 tbsp butter
2 tbsp brown sugar
1 1/2 tbsp honey
2 tbsp flour
1/2 tsp salt
Preheat oven to 375 degrees F. Line a pan with parchment or a silicone liner. Combine first 3 ingredients in a small saucepan and melt over low heat. Stir in flour and salt. Drop by teaspoonful onto prepared pan, leaving lots of room for spreading. Bake for 6-8 minutes or until golden brown. Cool fully then gently peel off the parchment/silicone. Store airtight.
Copycat Club: April 2011
This month was a little slower with Copycat Club recipes... but here's what we've got:
PF Chang's Stir Fried Spicy Eggplant by Joy of Kitchen Flavours: Red Lobster Biscuits by Abby of An A for Effort:
 Payday Bars by Michelle of Brown Eyed Baker:
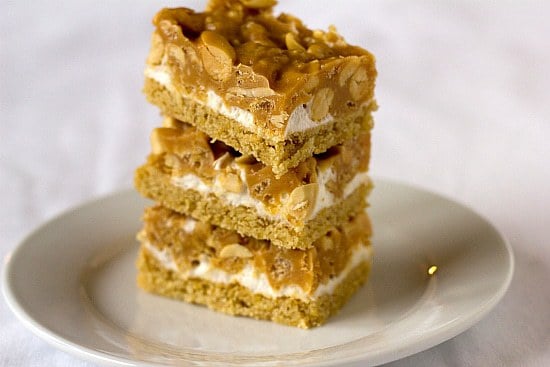 Olive Garden Alfredo with broccoli and chicken by Me
 It's been a super-busy month for me and I haven't been baking or cooking nearly as much as I would have liked to. I'm currently house hunting, moving work locations, finishing up a Business course, the list goes on... Here's to a (hopefully) much calmer month ahead! If you haven't already checked out this Kraft Canada contest, click HERE for info and for a Giveaway (Canadians only). Looks like fun and you can win $20,000!
Red Lobster Biscuits by Abby of An A for Effort:
Payday Bars by Michelle of Brown Eyed Baker:
Olive Garden Alfredo with broccoli and chicken by MeIt's been a super-busy month for me and I haven't been baking or cooking nearly as much as I would have liked to. I'm currently house hunting, moving work locations, finishing up a Business course, the list goes on... Here's to a (hopefully) much calmer month ahead! If you haven't already checked out this Kraft Canada contest, click HERE for info and for a Giveaway (Canadians only). Looks like fun and you can win $20,000!
Wednesday, April 6, 2011
Contest and Giveaway
I'm sooo excited! I love Kraft and I have always admired Anna Olson of the Food Network, so I was thrilled when they contacted me to help promote their latest contest: the Real Women of Philadelphia (Canada). Americans, check out the Real Women of Philadelphia (USA). I also have 3 giveaways for Canadians only, courtesy of Kraft Canada! Just leave a comment here and I will pick the winners at random on April 11th - the same day the competition begins!
Anna Olson will host the search for 4 of the next great cooking stars to be crowned the Real Women of Philadelphia. Together, the winners will help lead the site, host their own cooking videos, help contribute to a cookbook of Philly inspired recipes and take home $20,000 each.The contest begins April 11th and runs for 8 weeks until June 5th. Each week, you will have a chance to show off your cooking skills and compete for the grand prize! Enter as often as you like, as many weeks as you like.
Here’s how the competition works: There are 4 categories of dishes: Appetizer, Side Dish, Entrée and Dessert. There will be 2 competition weeks for each dish. Every Monday of the competition, Anna will post a video of her cooking a dish that fits the category. Then you have until Sunday to submit a recipe video of you making your tastiest dish for that week’s category. Be as creative as you want with your recipe, and be sure to include cream cheese.
They'll pick 2 finalists each week, for a total of 16 finalists who will be flown to Toronto to meet Anna and participate in a fantastic cook-off event on July 6th. They they'll select 4 winners from the cook-off to be crowned the Real Women of Philadelphia. They’ll host this website for the rest of the year by starring in their own cooking videos and participating as a contributing editor within the community and contributing to an online cookbook.Check out: How to submit a video
Tuesday, April 5, 2011
Olive Garden's Alfredo Sauce
The focus of my blog is sweets, baking and desserts. I don't often include "real food", but I just had to share this recipe with you. This is a simple recipe with outstanding results. This creamy, rich, flavorful sauce is definitely not diet food, but it's worth the splurge once in a while. I made it a little healthier by adding some fresh steamed broccoli and grilled chicken strips.I am also including this recipe in my Copycat Club round-up on April 7th. Please check out my link under my banner for Copycat Club info - all blog links welcome! Olive Garden's Alfredo Sauce adapted from Food.com 5 tablespoons butter 2 garlic cloves, minced 2 cups heavy cream 1/4 teaspoon white pepper 1/2 cup grated parmesan cheese 3/4 cup mozzarella cheese 1. Melt butter in medium saucepan over medium/low heat. Add the garlic, cream, white pepper and bring mixture to a simmer. Stir often. Add the Parmesan cheese and simmer sauce for 8-10 minutes or until sauce has thickened and is smooth. When sauce has thickened add the Mozzarella cheese and stirring frequently. 2. Serve over pasta. [I added cooked broccoli florets and grilled chicken].
TWD: Walnut Brownie Tart
 Jessica of Domestic Deep Thought chose the Coffee Ice Cream Tart for this week's TWD recipe.I made the crust as directed using walnuts instead of almonds. I didn't use ice-cream because even though it sounded delicious, I needed something to bring to work that didn't have to be frozen. So... instead of filling it with the tweaked ice-cream mixture, I made a chocolate syrup brownie and baked it in Dorie's crust.
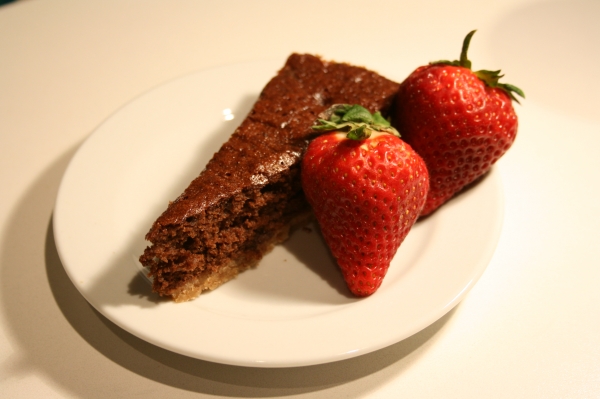 Note: The crust was delicious enough to eat on its own. I may even make sable-like cookies from the crust dough next time and skip the filling altogether!I have included my version of the tart shell and chocolate syrup brownie, but check out Jessica's website for the original recipe.Walnut Brownie Tart1- 10" tart | adapted from Dorie
For the Crust
1 cup (4 ounces) walnuts3/4 cup all-purpose flour
1/3 cup (packed) light brown sugar
1/2 teaspoon freshly grated nutmeg
pinch of salt
1/2 stick (4 tbsp) cold unsalted butter, cut into 4 pieces)
1 large egg
1/4 teaspoon vanilla extractFor the Brownie Filling
1/4 cup butter
1 tsp vanilla
1/2 cup sugar
1/2 cup chocolate syrup
2 eggs
pinch salt
1/2 cup chocolate chips1. Crust: Lightly butter a 10-inch fluted tart pan and line a baking sheet with parchment. Put the walnuts, flour, sugar, nutmeg and salt in a food processor and pulse for about 10 seconds, or until the nuts are coarsely chopped. Toss in the pieces of butter and pulse until the dough resembles coarse meal. Add the egg and extract and continue to pulse until the dough forms clumps and large curds, about 10 seconds. Turn the dough out into the tart pan and press the dough evenly over the bottom and up the sides of the tart pan. Freeze for 30 minutes.2. Preheat oven to 400 degrees F. Bake crust for 10 minutes then reduce heat to 350 degrees F. While crust is baking, make filling.3. Filling: Cream butter, sugar and eggs until creamy and well blended. Add salt. Stir in flour and blend thoroughly. Add chocolate syrup, vanilla and chocolate chips. Stir. Pour over semi-baked walnut crust. Bake for about 30 minutes or until a toothpick inserted near the center comes out almost clean. Loosen around edges and allow to cool in the pan.
Note: The crust was delicious enough to eat on its own. I may even make sable-like cookies from the crust dough next time and skip the filling altogether!I have included my version of the tart shell and chocolate syrup brownie, but check out Jessica's website for the original recipe.Walnut Brownie Tart1- 10" tart | adapted from Dorie
For the Crust
1 cup (4 ounces) walnuts3/4 cup all-purpose flour
1/3 cup (packed) light brown sugar
1/2 teaspoon freshly grated nutmeg
pinch of salt
1/2 stick (4 tbsp) cold unsalted butter, cut into 4 pieces)
1 large egg
1/4 teaspoon vanilla extractFor the Brownie Filling
1/4 cup butter
1 tsp vanilla
1/2 cup sugar
1/2 cup chocolate syrup
2 eggs
pinch salt
1/2 cup chocolate chips1. Crust: Lightly butter a 10-inch fluted tart pan and line a baking sheet with parchment. Put the walnuts, flour, sugar, nutmeg and salt in a food processor and pulse for about 10 seconds, or until the nuts are coarsely chopped. Toss in the pieces of butter and pulse until the dough resembles coarse meal. Add the egg and extract and continue to pulse until the dough forms clumps and large curds, about 10 seconds. Turn the dough out into the tart pan and press the dough evenly over the bottom and up the sides of the tart pan. Freeze for 30 minutes.2. Preheat oven to 400 degrees F. Bake crust for 10 minutes then reduce heat to 350 degrees F. While crust is baking, make filling.3. Filling: Cream butter, sugar and eggs until creamy and well blended. Add salt. Stir in flour and blend thoroughly. Add chocolate syrup, vanilla and chocolate chips. Stir. Pour over semi-baked walnut crust. Bake for about 30 minutes or until a toothpick inserted near the center comes out almost clean. Loosen around edges and allow to cool in the pan.
Monday, April 4, 2011
Strawberry Cake Muffins
 These muffins remind me a lot of the "Summer-Berry Muffins" that I used to buy all the time from a local cafe. The recipe I used comes from Screen Doors and Sweet Tea: Recipes and Tales from a Southern Cook by Martha Hall Foose. She calls them cupcakes but I think they are more like muffins since I opted not to frost them. I didn't want to cover up the naturally sweet flavor of the berries - it calls for a whole cup of pureed berries in the batter and the frosting (if you decide to make it) uses an additional 1/2 cup.
The results are gorgeous — tender little cakes with a beautiful rosy hue. Cake flour makes them especially delicate and bakery-shop perfect in texture. I had to take a picture of the pink batter before baking it just because it was so cute.
These muffins remind me a lot of the "Summer-Berry Muffins" that I used to buy all the time from a local cafe. The recipe I used comes from Screen Doors and Sweet Tea: Recipes and Tales from a Southern Cook by Martha Hall Foose. She calls them cupcakes but I think they are more like muffins since I opted not to frost them. I didn't want to cover up the naturally sweet flavor of the berries - it calls for a whole cup of pureed berries in the batter and the frosting (if you decide to make it) uses an additional 1/2 cup.
The results are gorgeous — tender little cakes with a beautiful rosy hue. Cake flour makes them especially delicate and bakery-shop perfect in texture. I had to take a picture of the pink batter before baking it just because it was so cute.
 Strawberry Cake MuffinsMakes 12 | adapted from
Screen Doors and Sweet Tea
2 1/2 cups cake flour
1 teaspoon baking soda
1/4 teaspoon salt
1/3 cup buttermilk
1/4 cup canola oil
1 teaspoon vanilla extract
1/2 cup (1 stick) unsalted butter
1 1/2 cups granulated sugar
2 large eggs
1 cup mashed strawberries
1 teaspoon grated orange zest
1. Preheat the oven to 350 degrees F. Spray a muffin tin with nonstick cooking spray or line with foil baking cups.
2. In a medium bowl, sift together the flour, baking soda, and salt. In another medium bowl, combine the buttermilk, oil, and vanilla extracts; set aside.
3.. In an electric mixer, beat the butter and granulated sugar until light and fluffy. Add the eggs one at a time, beating well after each addition. Gradually add the buttermilk mixture. Beat for 1 minute at medium speed.
4. Reduce the speed to low and add the flour mixture. Mix until just combined. Stir in the strawberries and the orange zest. Spoon into the prepared muffin tins, filling them two-thirds full. Bake for 18 to 20 minutes, or when cupcakes spring back when touched lightly in the center. Cool in the pan for 10 minutes, then unmold the cupcakes and cool on racks.
Strawberry Cake MuffinsMakes 12 | adapted from
Screen Doors and Sweet Tea
2 1/2 cups cake flour
1 teaspoon baking soda
1/4 teaspoon salt
1/3 cup buttermilk
1/4 cup canola oil
1 teaspoon vanilla extract
1/2 cup (1 stick) unsalted butter
1 1/2 cups granulated sugar
2 large eggs
1 cup mashed strawberries
1 teaspoon grated orange zest
1. Preheat the oven to 350 degrees F. Spray a muffin tin with nonstick cooking spray or line with foil baking cups.
2. In a medium bowl, sift together the flour, baking soda, and salt. In another medium bowl, combine the buttermilk, oil, and vanilla extracts; set aside.
3.. In an electric mixer, beat the butter and granulated sugar until light and fluffy. Add the eggs one at a time, beating well after each addition. Gradually add the buttermilk mixture. Beat for 1 minute at medium speed.
4. Reduce the speed to low and add the flour mixture. Mix until just combined. Stir in the strawberries and the orange zest. Spoon into the prepared muffin tins, filling them two-thirds full. Bake for 18 to 20 minutes, or when cupcakes spring back when touched lightly in the center. Cool in the pan for 10 minutes, then unmold the cupcakes and cool on racks.
Subscribe to:
Comments (Atom)


