This recipe comes from a cookbook called
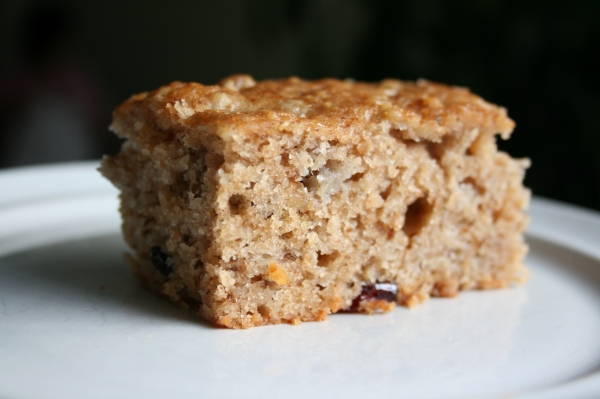
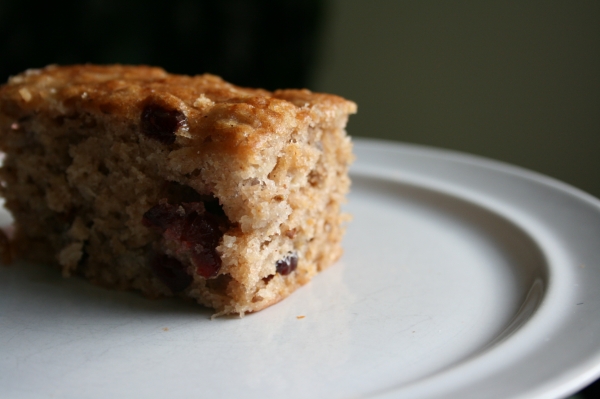
The Sweeter Side of Amy's Bread. Apples and walnuts are perfect partners and this recipe shows them off wonderfully. It is one of those homely, unpretentious, down to earth yummy cakes that reminds you of home. It is just the kind of comforting cake I need right now as I am 3 weeks into my home renovations and utterly sick of being surrounded by construction dust, debris and tools. If all goes well, I will have only 2 weeks left of this and I can hardly wait! Once this is all done I will be back to baking more frequently. I've really missed it.
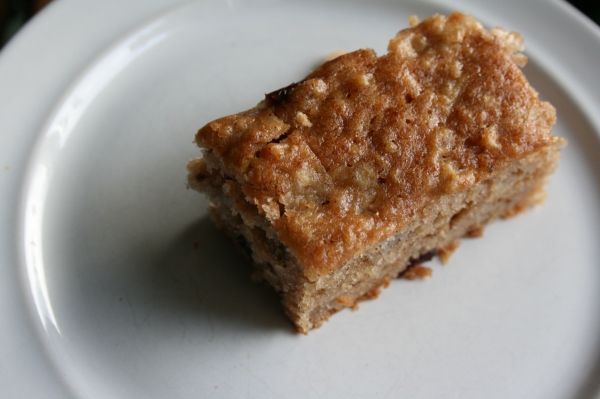
Recipe tips: The corn oil gives this cake a slightly more buttery flavor but canola oil will work just fine. If you don't have a food processor, use a grater to grate the apples. Just be warned that grated apples will release more moisture than those pulsed in the food processor.
 Apple Walnut Cake9x13" pan | adapted from The Sweeter Side of Amy's Bread
2 1/2 large apples
1/2 cup dried cherries or cranberries
3/4 cup chopped walnuts
1 1/2 cups sugar
1 cup corn oil or canola oil
2 large eggs
3/4 tsp vanilla
2 1/4 cups flour
1/2 tbsp salt
3/4 tsp baking soda
1 tsp cinnamon
1. Preheat oven ot 350 degrees F. Spray/line a 9x13" pan.
2. Cut apples into chunks and process in food processor for a few seconds until chopped but not mushy. Toss with dried cranberries/cherries and walnuts.
3. Whisk together sugar, oil, eggs, vanilla until well combined. In a separate, larger bowl, mix dry ingredients together. Add oil mixture to flour mixture and stir gently with wooden spoon until almost combined - there will still be flour visible. Fold in apple mixture until evenly distributed. Batter will become softer and easier to handle. Pour into prepared pan and spread evenly.
4. Bake 30-35 minutes or until toothpick comes out clean. Rotate the pan halfway through. Cool completely on wire rack. Serve at room temperature. Store in refrigerator.

 These muffins were just the way muffins should be: moist, bursting with berry flavor and crowned with high, domed tops. The batter is just the right consistency to hold the blueberries suspended evenly throughout the muffin and just the right sweetness to complement the berries. The recipe is from The Sweeter Side of Amy's Bread.Amy's Bread is a bakery in Manhattan and one of the many I plan on visiting when I visit New York at the end of September! Yup, this girl is going to the big apple for a week! I'm so excited to try all these restaurants and bakeries that I have only read about or watched as they were featured on the Food Network. If anyone knows of any "must visit" places, I'd love to hear about them!
 Blueberry Muffins
Makes 12 | The Sweeter Side of Amy's Bread
3 1/4 cups flour
1 1/3 cup sugar
1 tbsp baking powder
1 3/4 tsp salt
1 cup butter
3 large eggs
1 1/4 cups milk
1 1/2 tsp lemon zest
1 2/3 cups blueberries
1. Preheat oven to 375 degrees F. Line 12 muffin cups.
2. Combine flour, sugar, powder and salt in a bowl.
3. Whisk together melted butter, eggs, milk and zest in a separate bowl. Add liquid mixture to flour mixture and gently fold in berries. Fill muffin tins.
4. Bake for 20-25 minutes or until toothpick tests clean.
Blueberry Muffins
Makes 12 | The Sweeter Side of Amy's Bread
3 1/4 cups flour
1 1/3 cup sugar
1 tbsp baking powder
1 3/4 tsp salt
1 cup butter
3 large eggs
1 1/4 cups milk
1 1/2 tsp lemon zest
1 2/3 cups blueberries
1. Preheat oven to 375 degrees F. Line 12 muffin cups.
2. Combine flour, sugar, powder and salt in a bowl.
3. Whisk together melted butter, eggs, milk and zest in a separate bowl. Add liquid mixture to flour mixture and gently fold in berries. Fill muffin tins.
4. Bake for 20-25 minutes or until toothpick tests clean.
 A sugar cookie crust is filled with a tangy-sweet no-bake cheesecake filling and topped generously with strawberries. I can't think of a better summer dessert! You only need to turn your oven on to bake the crust, but if you're in one of those areas experiencing a heat wave or it's just too hot to think of using the oven, you could even skip this step if you use a graham cracker crust or crushed vanilla wafer crust.
 It is best served the same day it is made, although you can make the dough and filling in advance and/or bake the crust in advance and fill the tart the day it will be served.For the beautiful topping, the strawberry slices are layered on top, starting with from the outside edge and working inwards. This tart definitely has a "wow factor" when you serve it. The layering of the strawberries looks more complicated than it really is.
 Strawberry Cheesecake Tart
9" tart | adapted from Nick Malgieri and Allrecipes.com
Crust (Nick Malgieri)1 cup all-purpose flour
3 tablespoons sugar
1/2 teaspoon baking powder
1/4 teaspoon salt
3 tablespoons unsalted butter, cold and cut into 6 pieces
1 large egg
1 tablespoon cold waterFilling (Allrecipes.com)
1 stick (8 oz.) cream cheese, softened
1 can (14 oz.) sweetened condensed milk
1 tsp vanilla extract
1 tsp lemon zest2 pints strawberries, slicedGlaze
1/4 cup strawberry jam
1 tbsp water
Crust:
1. Combine all the dry ingredients in the bowl of a food processor fitted with the metal blade. Pulse 3-4 times to mix. Add the butter and pulse 10-12 times to mix the butter in finely. Add the egg and water and pulse repeatedly until the dough forms a ball.
2. Invert the bowl to a lightly floured work surface and carefully remove the blade. Form the dough into a disk and wrap it in plastic. Refrigerate dough 1 hour or up to 3 days.
3. Line a 9" fluted tart pan with the dough and prick all over with a fork to avoid bubbling or fill with pie weights. Bake at 400 degrees F for 12-20 minutes or until light golden brown and fully baked. Cool fully.
Filling:
1. Beat together cream cheese, sweetened condensed milk, vanilla and zest until smooth and lump-free. Spread evenly over cooled crust and arrange sliced strawberries on top in a decorative pattern.
Glaze:
1. Heat together jam and water. Brush over the strawberries. Refrigerate until serving time.
Strawberry Cheesecake Tart
9" tart | adapted from Nick Malgieri and Allrecipes.com
Crust (Nick Malgieri)1 cup all-purpose flour
3 tablespoons sugar
1/2 teaspoon baking powder
1/4 teaspoon salt
3 tablespoons unsalted butter, cold and cut into 6 pieces
1 large egg
1 tablespoon cold waterFilling (Allrecipes.com)
1 stick (8 oz.) cream cheese, softened
1 can (14 oz.) sweetened condensed milk
1 tsp vanilla extract
1 tsp lemon zest2 pints strawberries, slicedGlaze
1/4 cup strawberry jam
1 tbsp water
Crust:
1. Combine all the dry ingredients in the bowl of a food processor fitted with the metal blade. Pulse 3-4 times to mix. Add the butter and pulse 10-12 times to mix the butter in finely. Add the egg and water and pulse repeatedly until the dough forms a ball.
2. Invert the bowl to a lightly floured work surface and carefully remove the blade. Form the dough into a disk and wrap it in plastic. Refrigerate dough 1 hour or up to 3 days.
3. Line a 9" fluted tart pan with the dough and prick all over with a fork to avoid bubbling or fill with pie weights. Bake at 400 degrees F for 12-20 minutes or until light golden brown and fully baked. Cool fully.
Filling:
1. Beat together cream cheese, sweetened condensed milk, vanilla and zest until smooth and lump-free. Spread evenly over cooled crust and arrange sliced strawberries on top in a decorative pattern.
Glaze:
1. Heat together jam and water. Brush over the strawberries. Refrigerate until serving time.
 Lynne of Cafe LynnyLu chose Cream scones on page 27 of Dorie's book.
Scones are a favorite baked good around here. I threw in some chopped apricots and cranberries and a handful of chopped walnuts. I also made them bite-sized. Built in portion control = you can eat 3 minis for the calorie price of 1 large! They were no more than 1 1/2 inches along their longest edge. Simply perfect tea time treats.
Lynne of Cafe LynnyLu chose Cream scones on page 27 of Dorie's book.
Scones are a favorite baked good around here. I threw in some chopped apricots and cranberries and a handful of chopped walnuts. I also made them bite-sized. Built in portion control = you can eat 3 minis for the calorie price of 1 large! They were no more than 1 1/2 inches along their longest edge. Simply perfect tea time treats. Find the recipe
  These can be made either in the oven (recipe below) or in a food dehydrator (follow manufacturer's instructions). They are a healthy snack and a wonderful way to use up extra apples. Sometimes I sprinkle some cinnamon on the rings before baking. It makes your house smell amazing! My son likes snacking on them and taking them to school.Another way to use these dried apples is to chop them up and add use them in baked goods. Because they are drier than fresh apples, you can use them in cookies without worrying about the cookies getting soggy. I also find that they work well in muffins. My ultimate favorite use for these is in cinnamon buns. Rather than using raisins, throw a cup of chopped dried apples into your cinnamon bun filling mixture and voila - apple cinnamon buns!
Dried Apple RingsReader's Digest4 apples2 cups cold water2 tbsp lamon juice1. Peel and core the apples. Slice the apples into rings, about 1/4-inch thick.2. To keep the apple rings from browning, in a large bowl, combine 2 cups cold water and 2 tablespoons lemon juice. Add the apple rings, making sure each apple ring gets coated with the water-lemon mixture. Let stand for 5 minutes. Drain well; pat apple rings dry with paper towels.3. Preheat oven to 300 degrees F. Lightly coat 2 wire racks with nonstick cooking spray. Arrange the apple rings in a single layer on the wire racks, making sure rings do not touch or overlap. Set each rack on a baking sheet. Bake for 15 minutes. Reverse positions of the baking sheets in the oven, moving the baking sheet from the top oven rack to the bottom oven rack and vice versa. Bake for 15 minutes more. Turn off the oven. Let the apple rings dry in the oven, with the door closed, for 3 hours. Remove from oven. Store airtight.
These can be made either in the oven (recipe below) or in a food dehydrator (follow manufacturer's instructions). They are a healthy snack and a wonderful way to use up extra apples. Sometimes I sprinkle some cinnamon on the rings before baking. It makes your house smell amazing! My son likes snacking on them and taking them to school.Another way to use these dried apples is to chop them up and add use them in baked goods. Because they are drier than fresh apples, you can use them in cookies without worrying about the cookies getting soggy. I also find that they work well in muffins. My ultimate favorite use for these is in cinnamon buns. Rather than using raisins, throw a cup of chopped dried apples into your cinnamon bun filling mixture and voila - apple cinnamon buns!
Dried Apple RingsReader's Digest4 apples2 cups cold water2 tbsp lamon juice1. Peel and core the apples. Slice the apples into rings, about 1/4-inch thick.2. To keep the apple rings from browning, in a large bowl, combine 2 cups cold water and 2 tablespoons lemon juice. Add the apple rings, making sure each apple ring gets coated with the water-lemon mixture. Let stand for 5 minutes. Drain well; pat apple rings dry with paper towels.3. Preheat oven to 300 degrees F. Lightly coat 2 wire racks with nonstick cooking spray. Arrange the apple rings in a single layer on the wire racks, making sure rings do not touch or overlap. Set each rack on a baking sheet. Bake for 15 minutes. Reverse positions of the baking sheets in the oven, moving the baking sheet from the top oven rack to the bottom oven rack and vice versa. Bake for 15 minutes more. Turn off the oven. Let the apple rings dry in the oven, with the door closed, for 3 hours. Remove from oven. Store airtight.
 Chewy, crispy, crunchy base topped with a thin layer of chocolate and crowned with pillowy marshmallows. The peanut butter flavor is subtle but excellent.The special ingredient here is cornflakes for crunch. No need to turn your oven on for these, so feel free to make them even on a hot and sunny day. Just pop them in the fridge to set the chocolate at the end.
 1/2 cup sugar
1/2 cup brown sugar
1 cup corn syrup
1 cup peanut butter
6 cup corn flakes
1 cup semi-sweet chocolate chips
1 1/2 cups mini marshmallows
In medium pot mix sugar, brown sugar and syrup over medium-low heat. Bring to a boil and cook 1 minute. Take off the heat and add peanut butter. Stir well. Measure the corn flakes into a large bowl.
Add the sugar mixture and mix. Press firmly into a 9" x 13" greased pan. Melt chips in double boiler and pour over the pressed mixture. Sprinkle evenly with mini marshmallows and press down gently to adhere to the chocolate.
1/2 cup sugar
1/2 cup brown sugar
1 cup corn syrup
1 cup peanut butter
6 cup corn flakes
1 cup semi-sweet chocolate chips
1 1/2 cups mini marshmallows
In medium pot mix sugar, brown sugar and syrup over medium-low heat. Bring to a boil and cook 1 minute. Take off the heat and add peanut butter. Stir well. Measure the corn flakes into a large bowl.
Add the sugar mixture and mix. Press firmly into a 9" x 13" greased pan. Melt chips in double boiler and pour over the pressed mixture. Sprinkle evenly with mini marshmallows and press down gently to adhere to the chocolate.
 This week's TWD pick - a decadent chocolate chunk muffin (which I made into a coffee cake) - was by Bridget of


