Saturday, December 21, 2013

Caramel Cashew Bars


We are only 4 days away from Christmas!!! Where did the time go. Seems like every year goes by faster and faster!

These bars are great to make in a pinch for time. They start out with crushed shortbread cookies - storebought or homemade. Perfect recipes to use up crumbled shortbread cookies. You could also substitute crushed graham crackers for the shortbread. I chose to omit the marshmallows and to reserve some crushed shortbread to sprinkle on top of the caramel mixture.


Caramel Cashew Bars
Makes 9 x 13" pan | adapted from BH&G

3 cups finely crushed shortbread cookies
1/2 cup butter, melted
1/4 cup sugar
36 vanilla caramels, unwrapped
1/2 cup whipping cream
2 cups coarsely chopped cashews
2 cups tiny marshmallows

1. Preheat oven to 325 degrees F. Line a 9 x 13-inch baking pan with foil, extending foil over the edges of the pan. Lightly grease foil; set pan aside.

2. In a large bowl stir together crushed shortbread cookies, butter, and sugar. Press cookie mixture firmly and evenly in prepared pan. Bake about 15 minutes or until crust is golden and dried around edges. Cool in pan on a wire rack.

3. Meanwhile, in a medium heavy saucepan heat and stir caramels and cream over medium-low heat until melted and smooth. Stir in cashews. Sprinkle marshmallows evenly over baked shortbread crust. Pour caramel mixture over marshmallows; carefully spread evenly.

4. Bake for 8 to 10 minutes or until caramel is set and bubbly around edges. Cool in pan on a wire rack. Use foil to lift uncut bars out of pan. Place on cutting board; cut into bars.

Monday, November 11, 2013

Double Blueberry Muffins


Here you have it. The first thing I baked in my new oven in our new home! Nothing fancy because I'm too exhausted to do much more than muffins right now. It was nice anyhow to fill the house with the smell of baking. Can't wait for the holiday season coming up and using my new gas oven to make all my goodies. The thing preheats so quickly. It's a dream!

We officially took possession Oct 24, 2013 but have been living without furniture until this last weekend when we rented a huge Budget truck and brought all my stuff down from Canada to our new home in Washington State.I am so excited not to be living in a condo anymore and more importantly to be living with my husband after more than a year of immigration hoops to jump through. Here are a couple pix of our house.


And now onto the recipe from Gale Gand - 2001 James Beard Pastry Chef award winner. They were fluffy, moist and tender.

Double Blueberry Muffins
Makes 12 | Gale Gand

8 tablespoons (1 stick) unsalted butter, softened at room temperature
1 cup plus 2 tablespoons sugar
2 eggs
1 teaspoon pure vanilla extract
2 teaspoons baking powder
1/4 teaspoon salt
2 1/2 cups fresh or thawed frozen blueberries
2 cups flour
1/2 cup milk
1/4 teaspoon cinnamon

1. Preheat the oven to 375 degrees F. Grease a muffin tin or line the cups with paper liners. In a mixer fitted with a paddle attachment (or using a hand mixer), cream the butter until smooth. Add 1 cup of the sugar and mix. Add the eggs, vanilla, baking powder, and salt and mix. In a shallow bowl, mash 3/4 cup of the blueberries with the back of a fork. Add to the batter and mix.

2.With the mixer running at low speed, add 1/2 of the flour, then 1/2 of the milk, and mix. Repeat with remaining flour and milk. Fold in the remaining 1 3/4 cups whole blueberries by hand until well mixed. In a separate small bowl, mix the remaining 2 tablespoons sugar with the cinnamon. Use an ice-cream scoop or large spoon to fill the muffin cups 3/4 full.

3. Sprinkle the cinnamon-sugar over the muffins and bake until golden brown and risen, 25 to 30 minutes. Let cool in the pan at least 30 minutes before turning out.

Sunday, September 8, 2013

Country Blueberry Pie


My husband's family is a "pie family". There is pie at every gathering that I have been to. This blueberry pie was just perfect. It wasn't too sweet or too starchy like blueberry pies can be if you overdo it on the cornstarch. This recipe also didn't call for tapioca. I prefer recipes that use ingredients on hand so I don't have to make a special trip to the store, and for me, tapioca isn't a pantry staple.


Country Blueberry Pie
1 - 9" pie | adapted from Food Network

Filling:
3/4 cup sugar
2 tablespoons cornstarch
1/2 teaspoon cinnamon
1/2 cup water
3 cups blueberries
1 tablespoon lemon juice

Pastry:
2 cups all-purpose flour
1 tablespoon sugar
1 teaspoon salt
3/4 cup shortening
1 egg
2 tablespoons water
1/2 tablespoon vinegar
Sugar, for sprinkling on top

1. Filling: Combine sugar, cornstarch, cinnamon and water. Add to a saucepan and heat rapidly until thickened. Set aside to cool as you prepare the pastry. Once cooled add the berries and lemon juice.

2. Preheat oven to 425 degrees F.

3. Combine flour, sugar and salt. Cut in shortening. Whisk together egg, water and vinegar. Add to flour mixture tossing lightly with a fork. Turn out onto a lightly floured cutting board and using your hands combine dough. Separate into 2 single crusts. Line the bottom of a pie plate with 1 of the crusts.

4. Pour filling into dough lined pie pan, and sprinkle the lemon juice over the filling. Adjust top crust, cut vents and flute rim. Sprinkle top lightly with sugar. Place pie onto a baking sheet and into the oven for 20 minutes. Reduce heat to 350 degrees F and bake for an additional 20 to 25 minutes.

Thursday, May 16, 2013

Cranberry Maple Almond Granola


I signed up to be one of Cooks Illustrated's recipe testers. This recipe came to me a few months ago by email from them and I was eager to try it out. The end product is a chunky, crunchy, not-too-sweet granola with lots of goodies in it. What makes it so great is that unlike other granola recipes, you don't have to rotate the pan and toss the granola every few minutes in the oven. This is WAY easier. You simply mix up the ingredients, pack it down on a baking tray and ptu it in the oven to bake til golden brown - as though you are baking an oversized cookie. After it has cooled, you break the giant granola bar into chunks. It freezes well, but is so addictive it probably won't make it to your freezer anyway.

More tips: Chopping the almonds by hand is the first choice for superior texture and crunch. If you prefer not to hand chop, substitute an equal quantity of slivered or sliced almonds. (A food processor does a lousy job of chopping nuts evenly.) Use your favorite dried fruit or a combination. Do not use quick oats.

Cranberry Maple Almond Granola

Makes 9 cups | Cooks Illustrated

1/3 cup maple syrup
1/3 cup packed (2 1/3 ounces) light brown sugar
4 teaspoons vanilla extract
1/2 teaspoon salt
1/2 cup vegetable oil
5 cups old-fashioned rolled oats
2 cups (10 ounces) raw almonds, chopped coarse
2 cups craisins or other dried fruit, chopped

1. Adjust oven rack to upper-middle position and heat oven to 325 degrees. Line rimmed baking sheet with parchment paper.

2. Whisk maple syrup, brown sugar, vanilla, and salt in large bowl. Whisk in oil. Fold in oats and almonds until thoroughly coated.

3. Transfer oat mixture to prepared baking sheet and spread across sheet into thin, even layer (about 3/8 inch thick). Using stiff metal spatula, compress oat mixture until very compact. Bake until lightly browned, 40 to 45 minutes, rotating pan once halfway through baking. Remove granola from oven and cool on wire rack to room temperature, about 1 hour. Break cooled granola into pieces of desired size. Stir in dried fruit. (Granola can be stored in airtight container for up to 2 weeks or frozen).

Saturday, April 20, 2013

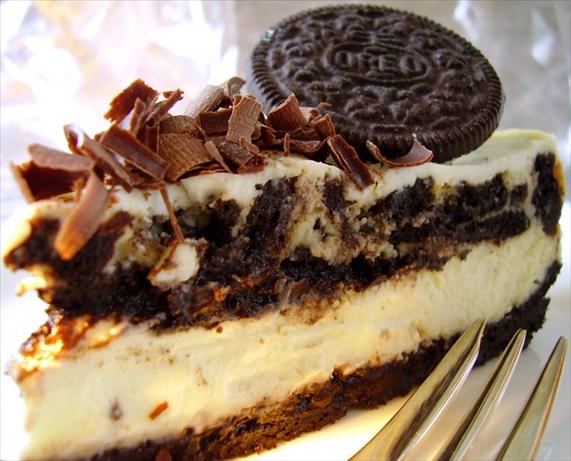
Cheesecake Factory's Oreo Cheesecake


This copycat cheesecake takes inspiration from the childhood favorite ice cream flavor. I love how it looks decorated with Oreos on top. It's fun, festive and delicious. My family loves cheesecake, so I'm always experimenting with different kinds. This one was not too sweet or rich, but delicious all the same. As with all cheesecake recipes, it is best to start with all ingredients at room temperature.

I have nothing but good memories at the Cheesecake Factory. One of my favorites is when my husband and I went there on one of our first few dates. The server was really friendly and chatty. He told my husband (then-boyfriend) what a great couple we were and how comfortable we seemed with each other. He thought we had been together much longer than just a few months. Well, not long after that, my husband proposed to me and we are now married! I guess the server had good intuition.

I hope you enjoy this cheesecake as much as we did!


Cheesecake Factory Oreo Cheesecake
Makes one 9" cake

1 1/2 cups Oreo cookie crumbs
2 tablespoons melted butter
3 - 8oz blocks cream cheese (1 1/2 lbs)
1 cup sugar
5 large eggs
1/4 teaspoon salt
2 teaspoons vanilla
1/4 cup flour
1 cup sour cream
5 Oreo cookies (coarsely chopped)

Oreo cookies
Chocolate shavings
Whipped cream

1. Preheat oven to 325 degrees F.

2. Mix melted butter with Oreo crumbs and press in the bottom of a greased 9 inch springform pan. Cover bottom and 1/2 inch up the sides with crumbs. Refrigerate while you prepare the filling.

3. Beat cream cheese until light and fluffy. Keep mixer on a low setting during the mixing and beating process. Add sugar gradually and continue beating cream cheese until mixed through. Add eggs one at a time and continue to beat until blended. Stir vanilla, salt and flour into cream cheese and egg mixture. Add the sour cream.

4. Fold in the 5 coarsely chopped Oreo cookies with a rubber spatula. Pour mixture into springform pan.

5. Bake for 1 hr 15 minutes. Turn off the oven, prop the door open several inches and let the cheese cake stay in the oven for one hour.

6. Decorate with whipped cream, chocolate shavings and Oreos.

Tuesday, April 9, 2013

Banana Bread Cinnamon Rolls


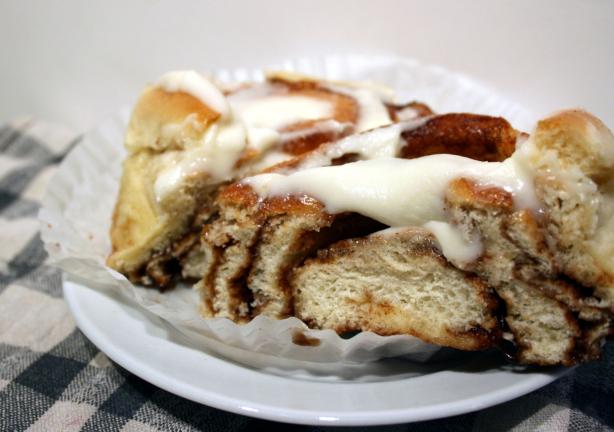
Two of the very yummiest baked goods are cinnamon rolls and banana bread. When you combine them into Banana Bread Cinnamon Rolls, they become total awesomeness! Finish them off with cream cheese frosting and you've got some pretty amazing buns!

These rolls have pureed bananas mixed right into the dough. A great recipe to keep on hand for those overripe bananas, especially now that the weather is getting warmer and bananas are ripening faster. A smattering of chopped walnuts adds a great crunch and contrast to the gooey cinnamon-y filling.


Banana Bread Cinnamon Rolls
Makes 12 | adapted from Cooking Classy

3 very ripe bananas
1 tsp lemon juice
2/3 cup milk
3 Tbsp butter, diced
2 Tbsp vegetable oil
2 1/4 tsp active dry yeast
1/4 cup granulated sugar
1/2 tsp salt
1 large egg yolk
3 3/4 cups bread flour, divided
1 Tbsp cornstarch
3/4 tsp baking powder

6 Tbsp butter, melted
3/4 cup packed light-brown sugar
1 1/2 tsp cinnamon
1/8 tsp nutmeg
1 cup chopped walnuts (optional)

Cream Cheese Frosting
6 oz. cream cheese, softened
6 Tbsp butter, softened
2 1/4 cups powdered sugar
2 - 3 tsp milk

Rolls
1. Puree bananas in a food processor with 1 tsp lemon juice until mixture is smooth and no chunks remain, set aside (you should have just over 1 1/3 cups pureed bananas).

2. Heat milk and 3 Tbsp butter in a small saucepan over medium low heat. Cook stirring occasionally until butter has melted. Remove from heat and pour mixture into the bowl of an electric stand mixer. Whisk in vegetable oil and allow mixture to cool to 110 degrees F. Whisk in yeast, stirring until dissolved and allow to rest 5 minutes. With the paddle attachment, mix in granulated sugar, salt, egg yolk, 2 cups bread flour and pureed bananas. Switch mixer to a hook attachment, add 1 1/2 cups bread flour and sprinkle in cornstarch, then knead mixture on medium low speed until a smooth and elastic dough forms (dough will be sticky). Cover bowl with plastic wrap and let rise until doubled in size, about 1 1/2 hours.

3. In a small bowl whisk together light-brown sugar, cinnamon, nutmeg and nuts (if using). Set aside. In a separate small bowl, whisk together remaining 1/4 cup bread flour and baking powder. Return bowl with dough to electric stand mixer, pour in flour/baking powder mixture and knead dough with hook attachment until mixture is well blended and smooth. Roll dough out on a floured surface (dough should be slightly sticky so I floured the surface fairly generously) to a 16 x 20 inch rectangle. Using the back of a spoon, spread 6 Tbsp melted butter evenly over the top of the dough. Sprinkle top evenly with brown sugar mixture and spread into an even layer, coming within a 1/2 inch of all edges.

4. Starting on the 16" side, snugly roll dough to opposite end. Cut rolled dough into 12 equal pieces. Arrange rolls in a buttered 13 x 9 inch baking dish. Cover baking dish and allow to rise until doubled in size, about 45 minutes. Preheat oven to 350 degrees F (I do this during the last 10 minutes of rising) and bake rolls in preheated oven for 22 - 26 minutes until golden. Cool slightly then frost with Cream Cheese Frosting.

Cream Cheese Frosting
1. In a large mixing bowl, using an electric and mixer, whip together cream cheese and butter until light and fluffy, about 2 minutes. Add powdered sugar and mix until smooth. Pour in milk and mix until well blended.


Wednesday, April 3, 2013

Pull-Apart Cheese Bread


This bread is as much fun to make as it is to eat. Kids love to help wrap the dough around the cubes of cheese and dip the pieces in butter before dropping them in the baking pan.

Once baked, the bread can be sliced for sandwiches (as shown in the picture) or pulled apart, bubble bread style. As a prettier alternative, you could use a bundt pan instead of two loaf pans.

The recipe called for frozen bread dough, but I made my own bread dough instead. Just select a dough recipe that makes enough for 2 loaves. I prefer this made with white bread dough as opposed to whole wheat bread dough, but either would work.


Pull Apart Cheese Bread
2 loaves | adapted from Bon Appetit

2 loaves frozen bread dough (store bought or home made)
32 (half-inch) cubes mild cheddar cheese
1 stick butter, melted
1/2 cup grated parmesan cheese
1 tsp oregano
1/2 tsp garlic salt
1 tsp parsley flakes

1. Cut thawed bread dough into 32 equal pieces.

2. Combine melted butter, parmesan, oregano, garlic salt, and parsley in a small bowl.

3. Wrap each piece of dough around 1 cube of cheese, dip in butter mixture. Place dough balls overlapping each other in two greased loaf pans.

4. Let rise 1 1/2 hours, then bake at 350 degrees F for 30 minutes.


Friday, March 29, 2013

Easy Bacon and Mushroom Quiche


Quiche is one of those foods that appears more difficult to make than it is. I can't believe when you go to a café and they charge $5 for a slice when it is so darn easy to make!

My husband thought he was a quiche-hater until he tried one of these quiches. This recipe is so versatile and can easily be suited for anything from an easy lunch to Christmas morning breakfast to an elegant tea time treat. I also like to make mini quiches in muffin tins with the pastry crust scraps. To save even more time, you can saute the filling the night before and store it in the fridge until you're ready to bake the quiche. Then dump it in the pie crust and you're all set to go.


Easy Bacon and Mushroom Quiche
Makes 1 - 9" Quiche

1 single pie crust (or 1 store-bought crust)

5 eggs
1 cup milk or cream
Salt and pepper to taste

1/3 cup chopped onions
10 slices bacon, chopped
1/2 red bell pepper, chopped
1 cup sliced mushrooms

3/4 cup grated sharp cheddar cheese

1. Preheat oven to 375 degrees F. Line a quiche pan or pie pan with the unbaked pie crust. Beat eggs with milk, salt and pepper. Set aside.

2. Saute together onions and bacon. When almost cooked through, add bell pepper and mushrooms. Continue sauteeing until fully cooked and veggies are slightly soft.

3. Transfer veggies/bacon to the unbaked pie crust. Sprinkle with 1/2 the cheese. Pour the egg mixture over the veggies then sprinkle with the remainder of the cheese. Bake for 40-50 minutes or until filling is slightly puffed and browned and cooked through. Cool slightly before serving, to give the filling a chance to set and therefore slice and serve up nicer.

Friday, December 21, 2012

Sponge Toffee Candy

This recipe is for a special childhood treat that is like the inside of a Cadbury's Crunchie candy bar. [I wonder if those only sold in Canada?] It is light as air and tinged with honey flavor. Dipped in chocolate or plain, this was yummy as well as fun to make. Words of caution: Make sure you are strong enough to lift the pot and its contents. I used a heavy dutch oven to make this and when it came time to dump it into the pan, I found myself struggling with the pot - filled with scorching hot sugar - because it was so heavy. Thankfully, I manoevered it without any injury, but next time I would definitely use a second pair of hands to help with this step.

Sponge Toffee Candy or Seafoam Candy1 1/4 cup sugar
1/3 cup corn syrup
1/3 cup honey
1/3 cup water
2 teaspoons baking soda, finely sifted
chocolate, for coating (optional)

1. In a saucepan, combine the sugar, corn syrup, honey, and water, and using a wooden spoon, stir constantly over low heat until the sugar is fully dissolved.

2. Put candy thermometer into the mixture to monitor temperature, increase the heat and boil mixture to exactly 270 degrees F (132C).

3. Reduce heat to as low as possible and maintain the temperature 270F for exactly 15 minutes.

4. It is very important that the temperature of the mixture does not fluctuate; if the temperature begins to rise, remove the pan from heat occasionally to reduce the heat.

5. After the temperature has been maintained for 15 minutes, remove the pan from heat, take out the thermometer, and allow the bubbles to subside.

6. Using a wooden spoon, quickly stir in finely sifted baking soda.

7. Immediately and quickly pour the mixture into a large oiled baking dish.

8. (Please note, important: the pouring step requires strength and you'll be handling extremely hot liquids; if you're not strong and agile enough you might want to leave that step to a strong and able assistant.) When candy has completely cooled, remove from pan and break into pieces and dip into chocolate if desired.

Friday, December 7, 2012

Maple Walnut Bars


I am officially a married woman as of December 1, 2012!!! The wedding went beautifully and it was everything I had ever wanted in a wedding. Despite it being in December and having the forecast say 90% chance of rain, the clouds parted and the sun shone through just in time for our photos and our ceremony.

Now that the stress of wedding preparations is behind us, I will have more time to devote back to my dear little baking blog. I've missed baking all these months and hope to dive right back in for the holiday season!

These bars are a cousin of pecan pie. They start out with a shortbread crust then are topped with a similar filling but instead of pecans you use walnuts and instead of corn syrup, you use maple syrup! They are perfect for potlucks, bake sales or just for eating.


Maple Walnut Bars
Makes 9" square pan

1-1/2 cups plus 1 tablespoon all-purpose flour, divided
1/3 cup plus 1/2 cup brown sugar, divided
1/2 cup butter, room temperature
3/4 cup maple syrup
1 large egg, beaten
2 tablespoons melted butter
1/4 cup heavy cream
1 teaspoon vanilla extract
1/4 teaspoon table salt
1 cup chopped walnuts

1. Preheat oven to 350°.

2. Make the crust: Whisk together 1-1/2 cups flour and 1/3 cup brown sugar; then cut in softened butter. Using a standing mixer, or a fork if you're working by hand, blend until mixture resembles coarse meal, dry and crumbly. Press mixture into the bottom of a greased 8- or 9-inch square pan. Bake 15 minutes.

3. To make the topping, combine 3/4 cup maple syrup, 1/2 cup brown sugar, beaten egg, melted butter, cream, vanilla, 1 tablespoon flour, and salt. Beat well; then stir in nuts. Pour batter carefully over half-baked crust.

4. Return crust and topping to the oven. Bake until set, about 35 minutes. Cut into small bars and remove from pan to cool.