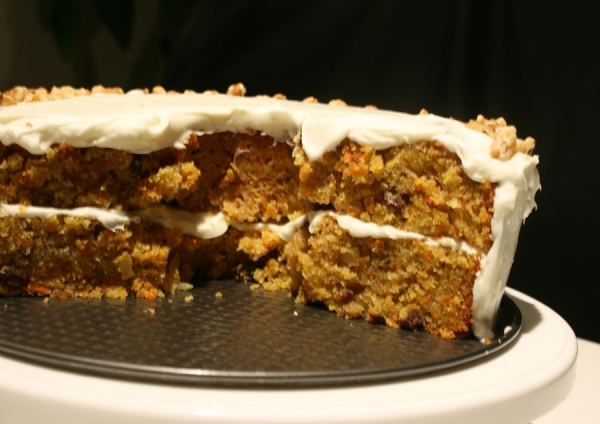
 This post is to make up for my missing Tuesdays with Dorie post on Tuesday. With Christmas and bank holidays and the whirlwind of activity, I completely forgot! So, here I present to you, a TWD rewind: Bill’s Big Carrot Cake, pages 253-255, originally selected April 22, 2008.
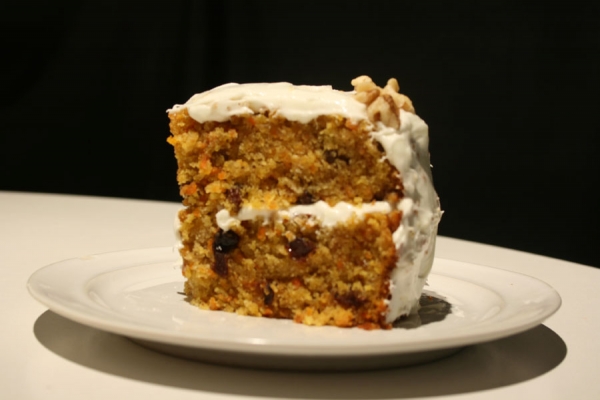
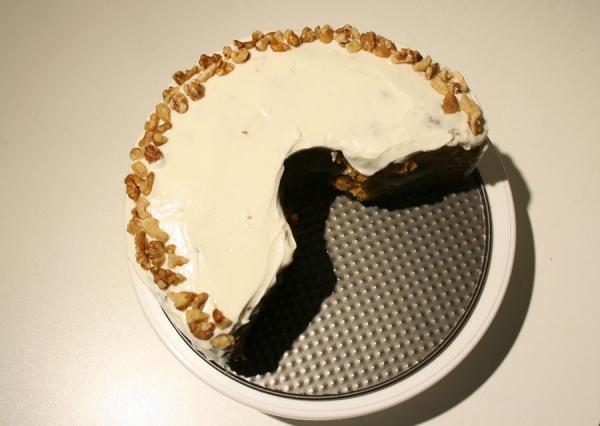 It was lighter than the typical carrot cakes I have been served - both in color and texture. It was moist even without the use of crushed pineapple. I kept wanting to add pineapple out of habit - all the carrot cakes I've ever made have called for pineapple, but I refrained and was pleased by the end product.
Not too heavily spiced, the flavor was interesting but not overpowering.
Bill’s Big Carrot Cake 8" three-layer cake or 12" Bundt | Dorie Greenspan Ingredients: For the cake: 2 cups all purpose flour 2 teaspoons baking powder 2 teaspoons baking soda 2 teaspoons ground cinnamon 3/4 teaspoon salt 3 cups grated carrots (about 9 carrots) 1 cup coarsely chopped walnuts 1 cup shredded coconut (sweetened or unsweetened) 1/2 cup moist, plump raisins or dried cranberries 2 cups sugar 1 cup canola oil 4 large eggs For the frosting: 8 ounces cream cheese, room temperature 1 stick (1/2 cup) unsalted butter, room temperature 1 pound or 3 3/4 cups confectioners’ sugar, sifted 1 tablespoon fresh lemon juice1/2 cup shredded coconut (optional) Finely chopped toasted nuts and/or toasted shredded coconut (optional) Getting ready: Position the racks to divide the oven into thirds and preheat the oven to 325 degrees Fahrenheit. Butter three 9-x-2-inch round cake pans, flour the insides, and tap out the excess. Put the two pans on one baking sheet and one on another. To make the cake: Whisk the flour, baking powder, baking soda, cinnamon and salt. In another bowl, stir together the carrots, chopped nuts, coconut, and raisins. Working with a stand mixer, preferably fitted with a paddle attachment, or with a hand mixer in a large bowl, beat the sugar and oil together on a medium speed until smooth. Add the eggs one by one and continue to beat until the batter is even smoother. Reduce the speed to low and add the flour mixture, mixing only until the dry ingredients disappear. Gently mix the chunky ingredients. Divide the batter among the baking pans. Bake for 40-50 minutes, rotating the pans from top to bottom and front to back at the midway point, until a thin knife inserted into the centers comes out clean. The cakes will have just started to come away from the sides of the pans. Transfer the cakes to cooling racks and cool for about 5 minutes, then run a knife around the sides of the cakes and unmold them. Invert and cool to room temperature right side up. The cakes can be wrapped airtight and kept at room temperature overnight or frozen for up to 2 months. To make the frosting: Working with a stand mixer, preferably fitted with a paddle attachment or with a hand mixer in a large bowl, beat the cream cheese and butter together until smooth and creamy. Gradually add the sugar and continue to beat until the frosting is velvety smooth. Beat in the lemon juice or extract. If you’d like coconut in the filling, scoop about half of the frosting and stir the coconut into this position. To assemble the cake: Put one layer top side up on a cardboard cake round or a cake plate protected by strips of wax or parchment paper. If you added the coconut to the frosting, use half of the coconut frosting to generously cover the first layer (or generously cover with plain frosting). Use an offset spatula or a spoon to smooth the frosting all the way to the edges of the layer. Top with the second layer, this time placing the cake stop side down, and frost with the remainder of the coconut frosting or plain frosting. Top with the last layer, right side up, and frost the top- and the sides- of the cake. Finish the top with swirls of frosting. If you want to top the cake with toasted nuts or coconut, sprinkle them on now while the frosting is soft. Refrigerate the cake for 30 minutes, just to set the frosting before serving. Serving: This cake can be served as soon as the frosting is set. It can also wait, at room temperature and covered with a cake keeper overnight. The cake is best served in thick slices at room temperature and while it’s good plain, it’s even better with vanilla ice cream or some lemon curd. Storing: The cake will keep at room temperature for 2 to 3 days. It can also be frozen. Freeze it uncovered, then when it’s firm, wrap airtight and freeze for up to 2 months. Defrost, still wrapped, overnight in the refrigerator.
 Tangy and full of bright apricot flavor from the chewy, plump diced dried apricots strewn throughout these rolls. They are a wonderful morning not-too-sweet treat. Sour cream, like buttermilk, adds a certain beauty to the dough. It's one of those ingredients that brings so much to a recipe - both savory and sweet, cakes and breads alike - moistness, flavor and tenderness.
 Oh yeah, don't forget to email/msg me your Copycat Club submissions for January! Check back on the 7th for everyone's yummy cloned concoctions.
Sour Cream Apricot Orange Buns
Makes 16 | adapted from King Arthur Flour
1/2 cup (4 ounces) sour cream
2 large eggs
3/4 cup (6 ounces) orange juice
3 1/2 cups (14 7/8 ounces) all purpose flour
1/4 cup (1 3/4 ounces) sugar
1 tablespoon instant yeast
1 1/2 teaspoons salt shopping list
1/3 cup instant potato flakes
3/4 cup (3 3/8 ounces) diced apricots
1/3 cup butter, melted
1/2 cup sugar
1 tbsp cinnamon
1. Place all of the ingredients into the pan of your bread machine in the order recommended by the manufacturer. Program the machine for the dough setting and press Start. Check the dough's consistency about 10 minutes before the end, adding additional water or flour to form a soft, smooth ball of dough. Let the dough rise until doubled in volume.
2. Gently punch down and roll out into a large rectagle - 11 x 17 inches - and spread melted butter over tip. Sprinkle with sugar and cinnamon and spread out evenly. Roll it up and pinch seams together. Slice into 1 1/2" thick rolls and place close but not touching each other on a greased or lined cookie sheet. Cover and let rise until puffy and almost doubled in size.
3. Bake at 350 degrees until golden and fully baked.
Oh yeah, don't forget to email/msg me your Copycat Club submissions for January! Check back on the 7th for everyone's yummy cloned concoctions.
Sour Cream Apricot Orange Buns
Makes 16 | adapted from King Arthur Flour
1/2 cup (4 ounces) sour cream
2 large eggs
3/4 cup (6 ounces) orange juice
3 1/2 cups (14 7/8 ounces) all purpose flour
1/4 cup (1 3/4 ounces) sugar
1 tablespoon instant yeast
1 1/2 teaspoons salt shopping list
1/3 cup instant potato flakes
3/4 cup (3 3/8 ounces) diced apricots
1/3 cup butter, melted
1/2 cup sugar
1 tbsp cinnamon
1. Place all of the ingredients into the pan of your bread machine in the order recommended by the manufacturer. Program the machine for the dough setting and press Start. Check the dough's consistency about 10 minutes before the end, adding additional water or flour to form a soft, smooth ball of dough. Let the dough rise until doubled in volume.
2. Gently punch down and roll out into a large rectagle - 11 x 17 inches - and spread melted butter over tip. Sprinkle with sugar and cinnamon and spread out evenly. Roll it up and pinch seams together. Slice into 1 1/2" thick rolls and place close but not touching each other on a greased or lined cookie sheet. Cover and let rise until puffy and almost doubled in size.
3. Bake at 350 degrees until golden and fully baked.
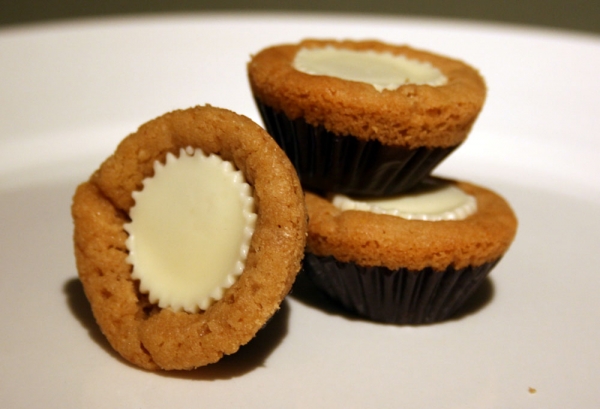
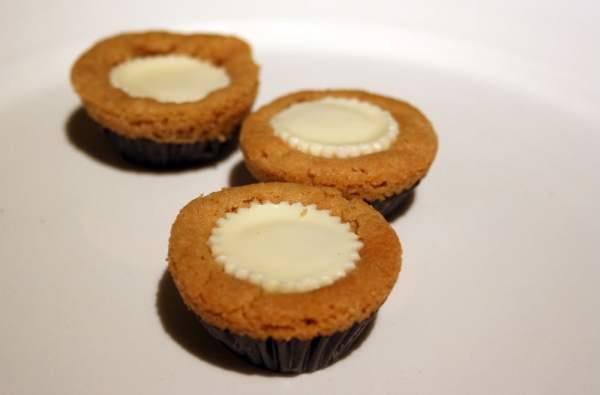 Merry (Belated) Christmas! I hope it was a great one for everyone. I got a bag of these amazing creations - White Chocolate Peanut Butter Cups. Who could think up a more sinful combination? They are amazing on their own but even more amazing when made into the centre of a chewy, peanut butter cookie. There is so much chocolate lying around here, it's just calling to be used up and given away before I get too tempted to eat it all, hehe.Any Hershey's Chocolate Kiss flavor or mini peanut butter cup will work. I also love these with the mini caramel cups. The caramel gets all melty from the heat of the cookie and even after they are fully cooled, the caramel centres still ooze out.In the middle of your busy post-holiday rush and Boxing Day shopping, whip up a batch of these. Psst... If you don't have Hershey's Kisses on hand, get some now at the amazing after-Christmas Sales.
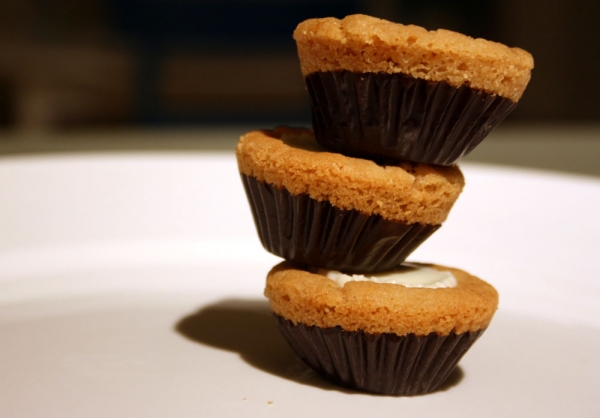 Peanut Blossom Cookies
Makes 48 | Cook's Country
2 3/4 cups all-purpose flour
1/2 teaspoon table salt
1/2 teaspoon baking soda
1/2 teaspoon baking powder
1 cup butter (2 sticks), softened
3/4 cup packed dark brown sugar
3/4 cup granulated sugar
1 cup peanut butter [I prefer crunchy]
2 large eggs , at room temperature
2 teaspoons vanilla extract
48 Reese's White Mini Peanut Butter Cups, unwrapped
1. Adjust oven rack to middle position and heat oven to 350 degrees. Line two mini muffin pans (48 cups) with mini liners. [I used the liners that came on the mini Reese's cups after I unwrapped them].
2. Whisk 1 3/4 cups flour, salt, baking soda, and baking powder together in medium bowl. Process remaining 1 cup flour and peanuts in food processor until ground, about fifteen 1-second pulses, then stir into flour mixture.
3. Beat butter and sugars together in large bowl with electric mixer at medium-high speed until fluffy, about 3 minutes. Add peanut butter and continue to beat until combined. Add eggs, one at a time, beating after each addition, until incorporated, about 30 seconds, then beat in vanilla, stopping to scrape down sides of bowl, if necessary. Reduce speed to low, add flour mixture in two batches, and mix until incorporated. Cover bowl and refrigerate dough until stiff, about 30 minutes.
4. Roll 1-inch balls of dough and place cash ball in a mini muffin tin. Bake until just set and beginning to crack, 9 to 11 minutes, rotating baking sheet from front to back halfway through baking (while cookies are baking, place additional balls of dough on second baking sheet). Working quickly, remove baking sheet from oven and firmly press one kiss/pb cup in center of each cookie. Return baking sheet to oven and bake until lightly golden, about 2 minutes. Transfer baking sheet to wire rack to cool for 5 minutes, then transfer cookies directly to wire rack to finish cooling. Repeat rolling and baking remaining cookies. Cool completely. (Cookies will be cool enough to eat after about 30 minutes, but the chocolate centres will take 2 hours to set completely.)
Peanut Blossom Cookies
Makes 48 | Cook's Country
2 3/4 cups all-purpose flour
1/2 teaspoon table salt
1/2 teaspoon baking soda
1/2 teaspoon baking powder
1 cup butter (2 sticks), softened
3/4 cup packed dark brown sugar
3/4 cup granulated sugar
1 cup peanut butter [I prefer crunchy]
2 large eggs , at room temperature
2 teaspoons vanilla extract
48 Reese's White Mini Peanut Butter Cups, unwrapped
1. Adjust oven rack to middle position and heat oven to 350 degrees. Line two mini muffin pans (48 cups) with mini liners. [I used the liners that came on the mini Reese's cups after I unwrapped them].
2. Whisk 1 3/4 cups flour, salt, baking soda, and baking powder together in medium bowl. Process remaining 1 cup flour and peanuts in food processor until ground, about fifteen 1-second pulses, then stir into flour mixture.
3. Beat butter and sugars together in large bowl with electric mixer at medium-high speed until fluffy, about 3 minutes. Add peanut butter and continue to beat until combined. Add eggs, one at a time, beating after each addition, until incorporated, about 30 seconds, then beat in vanilla, stopping to scrape down sides of bowl, if necessary. Reduce speed to low, add flour mixture in two batches, and mix until incorporated. Cover bowl and refrigerate dough until stiff, about 30 minutes.
4. Roll 1-inch balls of dough and place cash ball in a mini muffin tin. Bake until just set and beginning to crack, 9 to 11 minutes, rotating baking sheet from front to back halfway through baking (while cookies are baking, place additional balls of dough on second baking sheet). Working quickly, remove baking sheet from oven and firmly press one kiss/pb cup in center of each cookie. Return baking sheet to oven and bake until lightly golden, about 2 minutes. Transfer baking sheet to wire rack to cool for 5 minutes, then transfer cookies directly to wire rack to finish cooling. Repeat rolling and baking remaining cookies. Cool completely. (Cookies will be cool enough to eat after about 30 minutes, but the chocolate centres will take 2 hours to set completely.)
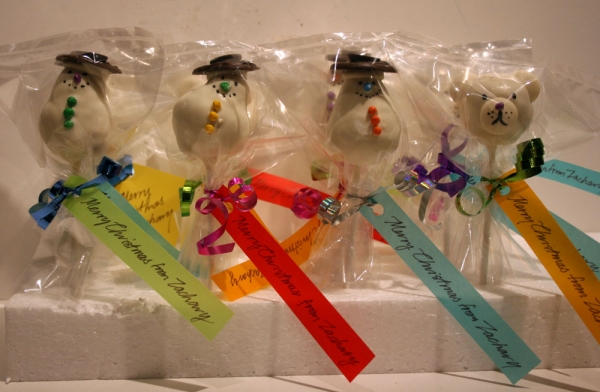
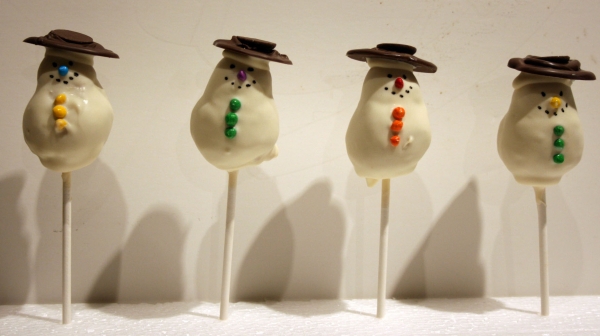 This was my first foray into the realm of cake pops. If you haven't hopped on this fad yet, I highly recommend it. They're so cute that it's worth the nit-picky work they take to make!
Bakerella, the author of
This was my first foray into the realm of cake pops. If you haven't hopped on this fad yet, I highly recommend it. They're so cute that it's worth the nit-picky work they take to make!
Bakerella, the author of 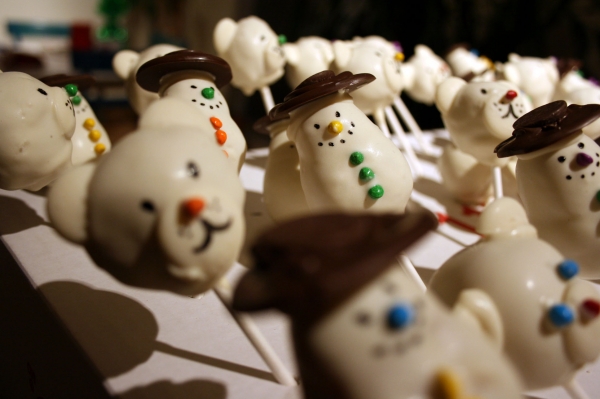
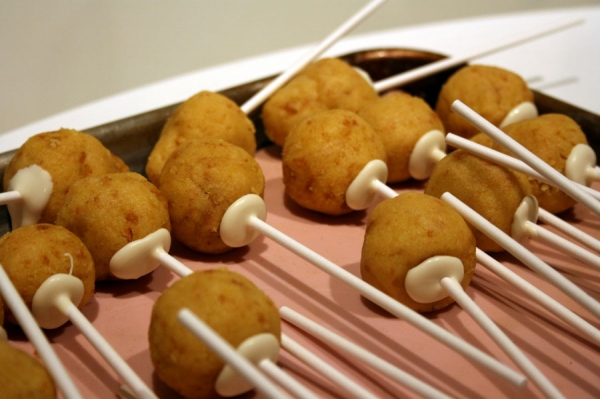 Some tips based on my first attempt:
-Make the cake balls and refrigerate them overnight before you dip them. This gives them lots of time to set fully and makes it easier to plan your time and split the work up over a couple of says.
-Don't add too much frosting at once. I did this and then I had to keep adding more crumbled cake to balance out the frosting.
-Make extra cake to have on standby just in case you need it.
-Candy melts harden quickly, so have your decorations ready to go at your fingertips so they can be 'glued' onto the pop before the coating hardens.
-Tweezers are invaluable.
-If you don't have a styrofoam block to hold your pops, use a cardboard box turned upside down with holes poked in it (Use a nail, small screwdriver or letter opener).
-I couldn't find a black edible ink pen so I used
Some tips based on my first attempt:
-Make the cake balls and refrigerate them overnight before you dip them. This gives them lots of time to set fully and makes it easier to plan your time and split the work up over a couple of says.
-Don't add too much frosting at once. I did this and then I had to keep adding more crumbled cake to balance out the frosting.
-Make extra cake to have on standby just in case you need it.
-Candy melts harden quickly, so have your decorations ready to go at your fingertips so they can be 'glued' onto the pop before the coating hardens.
-Tweezers are invaluable.
-If you don't have a styrofoam block to hold your pops, use a cardboard box turned upside down with holes poked in it (Use a nail, small screwdriver or letter opener).
-I couldn't find a black edible ink pen so I used 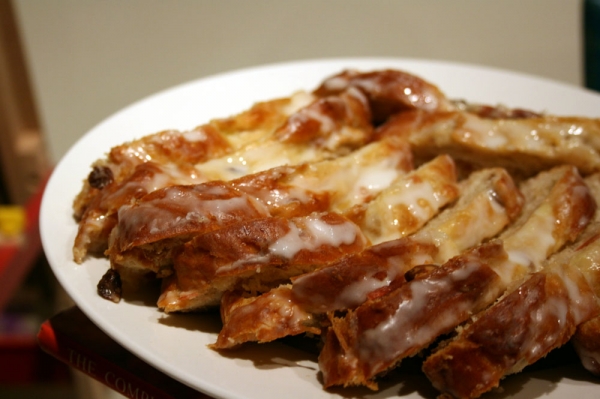 The 2010 December Daring Bakers’ challenge was hosted by Penny of Sweet Sadie’s Baking. She chose to challenge Daring Bakers’ to make Stollen. She adapted a friend’s family recipe and combined it with information from friends, techniques from Peter Reinhart’s book.........and Martha Stewart’s demonstration.
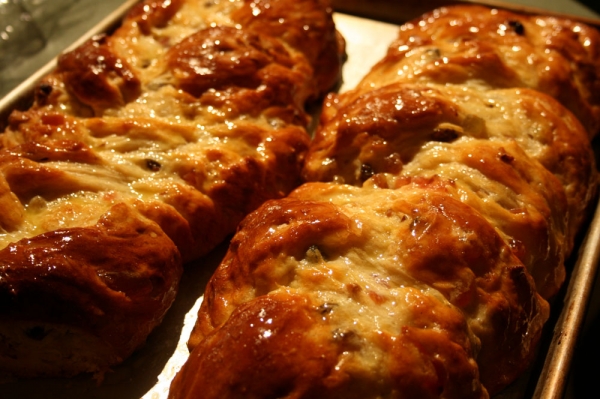 Stollen is a fruitcake made with yeast, water and flour, and usually dried citrus peel, dried fruit, almonds, and spices (cinnamon, cardamom, mace). The dough is rich with butter and eggs and slightly sweetened with sugar. The fruits are soaked in brandy or rum and the finished cake is sprinkled with icing sugar.I used a combination of recipes from the kitchen staple cookbooks: The Fannie Farmer Baking Book and the Joy of Cooking.I made a non-traditional shape - a braid instead of a wreath or loaf. I just couldn't bring myself to cover up the beautiful, golden-brown, fruit-studded bread, so I opted out of the powdered sugar on top.
 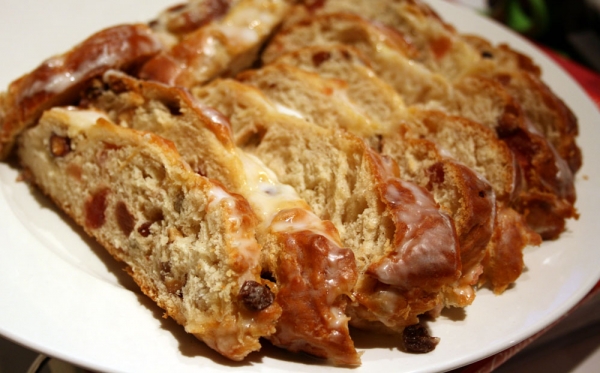 It was very festive looking and very tasty and reminded me of hot cross buns! This was the first stollen I've made, but I'm sure it will make my holiday list in years to come. Thank you, Penny, for opening my eyes and tastebuds to this delicious sweet bread!
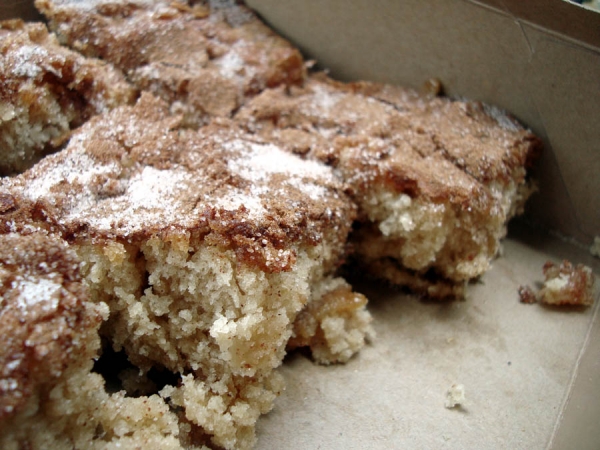 Jill of Jill’s Blog chose Cardamom Crumb Cake, on page 38, for this week's TWD bake-along. However, I made mine with Nutmeg instead and threw in a handful of chopped apples for good measure.
 It was a nice change from cinnamon crumb cake which is a much loved classic around here. My favorite part of this cake was the orange. It brought the deliciousness to a new, zesty level. I might even add more zest next time! The unusual combination of spice, coffee, walnuts, vanilla and orange zest is unexpectedly amazing. The cake texture is smooth as well as moist to perfectly contrast the walnut-crunched topping. Yum!
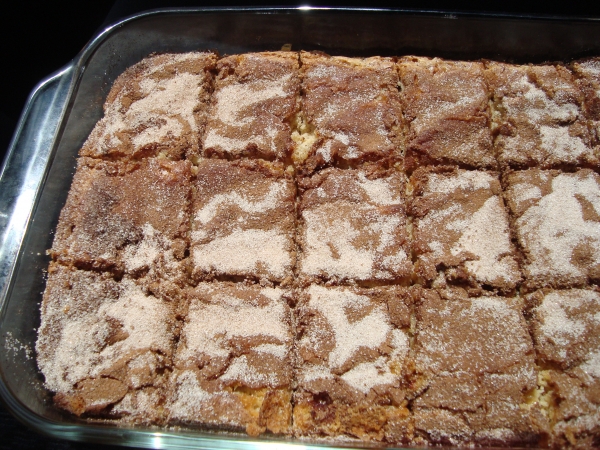
 Less than 1 week to Christmas! It was a really weird feeling this weekend to be at the mall on the last weekend before Christmas and NOT have it packed with line-ups out the doors. I heard that online shopping has increased this year and I definitely feel that too when I am in the mall. Stores seem emptier and the sales seem better online. I know that personally, 75% of my shopping was done on eBay or Amazon this year. While baking delicious cakes at the same time!If you like molasses spice cookies you will love this cake. Moist, spicy and comforting - it is especially good when served with a hot drink on a cold day. With a medley of cinnamon, cloves, nutmeg, ginger, it immediately awakens your palate and makes your house smell like Christmas with its light texture and creamy crumb. Even if you leave out the other spices and use only ginger, this recipe produces a really tasty cake that freezes well, double-wrapped in foil.
 Sour Cream Gingerbread
1 - 10" Bundt |
Sour Cream Gingerbread
1 - 10" Bundt |  You are most likely thinking - Oh no, not another brownie recipe - but before you click away, please note that these brownies are Incredible. So incredible that King Arthur Flour has designated them as "guaranteed" in the
  This week's TWD pick was by Amber of Cobbler du Monde who chose Apple-Coconut Family Cake, page 214 of
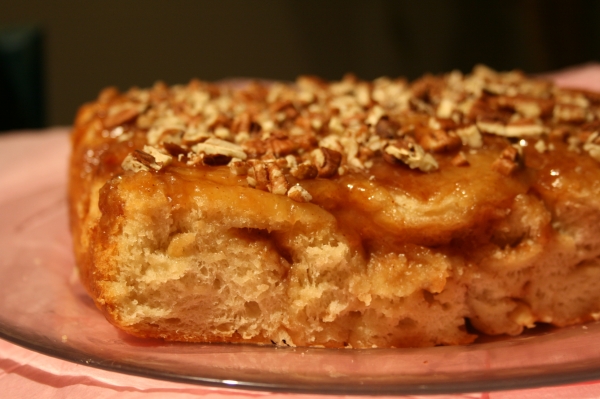
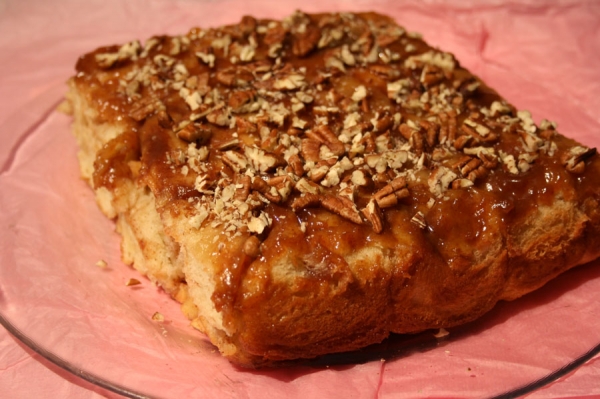
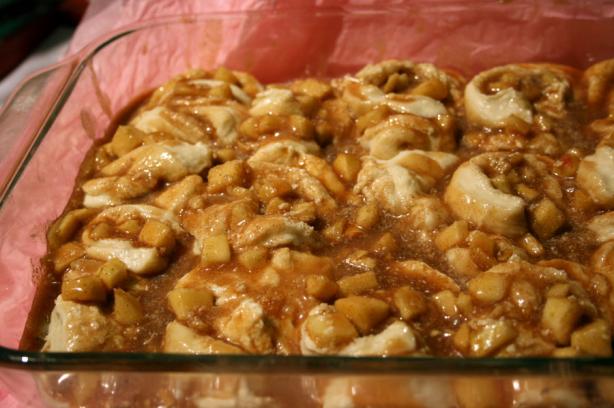
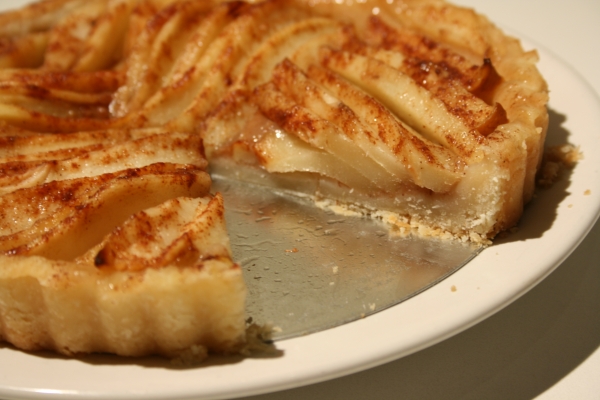
 These rolls are a pretty variation of pizza pretzels, recipe from Sandra Lee of the Food Network. I like to think of them as a savory version of cinnamon buns, since it's the same shaping method. They are full of classic flavors loved by all. They start out with storebought or homemade pizza dough and can be filled as simply or as extravagantly as you'd like. I went minimalistically with just a filling of tomato sauce and parmesan cheese. I think they'd also make for a portable, kid-friendly meal on the go if you opted for a filling of pepperoni and mozzarella or ham and pineapple. Be creative and go gourmet if you'd like with a greek-inspired spinach and feta, for example. Whatever you put on pizza is fair game.I like to make a batch then freeze half the rolls, individually wrapped, after baking. This makes it easy to pack them in my son's lunch box on hectic mornings. They thaw in the lunch box and are just right by lunchtime.
Tomato Parmesan Roll-Ups
adapted from Sandra Lee of the Food Network
3 tablespoons olive oil
1 tablespoon crushed garlic
2 tablespoons Italian seasoning
1 pound pizza dough or bread dough
1 cup tomato sauce or pizza sauce
1 cup shredded fresh parmesan
1 egg + 2 tablespoons water for egg wash
1. In a small bowl, whisk together the olive oil, garlic, and Italian seasoning.
2. On a lightly floured surface, roll out the pizza dough into a 12-inch square. Brush the entire surface with the seasoned olive oil. Top with 1 cup of shredded cheese. Reserve some cheese for sprinkling on top just before baking, if desired.3. Starting from the bottom edge, tightly roll up the dough to form a log. Using a sharp serrated knife, slice the roll on the bias into 1-inch thick pieces. Arrange the rolls on their side on a nonstick or lightly oiled baking sheet. Cover loosely with plastic wrap and allow to sit at room temperature for 30 minutes to proof. 4. Preheat the oven to 375 degrees F. 5. In a small bowl, whisk together the egg with 2 tablespoons of water. Brush the tops and sides of the rolls with the egg wash. Bake until golden brown, about 30 to 35 minutes. 6. Remove from the oven, transfer to a serving platter and serve.
These rolls are a pretty variation of pizza pretzels, recipe from Sandra Lee of the Food Network. I like to think of them as a savory version of cinnamon buns, since it's the same shaping method. They are full of classic flavors loved by all. They start out with storebought or homemade pizza dough and can be filled as simply or as extravagantly as you'd like. I went minimalistically with just a filling of tomato sauce and parmesan cheese. I think they'd also make for a portable, kid-friendly meal on the go if you opted for a filling of pepperoni and mozzarella or ham and pineapple. Be creative and go gourmet if you'd like with a greek-inspired spinach and feta, for example. Whatever you put on pizza is fair game.I like to make a batch then freeze half the rolls, individually wrapped, after baking. This makes it easy to pack them in my son's lunch box on hectic mornings. They thaw in the lunch box and are just right by lunchtime.
Tomato Parmesan Roll-Ups
adapted from Sandra Lee of the Food Network
3 tablespoons olive oil
1 tablespoon crushed garlic
2 tablespoons Italian seasoning
1 pound pizza dough or bread dough
1 cup tomato sauce or pizza sauce
1 cup shredded fresh parmesan
1 egg + 2 tablespoons water for egg wash
1. In a small bowl, whisk together the olive oil, garlic, and Italian seasoning.
2. On a lightly floured surface, roll out the pizza dough into a 12-inch square. Brush the entire surface with the seasoned olive oil. Top with 1 cup of shredded cheese. Reserve some cheese for sprinkling on top just before baking, if desired.3. Starting from the bottom edge, tightly roll up the dough to form a log. Using a sharp serrated knife, slice the roll on the bias into 1-inch thick pieces. Arrange the rolls on their side on a nonstick or lightly oiled baking sheet. Cover loosely with plastic wrap and allow to sit at room temperature for 30 minutes to proof. 4. Preheat the oven to 375 degrees F. 5. In a small bowl, whisk together the egg with 2 tablespoons of water. Brush the tops and sides of the rolls with the egg wash. Bake until golden brown, about 30 to 35 minutes. 6. Remove from the oven, transfer to a serving platter and serve.

 I volunteered to make a bunch of cakes for a cake walk at our church, so I was in mass production mode. I came up with the idea to bake two jelly-roll sheets 11" x 17" and cut each into 6 smaller rectangles, make 2-layer high cakes from these rectangles. It worked out *so* well. The layers were perfectly even, I didn't have to worry about splitting my cake into layers after it was baked, so from now on I will be making my layer cakes in sheet pans so they bake thinner and more evenly, then just cutting circles of cake from the large sheet pans.
This is a must-try frosting recipe, especially if you are in a bind for refrigerator space, as I often am. The frosting is just like the bakeries use on their cakes and does not require refrigeration if you are serving the cake within a day of making it. The Coffeemate instead of milk/cream makes it more stable. For longer storage it may be kept up to 3 months covered in the refrigerator. Just bring to room temperature before using.
Semisweet Chocolate Layer Cake
Makes 3 - 8" rounds | Gourmet, Feb. 2006
6 ounces semisweet chocolate, chopped
3/4 cup all purpose flour
3/4 cup cake flour
1/2 teaspoon baking powder
1/2 teaspoon baking soda
1/2 teaspoon coarse kosher salt
1 3/4 cups (packed) dark brown sugar
6 tablespoons (3/4 stick) unsalted butter, room temperature
1 teaspoon vanilla extract
2 large eggs
3/4 cup buttermilk
1. Preheat oven to 325 degrees F. Butter three 8" cake pans with 1 1/2-inch-high sides. Line bottoms with parchment paper round; butter parchment. Place chocolate in metal bowl set over saucepan of simmering water. Stir until melted and smooth.
2. Whisk all purpose flour and next 4 ingredients in medium bowl. Using electric mixer, beat brown sugar, butter, and vanilla in large bowl to blend (mixture will be crumbly). Add eggs 1 at a time, beating well after each addition. Beat in warm melted chocolate. Mix in dry ingredients in 2 additions alternately with buttermilk in 1 addition. Divide batter among prepared pans.
3. Bake cakes until tester inserted into center comes out clean, about 23 minutes. Cool cakes in pans 10 minutes. Turn cakes out onto rack; peel off parchment. Cool cakes completely. Can be made 1 day ahead. Wrap cakes in plastic and store at room temperature.
Bakery-Style No Refrigeration Needed Frosting
Makes 8 cups | adapted from Kittencal on Food.com
1 1/2 cups shortening
1/2 cup butter, softened
1/2 cup non-dairy powdered coffee creamer (Coffee Mate)
1/2 teaspoon vanilla
1 (32 ounce) package confectioners sugar, sifted
1/2-3/4 cup water
1/4 cup, approx. cocoa powder (optional)
1. In a large mixing bowl beat the shortening, butter, creamer and vanilla.
2. Gradually beat in the confectioners sugar.
3. Add in enough water (starting with 1/2 cup) until frosting reaches desired consistency.
4. To make chocolate frosting, beat in cocoa powder to taste or to achieve the desired chocolatey-ness.
I volunteered to make a bunch of cakes for a cake walk at our church, so I was in mass production mode. I came up with the idea to bake two jelly-roll sheets 11" x 17" and cut each into 6 smaller rectangles, make 2-layer high cakes from these rectangles. It worked out *so* well. The layers were perfectly even, I didn't have to worry about splitting my cake into layers after it was baked, so from now on I will be making my layer cakes in sheet pans so they bake thinner and more evenly, then just cutting circles of cake from the large sheet pans.
This is a must-try frosting recipe, especially if you are in a bind for refrigerator space, as I often am. The frosting is just like the bakeries use on their cakes and does not require refrigeration if you are serving the cake within a day of making it. The Coffeemate instead of milk/cream makes it more stable. For longer storage it may be kept up to 3 months covered in the refrigerator. Just bring to room temperature before using.
Semisweet Chocolate Layer Cake
Makes 3 - 8" rounds | Gourmet, Feb. 2006
6 ounces semisweet chocolate, chopped
3/4 cup all purpose flour
3/4 cup cake flour
1/2 teaspoon baking powder
1/2 teaspoon baking soda
1/2 teaspoon coarse kosher salt
1 3/4 cups (packed) dark brown sugar
6 tablespoons (3/4 stick) unsalted butter, room temperature
1 teaspoon vanilla extract
2 large eggs
3/4 cup buttermilk
1. Preheat oven to 325 degrees F. Butter three 8" cake pans with 1 1/2-inch-high sides. Line bottoms with parchment paper round; butter parchment. Place chocolate in metal bowl set over saucepan of simmering water. Stir until melted and smooth.
2. Whisk all purpose flour and next 4 ingredients in medium bowl. Using electric mixer, beat brown sugar, butter, and vanilla in large bowl to blend (mixture will be crumbly). Add eggs 1 at a time, beating well after each addition. Beat in warm melted chocolate. Mix in dry ingredients in 2 additions alternately with buttermilk in 1 addition. Divide batter among prepared pans.
3. Bake cakes until tester inserted into center comes out clean, about 23 minutes. Cool cakes in pans 10 minutes. Turn cakes out onto rack; peel off parchment. Cool cakes completely. Can be made 1 day ahead. Wrap cakes in plastic and store at room temperature.
Bakery-Style No Refrigeration Needed Frosting
Makes 8 cups | adapted from Kittencal on Food.com
1 1/2 cups shortening
1/2 cup butter, softened
1/2 cup non-dairy powdered coffee creamer (Coffee Mate)
1/2 teaspoon vanilla
1 (32 ounce) package confectioners sugar, sifted
1/2-3/4 cup water
1/4 cup, approx. cocoa powder (optional)
1. In a large mixing bowl beat the shortening, butter, creamer and vanilla.
2. Gradually beat in the confectioners sugar.
3. Add in enough water (starting with 1/2 cup) until frosting reaches desired consistency.
4. To make chocolate frosting, beat in cocoa powder to taste or to achieve the desired chocolatey-ness.

 Chaya of Comfy Cook made
  The Girl Who Ate Everything made


 If you didn't have a chance to email me your post or if I somehow missed you, please add your Copycat post below. I'd love to take a peek!
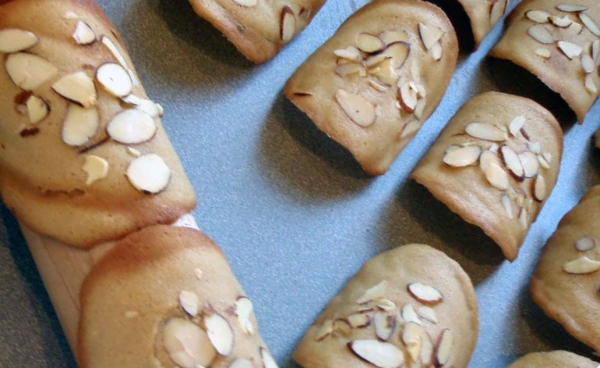 Hindy of Bubie’s Little Baker chose Translucent Maple Tuiles, on page 173 of
 Lastly, congrats to Sara of